
Welcome to our first Flutter Android Studio tutorial.
Let’s start by talking about Flutter.
Google has introduced its software development kit Flutter in 2017. Using Flutter, you can develop applications for Android, ios, Mac, Windows, Linux, and More.
If you are making an app for Android and ios. You can consider using Flutter, which helps you to make both in one codebase.
- Amazing Flutter Notes App Tutorial
- Flutter RaisedButton Tutorial
- 7 Flutter Commands You Must Know
- 3 Flutter FlatButton Examples With Tutorial
So in this post, you will learn,
Contents
I am assuming that you have downloaded
and know, how to create an android project, emulator also.
How To Download Flutter SDK In Windows

- Go to this URL – Flutter SDK – Windows, Linux, and macOs or You can go to flutter.dev and click on Get started,
- Click on Windows.

- While scrolling down, you will see a blue button with flutter latest SDK version in a zip file, just click on it.
- Download begins…
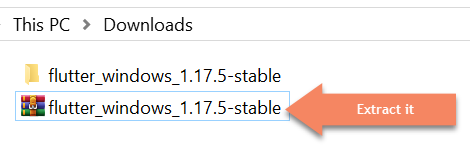
- After the download, Extract the zip file

- Just cut and paste the extracted file in C drive, just like above. You can choose your suitable location except for Program Files in C drive.
- Just click on the extracted directory.

- Click on flutter.

- This is Flutter software development kit. Here you can click on flutter console and check flutter commands.

- This is flutter console window.
- click on bin folder.

- We need to update the PATH variable with “…/flutter/bin”, then only we can run flutter commands from any command prompt.
- So copy the path with “flutter/bin” like shown above.
How To Update Path Variable With Flutter SDK Path In Windows

- Search “env” on the search bar and click on “Edit environment variables for your account”.

- Click on the path field -> Edit -> New -> Paste it in the empty field. Just like above.
- Click Ok.

If the Path variable doesn’t exist, you need to create one. By clicking New->Providing values in each field (name and value) and click OK (just like shown above).

- Open the command prompt, and run the “flutter doctor” command.
- If there is any problem you will see the red cross mark.
- Here I got errors because flutter and dart plugin are unavailable, let’s clear it now.
How To Install Flutter Plugin In Android Studio

- Open Android Studio
- If you don’t get a window like the above image.
You may not close your last opened project. So just close your project, File -> Close Project. - Click on “Configure“.
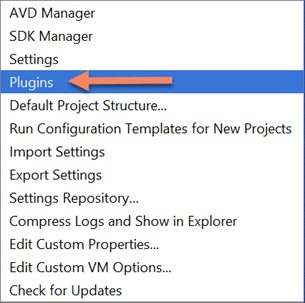
- Next click on the “plugins” items from the drop-down menu.

- Next, we have to find the flutter plugin from the marketplace. Make sure you are on the marketplace tab.
- Then search “Flutter” in the search box and press Enter.
- Click on the install button to install the flutter plugin.
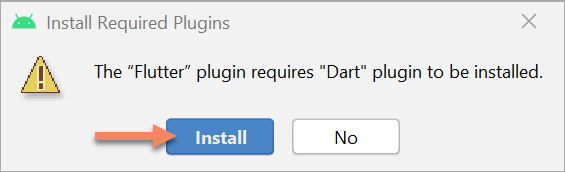
- Dart plugin is also needed to make flutter applications. You don’t need to install separately. Just click on ‘Install‘ on the dialog box.
- It will automatically download both.

- Now click on the Restart IDE button to restart the Android Studio.

- In the next alert dialog box, “Restart Android Studio to activate changes in plugins?“. Click on Restart.

- After the restart, now you can see “Start a new flutter project” item in the window.
- That means you have successfully installed a flutter plugin in Android Studio.
- But check again to confirm our system is ready to create flutter applicaions using flutter doctor command.

- Everything fine now.
How To Create Flutter Project In Android Studio
- Click on “Start a new Flutter project”.

- Select “Flutter Application” and click “Next”.
How To Change Flutter SDK Path In Android Studio

- I just let the project name as ‘flutter_app’. After that, one of the important step is to change the Flutter SDK path.
- Click on Flutter SDK path …(3 dot) button.

- Now you have to select the flutter SDK location, for me, it’s in C drive. Expand drives by clicking on it.
- After selecting flutter folder just click OK.

- Flutter SDK path is set now, then click Next.

- Change package name if you want.
- I have changed to “com.androidride” , leave others, and click Finish.
How To Run Flutter Project In Android Studio

- After the build, the project will shown up just like above.
- Like Android Project, Select your emulator and click on Run button.

- The flutter application is ready now.
How To Open Existing Flutter Project In Android Studio
Method I – Drag And Drop Flutter Project To Android Studio

- Before drag and drop your project, make sure you have installed the flutter plugin in Android Studio.
Method II – Using Open An Existing Android Studio Project

- Click on “Open an Existing Android Studio project “.

- Now you have to find the location of your flutter project. Here, my fluter project is located at desktop.
- After selecting your project, just click OK.
- The project is ready now.
I believe that this post will help you start your flutter journey. If you like this post, please share it with your family and friends. Thank you.
Comments are closed.