Does your Android Studio takes a lot of time to build and run??
If you have a low-end pc, then this time increases.
When I hit the run button, I sit and wait for gradle to get finished. One minute is gone, two minutes, three minutes.
In my old PC, Waiting has passed more than 30 minutes.
That affected my productivity very badly.
End of the day, I feel miserable, nothing is done, Still waiting for gradle build completion.
At that time, Just like any other beginner, I searched on Google “How to reduce Android build time”. But nothing gets worked.
Then I learned about the Gradle build system. after that, I got to know we can run the project using Commands.
So in this post, I will tell you a way that I am using which reduced my APK build time.
Yes, this is really interesting and It will be useful in the long run.
Before that, let’s make a simple talk about Gradle and gradlew.
What is gradle and gradlew??
Gradle is a build tool which makes APK using our source code and resources like layouts, images by giving them to suitable tools. When you click the run button, Android Studio delegates power to gradle and wait for it to finish just like us.
gradlew is a batch file in Windows. In Mac and Linux, it available in the form of a shell. You could find it on the Android Studio project’s root directory. It has the ability to pass commands to gradle. Using those commands we can make Gradle work. gradlew is also responsible for downloading gradle from the Internet.
If you are in the Android Studio project folder, Open your command prompt and Just type gradlew and press enter. The script runs and looking for a gradle in your system. If the desired one not found, It goes online and downloads gradle.
Everybody hates to be waited, there no change in build time too. Build takes so much time from our life and it increases the development period. High-level PC and gradlew installdebug command can help you to save your valuable time. Using gradlew and Gradle we can do so much stuff. If there is any other technique you use. Feel free to comment here and please share this article. Thank you, guys.
These methods are available from API level 1. Let’s talk more about these types.
setContentView(int resourceId)
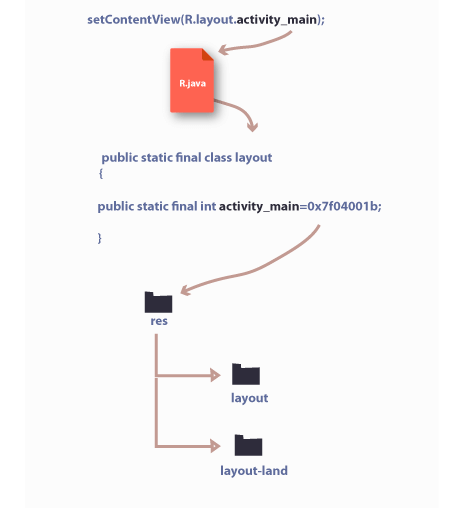
This method uses layout constant from automatically generated R.java class. R.java class holds many static constant values in nested classes. So that you can access directly by specifying R class and nested class.
Nested Layout class contains layout resource constants to ease the availability of actual files in the resource directory.
At runtime, the System will select the appropriate layout based on orientation and other factors like language and region. By default, it selects the layout in the res/layout directory.
Eg:
setContentView(R.layout.activity_main);
Here, R.layout.activity_main is an integer value contained inside of the layout class in the R.java file. Using this integer value Android system will look in the res/layout directory. That’s how android finds the correct layout.
If you are using XML layout do not try to initialize views before calling setContentView(R.layout.layout_name), because without inflating the layouts, there are no actual views in memory. It will lead to NullpointerException.
Set any view as your activity’s content. View’s height and width set to MATCH_PARENT as default.
@Override
Protected void onCreate(Bundle savedInstanceState)
{
//create a textview object
TextView textview=new TextView(this);
//set text to textview
Textview.setText(”hello world!”);
SetContentView(textview);
}
You probably need to add an import android.widget.TextView; statement.
setContentView(View view, ViewGroup.Layoutparams)
Extension of setContentView(View view) method. Here you can specify view’s parameters.
@Override
Protected void onCreate(Bundle savedInstanceState)
{
//create a LinearLayout object
LinearLayout linearLayout = new LinearLayout(this);

//set orientation
LinearLayout.setOrientation(LinearLayout.HORIZONTAL);
//make LinearLayoutParams object with width as MATCH_PARENT and height as MATCH_PARENT

LayoutParams linearLayoutParams = new LayoutParams(LayoutParams.MATCH_PARENT,LayoutParams.MATCH_PARENT);

SetContentView(linearLayout,linearLayoutParam);

}
You can add child views to Linearlayout using addView() method.
You can call many times setContentView() method, but it works only at the last call.
You can use setContentView() outside of the onCreate() method.
ListActivity does not use setContentView() Because it already contains a listview and use setListAdapter() to populate.
In fragments, LayoutInflater does layout rendering work with inflate() method. Just equivalent to setContentView().
Sometimes, you need to display a layout from many layouts based on any condition. Like showing login or signup page. So there is no need to create two activities. Just use if statement or other depends on your needs and do just like below.
That’s all for now. Is there any suggestions, please comment below.
Conclusion
One of the most known methods in Android is setContentView(). I think most of us started Android development by thinking about what is setContentView and what it does. It’s used to show the app’s appearance. We can show our UI effectively by programmatically or using XML layouts. Android uses a different approach to showing XML layouts. Sometimes, it may difficult for beginners to understand. But I think, I have explained well by picture. If you have any doubts feel free to ask. By the way, sharing is caring.
Then you must learn basics well, better you understand the fundamentals, easier to learn the advanced concepts.
So today I am talking about Android layout, the word you already heard and a basic concept.
So let’s start here,
What is Android layout?
In Android, the layout describes the appearance of the app. Layouts are just resourced files. The instructions or content in layout decides to position your widget and make your user interface.
The layout contains View, ViewGroup objects and <merge> tag. Just like HTML, It must have a root element. It can contain more GUI widgets like Button, TextView, etc. Nested elements are also supported.
An app can have more than one screens based on developer needs. So you can have many layouts as you want.
Layout resource names must contain only lowercase a-z, 0-9, or underscore otherwise, you might end with an error.
Different types of Android layouts
For user convenience, Android engineers developed many layouts.
LinearLayout – Arrange Android widgets vertically or horizontally.
RelativeLayout – Organize widgets relative to each other.
You can use XML straightforward vocabulary to specify your UI. For beginners, you can check it out drag and drop feature. It helps us to drag a view which you want and drop it wherever you want in layout design. The XML code will automatically complete by android studio.
For localization (translating strings into different languages), XML layout would be a better idea.
Note: You must put xmlns:android attribute with android namespace inside the root element.
For an example: assume LinearLayout as your root element.
How to create Android layout Programmatically at runtime
It’s not generally recommended for beginners. There may be occasions to make your layout at runtime. But it mixes up UI code and code that controlling app behavior. So it may become difficult to tweak and refine user interface.
Where is layout files located at?
Android studio automatically creates a directory to hold your layout files – layout subdirectory.
In your project structure
app->res->layout .
all resource files stored in res (resources folder).
How to create a layout file in android studio?
Right Click on your default layout subdirectory
New -> Layout resource file -> Enter layout Name and click OK.
Also give details of the root element, source set, Directory name, and other available qualifiers.
How to rename layout file in android studio?
Right click on your layout file which wants to rename
Refactor -> Rename -> give new file name -> Refactor. You can use shift + F6 key also.
Conclusion
There are some set of words may confuse developers when they start Android apps Development. One of them I think is layout. Better you learn each term in any language, better programmer you will be. In this post, you learned about layout. The layout defines the appearance of the app or It says how should User Interface elements get arranged. You can define layout in an easy and difficult way, Through XML and programmatically. There are different types of layouts, using them you can accomplish an awesome user interface. If you got anything useful, please share it.
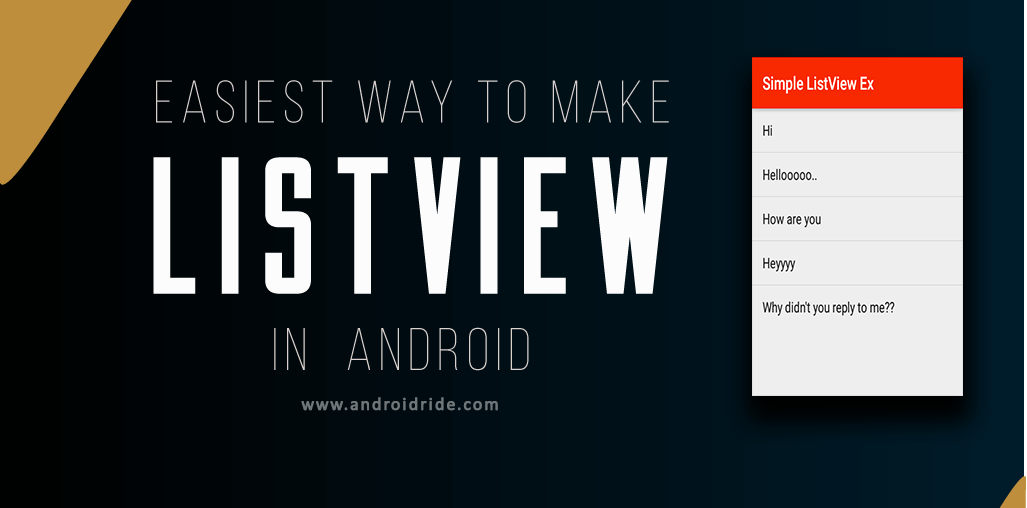
Those messages in the listview are sent by my crush to me.
Yes, that was the best dream I ever had ;-).
I’m just kidding…
Let’s back to the topic,
When beginners make an app for showing a collection of data, Most of them prefer ListView. It is easy to work with listview when comparing its successor RecyclerView. Although ListView becomes old now, the uses of ListView still goes on.
You don’t need to code the adapter to make ListView. Android API already provides an easy way to build a listview.
In this tutorial you will learn to construct listview easily and less code.
The android:entries XML attribute helps us achieve our target.
Easy to populate ListView, Spinner, Gallery and ListPreference.
Only static, unchanging string data allowed. So you can’t use with data from internet, database,
shared preferences etc.
How android:entries works ??
pin me …. too
As shown in the picture, android:entries attribute needs an array resource name, not the file name which contains array resource. You can define the array resource in strings.xml. Not only listview, Spinner, ListPreference, and gallery also use android:entries attribute. But gallery deprecated in API level 16. As a successor of ListView, RecyclerView doesn’t hold entries attribute.
When the user runs the app, the Listview constructor takes the array resource referred in the entries attribute. Then the constructor makes an adapter itself with the simple_list_item_1 layout in SDK. Then assign it to the ListView.
Actually, we just point our data to the ListView, listview does all other work.
This is the way how it works.
How To Make A ListView In Android Studio
Step 1
Create a new project
In Android Studio, create a new project File -> New -> Project
Application Name: Simple ListView Ex
Company Domain: androidride.com
Android convention to use the reverse of the domain name. that’s never a problem for you.
Click Next
Step 2
Choose your minimum SDK
It is necessary to choose the minimum SDK that you want. tick the phone and tablet checkbox for making the app for only phone and tablet.
Click next
Step 3
Select empty activity template
For this project, we just need an empty activity. So just select the empty activity template and click next.
Step 4
Create a new empty activity and layout
Next screen prompt for making an activity class file and its layout.
Activity Name : MainActivity
Tick the generate the layout checkbox if it’s not checked. Click finish. Now, you will see the MainActivity class
Step 5
Change toolbar and status bar color
You can skip this step if you don’t want to alter the default style. Open res/values/colors.xml and paste the code below to make a red colored toolbar.
   #f82900
   #bc0000
   #f82900
Step 6
Make a string array to hold the contents of the listview.
Open res/values/Strings.xml, and paste the below code between .
Hi
Helloo
How are you
Heyy
Why didn\'t you reply to me??
Use escape sequence \’ to get the apostrophe in the last string.
Step 6
Add android: entries attribute and its value in listview XML definition.
open res/layout/activity_main.xml, delete the existing code and paste the code below.
<!--?xml version="1.0" encoding="utf-8"?-->
If you wish to add other widgets to your layout, then you can add ViewGroups like RelativeLayout, LinearLayout and other. Then just replace the XML namespace ( xmlns:android=”http://schemas.android.com/apk/res/android”) from listview to the root element.
Run the app. You will get the output like below.
How does ListView know did user click on list item ??
Based on tapping sound.
No, Here comes Listener. Listener waits for the events. Such as tapping, touching events.
Here we use the OnItemClickListener nested class. Its onItemClick(…) method will trigger when an item in the listview clicked. So place the code that wants to run when click event happens.
Step 7
Create and Instantiate listview variable
In onCreate() method, create listview variable and instantiate using findViewById(int id) method. In this case, id is listview, we must use the same id in XML description. Type cast the returned View object to the ListView.
Add listener to listview for listening click events
Add OnItemClickListener and Implement OnItemClick(…) method. Use listview’s setOnItemClickListener() method to register the listener.
listview.setOnItemClickListener(new AdapterView.OnItemClickListener()
       {
           @Override
           public void onItemClick(AdapterView<?> parent, View view, int position, long id)
           {
                       }

});
Step 9
Display the content in the clicked item.
In onItemClick(…) method, Implement code to reveal the content in listview row. First, Use adapterview’s getItemAtPosition(int position) method to retrieve the data from listview item row. getItemAtPosition() returns data as object in the given position.