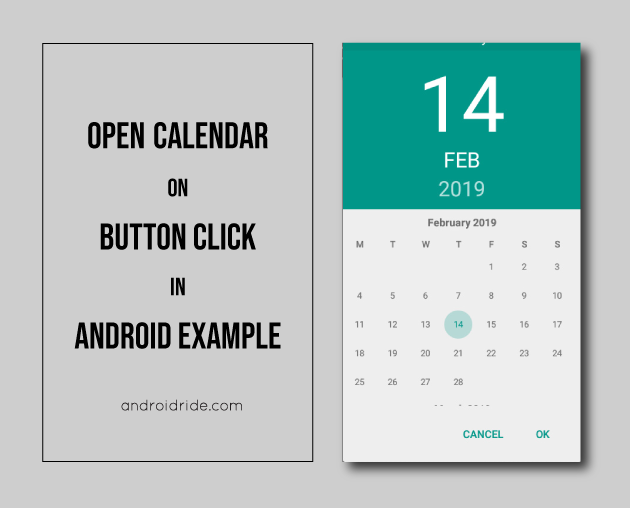
In this example, you will learn how to open the calendar on button click in Android with an example. Here I use DatePickerDialog, not CalendarView. Beginners tend to use Calendar, that’s why I use that here.
//getting current day,month and year.
val year = calendar.get(Calendar.YEAR)
val month = calendar.get(Calendar.MONTH)
val day = calendar.get(Calendar.DAY_OF_MONTH)
Calendar calendar = Calendar.getInstance();
        int year=calendar.get(Calendar.YEAR);
        int month=calendar.get(Calendar.MONTH);
        int day=calendar.get(Calendar.DAY_OF_MONTH);
3. Initialize DatePickerDialog with the current date and show it. If you don’t and use 0 as day, month, and year. Then DatePickerDialog shows Feb month 1900.
DatePickerDialog datePickerDialog = new DatePickerDialog(this, new DatePickerDialog.OnDateSetListener()
        {
            @Override
            public void onDateSet(DatePicker view, int year, int month, int dayOfMonth)
            {

            }
        }, myear, mMonth, mDay);
        datePickerDialog.show();
4. Get day, month and year from DatePickerDialog onDateSet() method.
When you select a date in DatePickerDialog, onDateSet() method gives day, year in the as correct number specified in DatePickerDialog. But month value varies from 0 to 11. So just add 1 to month value to show the original month number.
Create Project – Open Calendar on Button click in Android Example
Let’s create a project that sets the date in EditText. When you click on Button, DatePickerDialog shows up, When you select a date, it sets on EditText.
Start a new Android Studio project
Application name: Open Calendar on Button Click in Android Example.
Conclusion
There are many occasions when you need a date from the user. Date of birth in sign up process, Ticket reservation, and date of an upcoming event just like that. It may not be user-friendly If the user needs to type it down. Android provides views for that, so users can easily pick it up. So I think if you are making an app like that, this post might have helped you. If you like this tutorial, please share it.
In this tutorial, you’ll learn four ways to make an Android TextView bold. You can easily adapt the code and use it in your project as needed. Let’s get started!
         String html="This is TEXTVIEW 3";
        textview3.setText(Html.fromHtml(html));
Html.fromHtml(String source) was deprecated in API level 24. Use androidx.core.text.HtmlCompat instead. For using HtmlCompat, you need to include dependency in your project.
implementation 'androidx.core:core:1.0.1'
If you got Manifest merger failed error, then add below code in gradle.properties.
String html="This is TEXTVIEW 3";
textview3.setText(HtmlCompat.fromHtml(html,Typeface.BOLD));
HtmlCompat.FROM_HTML_MODE_LEGACY – It just adds two newline character between block level elements.
Way 4 – Make Android TextView Bold using separate style
In this example, we create a separate style resource and set it to our TextView. The advantage of this technique – you can use this style for many TextViews. Just specifying style attribute.
Step 1
Create a separate style resource named “boldStyle”, add “android:textStyle” as item and provide value “bold”.
Step 2
Set style to TextView using style attribute.
Let’s create an Android app with these examples. Open your Android Studio,
// Top-level build file where you can add configuration options common to all sub-projects/modules.
buildscript {
ext.kotlin_version = '1.2.71'
repositories {
google()
jcenter()
}
dependencies {
classpath 'com.android.tools.build:gradle:3.2.1'
classpath "org.jetbrains.kotlin:kotlin-gradle-plugin:$kotlin_version"
// NOTE: Do not place your application dependencies here; they belong
// in the individual module build.gradle files
}
}
allprojects {
repositories {
google()
jcenter()
}
}
task clean(type: Delete) {
delete rootProject.buildDir
}
# Project-wide Gradle settings.
# IDE (e.g. Android Studio) users:
# Gradle settings configured through the IDE *will override*
# any settings specified in this file.
# For more details on how to configure your build environment visit
# http://www.gradle.org/docs/current/userguide/build_environment.html
# Specifies the JVM arguments used for the daemon process.
# The setting is particularly useful for tweaking memory settings.
org.gradle.jvmargs=-Xmx1024m
# When configured, Gradle will run in incubating parallel mode.
# This option should only be used with decoupled projects. More details, visit
# http://www.gradle.org/docs/current/userguide/multi_project_builds.html#sec:decoupled_projects
# org.gradle.parallel=true
# Kotlin code style for this project: "official" or "obsolete":
kotlin.code.style=official
android.useAndroidX=true
android.enableJetifier=true
colors.xml
#008577#00574B#D81B60
strings.xml
TextView Bold Example
styles.xml
activity_main.xml
MainActivity.kt
package com.example.androidride.textviewbold_kotlin
import android.graphics.Typeface
import android.os.Bundle
import androidx.appcompat.app.AppCompatActivity
import androidx.core.text.HtmlCompat
import kotlinx.android.synthetic.main.activity_main.*
class MainActivity : AppCompatActivity() {
override fun onCreate(savedInstanceState: Bundle?)
{
super.onCreate(savedInstanceState)
setContentView(R.layout.activity_main)
//Make textview bold - programmatically
textview2.setTypeface(null,Typeface.BOLD)
textview2.text= "TEXTVIEW 2"
//Using fromHtml() method
        val html = "This is TEXTVIEW 3"
        textview3.text = HtmlCompat.fromHtml(html,HtmlCompat.FROM_HTML_MODE_LEGACY)
}
}
In this post, you will learn how to convert Java class to Kotlin in Android Studio. Google announced Kotlin as an official language for Android Development. When comparing Java with Kotlin, It has lots of advantages. But I am not going to talk about its advantages here.
If you are from Java and want to step into Kotlin world, But don’t know how to write your code in Kotlin. Don’t worry, Kotlin plugin helps to convert Java code to Kotlin in Android Studio. Just type your code in Java then use below steps
This is not 100% perfect, the Best way is to learn Kotlin on your own. But for beginners, This will help a lot to move forward with Kotlin.
If you are using below Android Studio 3.0, You must install Kotlin plugin. Then only below steps work. So go to this tutorial and install Kotlin plugin in Android Studio. Otherwise, Just read on.
Open any project in Android Studio, Here I have opened the HelloWorld App.
Choose Code-> Convert Java File to Kotlin File or you can also use keyboard shortcut Ctrl + ALT + Shift + K.
Now plugin starts its job and your .java files will convert to .kt files in the src folder.
You will get a notification says “Kotlin not configured”. Just click on Configure.
If you don’t get the configure option, then you need to go
Tools-> Kotlin -> Configure Kotlin in Project
Select the latest Kotlin compiler and runtime version, and click OK.
After gradle configuration,
ext.kotlin_version stores Kotlin version and uses in various spots.
Added a dependency for Kotlin plugin
Kotlin plugin added
Kotlin standard library dependency added.
you don’t have to convert each java file one by one for a big project, you can convert the whole package using the above method.
The plugin also converts automatically if you paste java code into Kotlin file.
JetBrains team does not stop making java to Kotlin offline tool, they also provide an online tool.
Convert Java code to Kotlin – online.
Go to this URL “https://try.kotlinlang.org/” and click on “Convert from Java”
how to convert java class to kotlin online
Just paste your java code in the left section and click on “convert to Kotlin” shown on the bottom of the box. Now Kotlin code will appear on the right section.
Conclusion
Kotlin has become one of the fastest growing languages after Google has selected it as an official language for Android Development. Many of the business giants are also started making big projects in Kotlin. If you are a beginner in Kotlin and know how to code in Java. Don’t worry you can convert it to Kotlin using the Kotlin plugin. Android Studio makes the process more simple, so you can accomplish migration in a few seconds. For the beginning days, It assists you well to understand the basic structure of Kotlin. I assume this post might have helped you and If you like this post, please share it. Any other ways to convert, feel free to comment here.
There may be occasions when you want to show a webpage to your users such as Terms and conditions, app manual or your website and so on.
In a traditional way, we can send users to an external web browser but there is no guarantee that users would come back. So that’s one of the main reasons Android introduced a widget named WebView.
As the name suggests it helps to show or view online and offline web pages in our app. It’s available in android.webkit package and has abilities in history management, zooming, javascript, and CSS rendering.
So you can load the webpage easily in your app, webview will take care of it. It’s not a browser because it lacks navigational toolbar like features.
From the beginning to now, WebView has grown a lot. Let’s check how it implemented in Android.
WebView to Android System Webview – implementation history
WebView to Android System WebView -WebView implementation history
WebView was added in API level 1. It renders web pages using Webkit engine, which behind Apple’s Safari browser. Actually, WebKit makes an environment or views for the webpage to display on the app.
In Android 4.4, For better performance, Google decided to change webview rendering from stock webview to google’s chromium or blink.
Lots of bugs and fixes through os update, that made long time vulnerable. So Android engineers innovated a separate Android System Webview app that can install and update through Google’s app market Play store with next release “Lolipop”.
That made easy fixes in less time.
In Android 7.0, there is no need to enable Android System Webview app, Chrome will take care of webview. if it is disabled or uninstalled already, the system will use android system webview.
If both of them get disabled, webview will use stock Webkit engine and take care of your valuable web pages.
How to add WebView to your layout?
Webview can easily be added to your layout as any other view. You can just drag and drop webview or write code for that just like below
For Kotlin users, I am using Android studio 3.1.2 and it uses Kotlin Android Extensions plugin by default. So there is no need to call findviewByid and cast. just use the id of the widget and call the methods.
Okay… Let’s start with our first example – Using the loadUrl() method.
Load Url – WebView Android Example In Kotlin & Java
android webview loadurl example
We can easily load a webpage in webview using loadUrl() method. Just put your URL as a string, Before that, we must provide Internet permission in AndroidManifest.xml.
create a webview app in android with below code
package com.androidride.webviewloadurlex

import android.support.v7.app.AppCompatActivity
import android.os.Bundle
import kotlinx.android.synthetic.main.activity_main.*

class MainActivity : AppCompatActivity() {

    override fun onCreate(savedInstanceState: Bundle?) {
        super.onCreate(savedInstanceState)
        setContentView(R.layout.activity_main)

        //loads androidride homepage to webview, webview: id of webview
        webview.loadUrl("https://www.androidride.com")
    }
}
This is enough to open your links in webview. It internally calls, shouldOverrideUrlLoading() method and it returns false. False means redirect or clicking on a link opens in the same webview, True will abort the operation.
How to open link in the external browser using Android WebView
Sometimes You need to open your website links in webview and other links in external browsers. Then you can use the below sample code.
@Override
       public boolean shouldOverrideUrlLoading(WebView view, String url)
       {
           if (Uri.parse(url).getHost().equals("https://www.example.com")) {
               return false;
           }
           Intent intent = new Intent(Intent.ACTION_VIEW, Uri.parse(url));
           startActivity(intent);
           return true;
       }
But shouldOverrideUrlLoading (WebView view, String url) was deprecated in API level 24. So if you are planning to make an application for Nougat or above, then you can use
public boolean shouldOverrideUrlLoading (WebView view,WebResourceRequest request)
To open links in WebView in All devices use both shouldOverrideUrlLoading() methods just like
webview.webViewClient = object : WebViewClient()
       {
           override fun shouldOverrideUrlLoading(view: WebView?, url: String?): Boolean
           {
               if(Uri.parse(url).host=="www.example.com")
               {
                   return false
               }

               val intent= Intent(Intent.ACTION_VIEW,Uri.parse(url))
               startActivity(intent)
               return true

           }

           @RequiresApi(Build.VERSION_CODES.N)
           override fun shouldOverrideUrlLoading(view: WebView?, request: WebResourceRequest?): Boolean
           {
           val url=request?.url.toString()

               if(Uri.parse(url).host=="www.example.com")
               {
                   return false
               }
               val intent= Intent(Intent.ACTION_VIEW,Uri.parse(url));
               startActivity(intent)
               return true

           }
       }
@RequiresApi(Build.VERSION_CODES.N)
       @Override
       public boolean shouldOverrideUrlLoading(WebView view, WebResourceRequest request)
       {
           String url=request.getUrl().toString();

           if (Uri.parse(url).getHost().equals("https://www.example.com")) {
               return false;
           }
           Intent intent = new Intent(Intent.ACTION_VIEW, Uri.parse(url));
           startActivity(intent);
           return true;

       }

       @Override
       public boolean shouldOverrideUrlLoading(WebView view, String url)
       {
           if (Uri.parse(url).getHost().equals("https://www.example.com")) {
               return false;
           }
           Intent intent = new Intent(Intent.ACTION_VIEW, Uri.parse(url));
           startActivity(intent);
           return true;
       }
   }
How To Play YouTube Video In WebView By Enabling JavaScript In Android
Let’s open youtube in our webview.
Use our first example, and replace URL in loadUrl with “https://www.youtube.com” and run.
webview.loadUrl("https://www.youtube.com");
You may see these type of actions:
Youtube shows a progress bar loading.
Bowser says Please enable JavaScript in your browser.
This is because of JavaScript. If you are a web developer, you already know the importance of javascript. If you don’t, Javascript is a client-side programming language, it helps us to provide validation, animations and popups and so on.
By default, Javascript is disabled on your browser. we can easily enable it by simple lines of code.
how to enable javascript in android webview
//enables javascript in webview
      webview.settings.javaScriptEnabled = true
//enables javascript in webview
      webview.getSettings().setJavaScriptEnabled(true);
Now you can start watching youtube videos in your webview.
Android WebView local file example
android webview local file example
In this example, you will learn how to show a local HTML file in webview. We have already created a webpage for you. You can use that for a sample.
<!doctype html>
<html>
<head>
<meta http-equiv="Content-Type" content="text/html; charset=utf-8" />
<meta name="viewport" content="width=device-width, initial-scale=1"/>
<title>Android webview local file ex - androidride</title>
<style type="text/css">
h1
{
border:2px solid #707cff;
padding:5px;
color:#707cff;
margin-top:120px;
text-align:center;
background-color:white;
}
p
{
text-align:center;
}
body
{
background-color:#e0e0e0;
}
</style>
</head>
<body>
<h1>ANDROIDRIDE</h1>
<p>
This is a <strong>local html file</strong> loaded from <strong>assets</strong> folder
</p>
</body>
</html>
This is a local html file loaded from assets folder
Just make an assets folder in your project, Right click on app->New->Folder->Assets Folder. Now a dialog appears to change the location of assets folder. Leave it and Click Finish.
Place demo.html into assets folder and use below code
package com.example.androidride.webviewlocalfileex

import android.support.v7.app.AppCompatActivity
import android.os.Bundle
import kotlinx.android.synthetic.main.activity_main.*

class MainActivity : AppCompatActivity() {

    override fun onCreate(savedInstanceState: Bundle?) {
        super.onCreate(savedInstanceState)
        setContentView(R.layout.activity_main)
//loads local html file
        webview.loadUrl("file:///android_asset/demo.html")

    }
}
In URL, use android_asset not android_assets, yes, there is no ‘s’ at the end.
webview.loadUrl(“file:///android_res/mipmap/ic_launcher”)
There is no need for the file extension, but it won’t be a problem if you add it.
content://URLs pointing content provider.
ERR_UNKNOWN_URL_SCHEME in Android WebView – Fixed.
err_unknown_url_scheme in android webview fixed
In this example, You will learn how to solve ERR_UNKNOWN_URL_SCHEME in Android WebView. This type of error happens when WebView deals with UNKNOWN URL SCHEME links. Before that learn some basics.
What is URL SHEME?
The URL scheme is something before the colon in the URL. actually, it’s the protocol describes how to access the resource.
WebView knows how to deal with HTTP, HTTPS, and file Schemes, but they don’t know what to do when these type of schemes come. ‘tel:’, ‘sms:’, and ‘mailto:’ and others.
So we have to tell webview to how to deal with those schemes in shouldOverrideUrlLoading() method. In this example, we are going to use ‘tel:’, ‘sms:’, ‘mailto:’, and ‘geo:’ links. When you click on them, each link will get opened with appropriate apps installed on your Android device.
<!doctype html>
<html>
<head>
<meta http-equiv="Content-Type" content="text/html; charset=utf-8" />
<meta name="viewport" content="width=device-width, initial-scale=1"/>
    <title>Error Unknown URL scheme fixed - androidride</title>
</head>
<body>
<a href='tel:99999999999'>Click here to call</a><br><br>
<a href='sms:99999999999'>Click here to message</a><br><br>
<a href='mailto:example@mail.com'>Click here to mail</a><br><br>
<a href='geo:51.5074,0.1278'>Click here to show location</a><br><br>
</body>
</html>
If it’s a network URL, WebView force the links to open in WebView,otherwise find a best option from Android System.
Create your webview app with the above code or you can download our example.
WebView loadData() example in Android
In this Android WebView example, we will show you how to render HTML code in Android WebView. It’s simple, Android API provides a method called loadData().
loadData() method needs 3 contents.
String htmlData: This is our html content.
String mimeType: here we use “text/html”.
String encoding: most of the time, base64 or UTF-8.
It works with data,http and https schemes.
If you use other schemes, webview can’t access content due to javascript same origin policy.
You should use loadDataWithBaseURL(), if you want to use other schemes.
class MainActivity : AppCompatActivity()
{
override fun onCreate(savedInstanceState: Bundle?)
{
super.onCreate(savedInstanceState)
setContentView(R.layout.activity_main)
val html="
In this example, you will learn how to work with loadDataWithBaseURL() example. When you want to fetch an image from the assets folder using loadData() method. JavaScript origin policy restricts the access to content.
loadDataWithBaseURL() avoids this problem by specifying BaseURL. Using the Base URL, system resolve relative URLs in HTML content.
loadDataWithBaseURL() needs
String baseURL: This URL is used to resolve relatvie URLs.
String data: Html content that you want to show.
String mimeType: mimeType of HTML data
String encoding: encoding of html data
String historyURL: This URL loads when you navigate back in webview
In this example, I am going to use the same loadData() code but just want to add image ‘ic_launcher’ from the mipmap folder.
class MainActivity : AppCompatActivity()
{
override fun onCreate(savedInstanceState: Bundle?)
{
super.onCreate(savedInstanceState)
setContentView(R.layout.activity_main)
val html="
In this android webview example, you will learn how to download a file using WebView and DownloadManager. Using DownloadManager, we can reduce code and leave the stress to DownloadManager. We also show AlertDialog for Download notification.
public class MainActivity extends AppCompatActivity
{
    private static final String TAG="AndroidRide";
    private WebView webview;

    @Override
    protected void onCreate(Bundle savedInstanceState)
    {
        super.onCreate(savedInstanceState);
        setContentView(R.layout.activity_main);

        webview=(WebView)findViewById(R.id.webview);
        webview.loadUrl("https://www.google.com");

        webview.setWebViewClient(new WebViewClient());

        webview.setDownloadListener(new DownloadListener() {
            @Override
            public void onDownloadStart(final String url, final String userAgent, String contentDisposition, String mimetype, long contentLength)
            {
				//Checking runtime permission for devices above Marshmallow.
                if (Build.VERSION.SDK_INT >= Build.VERSION_CODES.M) {
                    if (checkSelfPermission(android.Manifest.permission.WRITE_EXTERNAL_STORAGE)
                            == PackageManager.PERMISSION_GRANTED) {
                        Log.v(TAG,"Permission is granted");
                        downloadDialog(url,userAgent,contentDisposition,mimetype);

                    } else {

                        Log.v(TAG,"Permission is revoked");
						//requesting permissions.
                        ActivityCompat.requestPermissions(MainActivity.this, new String[]{Manifest.permission.WRITE_EXTERNAL_STORAGE}, 1);

                    }
                }
                else {
                    //Code for devices below API 23 or Marshmallow
                    Log.v(TAG,"Permission is granted");
                    downloadDialog(url,userAgent,contentDisposition,mimetype);

                }
            }
        });
    }
    public void downloadDialog(final String url,final String userAgent,String contentDisposition,String mimetype)
    {
		//getting filename from url.
        final String filename = URLUtil.guessFileName(url,contentDisposition,mimetype);
		//alertdialog
        AlertDialog.Builder builder=new AlertDialog.Builder(MainActivity.this);
		//title of alertdialog
        builder.setTitle("Download");
		//message of alertdialog
        builder.setMessage("Do you want to save " +filename);
		//if Yes button clicks.
        builder.setPositiveButton("Yes", new DialogInterface.OnClickListener()
        {
            @Override
            public void onClick(DialogInterface dialog, int which)
            {
				//DownloadManager.Request created with url.
                DownloadManager.Request request = new DownloadManager.Request(Uri.parse(url));
				//cookie
                String cookie=CookieManager.getInstance().getCookie(url);
				//Add cookie and User-Agent to request
                request.addRequestHeader("Cookie",cookie);
                request.addRequestHeader("User-Agent",userAgent);
				 //file scanned by MediaScannar
                request.allowScanningByMediaScanner();
				//Download is visible and its progress, after completion too.
                request.setNotificationVisibility(DownloadManager.Request.VISIBILITY_VISIBLE_NOTIFY_COMPLETED);
				//DownloadManager created
                DownloadManager downloadManager=(DownloadManager)getSystemService(DOWNLOAD_SERVICE);
				//Saving files in Download folder
                request.setDestinationInExternalPublicDir(Environment.DIRECTORY_DOWNLOADS, filename);
				//download enqued
                downloadManager.enqueue(request);
            }
        });
        builder.setNegativeButton("Cancel", new DialogInterface.OnClickListener() {
            @Override
            public void onClick(DialogInterface dialog, int which)
			{
			//cancel the dialog if Cancel clicks
			dialog.cancel();
            }

        });
		//alertdialog shows.
        builder.create().show();

    }

}
How To Run JavScript In Android WebView
how to run javascript in android webview
I already said JavaScript has an important role in the web world. In Android, we can also make use of JavaScript by sending data to Javascript from Android and vice versa. But it also raises security issues too. If you are using any third-party code, make sure it’s not vulnerable to users security.
Android API provides a number of methods and classes to achieve a super web app. I have categorized them
JavaScript calling Kotlin/Java
addJavascriptInterface()
WebMessagePort – (6.0)
Kotlin/Java calling JavaScript
loadUrl()
evaluateJavascript() – (4.4)
WebMessage – (6.0)
The numbers shown in the brackets means the starting API. We are not going to discuss WebMessagePort and WebMessage here. That will be updated later.
webview addJavascriptInterface example in android
webview addjavascriptinterface example in android
In this addJavascriptInterface example, we send a message from a local HTML webpage to Android and show it through a toast.
JavaScript can access methods in API level Build.VERSION_CODES.JELLY_BEAN_MR1 and above, if they are
defined as public
annotated with JavascriptInterface
sample.html
WebView addJavascriptInterface Example
Web To Android
MainActivity.kt
class MainActivity : AppCompatActivity()
{
    @SuppressLint( "SetJavaScriptEnabled")
    override fun onCreate(savedInstanceState: Bundle?) {
        super.onCreate(savedInstanceState)
        setContentView(R.layout.activity_main)

        //webview loads sample html
        webview.loadUrl("file:///android_asset/sample.html")
        //enables javascript in webview
        webview.settings.javaScriptEnabled = true
        //injecting java object
        webview.addJavascriptInterface(JavascriptInterface(),"javascript_object")
    }

    private inner class JavascriptInterface
    {
        @android.webkit.JavascriptInterface
        fun showToast(text: String?)
        {
            //toasting the text
            Toast.makeText(this@MainActivity,text,Toast.LENGTH_SHORT).show()
        }
    }

    override fun onDestroy()
    {
        //removes the java object from webview
        webview.removeJavascriptInterface("javascript_object")
        super.onDestroy()
    }
}
public class MainActivity extends AppCompatActivity
{
WebView webview;

    @SuppressLint("SetJavascriptEnabled")
    @Override
    protected void onCreate(Bundle savedInstanceState)
    {
        super.onCreate(savedInstanceState);
        setContentView(R.layout.activity_main);
        //get webview
        webview=(WebView)findViewById(R.id.webview);
        //webview loads sample html
        webview.loadUrl("file:///android_asset/sample.html");
        //enables javascript in webview
        webview.getSettings().setJavaScriptEnabled(true);
        //injecting java object in webview
        webview.addJavascriptInterface(new JavascriptInterface(),"javascript_object");

    }
    public class JavascriptInterface
    {

        @android.webkit.JavascriptInterface
        public void showToast(String text)
        {
            //toasting text
            Toast.makeText(MainActivity.this, text, Toast.LENGTH_SHORT).show();
        }
    }

    @Override
    protected void onDestroy()
    {
        //removes java object from webview
        webview.removeJavascriptInterface("javascript_object");
        super.onDestroy();
    }
}
how above code works?
JavaScript enabled.
Inject java object into webpage using addJavascriptInterface() method. It needs
Java class object: The java class object which inject into webview
String name: The name used to access java methods from JavaScript
It’s better to remove java object from webview after the use
WebView evaluateJavascript example in Android
Let’s call javascript from Java. In this example, we receive the text from edittext and send it to the local HTML page. Use loadUrl() for below 4.4 and evaluateJavascript() works with KitKat and above.
sample.html
Android Javascript Ex
WebView
MainActivity.kt
class MainActivity : AppCompatActivity() {

    override fun onCreate(savedInstanceState: Bundle?)
    {
        super.onCreate(savedInstanceState)
        setContentView(R.layout.activity_main)
        //loads sample html
        webview.loadUrl("file:///android_asset/sample.html")
        //enables javascript in webview
        webview.settings.javaScriptEnabled = true
    }

    fun sendMessage(view: View?)
    {
        if (Build.VERSION.SDK_INT >= Build.VERSION_CODES.KITKAT)
        {
            //calls when version code greater than or equal to KITKAT
            webview.evaluateJavascript("show(\"" + edittext.getText() + "\")",null)
        }
        else
        {
            webview.loadUrl("javascript:show(\"" + edittext.getText() + "\")")
        }
    }
}
Add INTERNET and WRITE_EXTERNAL_STORAGE permission in AndroidManifest.xml
AndroidManifest.xml
android:windowSoftInputMode=”stateAlwaysHidden|adjustNothing” – it helps by without adjusting our bottom bar layout and disable the focus in EditText while startup.
android:background=”?android:selectableItemBackground” – makes transparent
I have used vector asset icons, you can also access them by right clicking on res->New->Vector Asset->Click on clip Art and select your icons, you can change color and size. Click OK and Next.
Step 9
custom_progress.xml
Step 10
This browser has a simple home page, for that, we have to add local HTML file in the assets folder.
package com.example.androidride.webviewbrowser;

import android.annotation.SuppressLint;
import android.app.Activity;
import android.app.DownloadManager;
import android.content.DialogInterface;
import android.content.Intent;
import android.graphics.Bitmap;
import android.net.Uri;
import android.os.Environment;
import android.support.v7.app.AlertDialog;
import android.support.v7.app.AppCompatActivity;
import android.os.Bundle;
import android.support.v7.widget.Toolbar;
import android.util.Patterns;
import android.view.View;
import android.webkit.CookieManager;
import android.webkit.DownloadListener;
import android.webkit.URLUtil;
import android.webkit.WebChromeClient;
import android.webkit.WebView;
import android.webkit.WebViewClient;
import android.widget.EditText;
import android.widget.ImageView;
import android.widget.ProgressBar;
import android.view.inputmethod.InputMethodManager;

import android.widget.Toast;
import android.view.KeyEvent;


public class MainActivity extends AppCompatActivity
{
private Toolbar toolbar;
private EditText edittext;
private WebView webview;
//private ImageView imageview;
private String Share_url,Title_url;
private ProgressBar progressbar;
String filename,directoryName;


    @SuppressLint("SetJavaScriptEnabled")
    @Override
    protected void onCreate(Bundle savedInstanceState) {
        super.onCreate(savedInstanceState);
        setContentView(R.layout.activity_main);

        initialise();
		webview.loadUrl("file:///android_asset/demo.html");
        setSupportActionBar(toolbar);
        webview.getSettings().setJavaScriptEnabled(true);

        webview.setWebChromeClient(new WebChromeClient()
        {
            @Override
            public void onProgressChanged(WebView view, int newProgress) {
                progressbar.setProgress(newProgress);
                super.onProgressChanged(view, newProgress);

                if(newProgress==100)
                {
                progressbar.setVisibility(View.GONE);
                }
            }

            @Override
            public void onReceivedIcon(WebView view, Bitmap icon) {
                super.onReceivedIcon(view, icon);
                //set favicon to imageview
                //imageview.setImageBitmap(icon);
            }
        });

        webview.setWebViewClient(new WebViewClient()
        {
            @Override
            public void onPageStarted(WebView view, String url, Bitmap favicon)
            {
                progressbar.setVisibility(View.VISIBLE);

                if(!"file:///android_asset/demo.html".equals(url))
				{
                edittext.setText(url);
				}
				else
				{
				edittext.setText("");
				}

                super.onPageStarted(view, url, favicon);
            }
			@Override
			public void onPageFinished(WebView view,String url)
			{
				Share_url=url;
                super.onPageFinished(view,url);
			}


        });

        webview.setDownloadListener(new DownloadListener() {
            @Override
            public void onDownloadStart(final String url, final String userAgent, String contentDisposition, String mimetype, long contentLength)
            {
             //checking runtime permissions
				if (Build.VERSION.SDK_INT >= Build.VERSION_CODES.M) {
                    if (checkSelfPermission(android.Manifest.permission.WRITE_EXTERNAL_STORAGE)
                            == PackageManager.PERMISSION_GRANTED) {

                        downloadDialog(url,userAgent,contentDisposition,mimetype);

                    } else {

						//requesting permissions
                        ActivityCompat.requestPermissions(MainActivity.this, new String[]{Manifest.permission.WRITE_EXTERNAL_STORAGE}, 1);

                    }
                }
                else {
                    //Code for devices below API 23 or Marshmallow
                    downloadDialog(url,userAgent,contentDisposition,mimetype);

                }

            }
        });
    }
	@Override
public boolean onKeyDown(int keyCode, KeyEvent event) {
    if((keyCode==KeyEvent.KEYCODE_BACK)&&this.webview.canGoBack())
    {
        webview.goBack();
        return true;
    }

    return super.onKeyDown(keyCode, event);
}

    public void goBack(View view)
    {
        if(webview.canGoBack())
            webview.goBack();
    }

    public void goForward(View view)
    {
        if(webview.canGoForward())
            webview.goForward();
    }

    public void goHome(View view)
    {
				webview.loadUrl("file:///android_asset/demo.html");
		}

    public void refresh(View view)
    {
        webview.reload();
    }

    public void share(View view)
    {
        Intent shareIntent=new Intent(Intent.ACTION_SEND);
        shareIntent.setType("text/plain");
        shareIntent.putExtra(Intent.EXTRA_TEXT,Share_url);
        shareIntent.putExtra(Intent.EXTRA_SUBJECT,"URL");
        startActivity(Intent.createChooser(shareIntent,"Share with your friends"));
    }
    public void go(View view)
    {
        String text=edittext.getText().toString();
        searchOrLoad(text);
    }

    void searchOrLoad(String txt)
    {
        if(Patterns.WEB_URL.matcher(txt.toLowerCase()).matches())
        {

            if(txt.contains("http://")||txt.contains("https://"))
            {
                webview.loadUrl(txt);
            }
            else
            {
                webview.loadUrl("http://"+txt);
            }
        }
        else
        {
            webview.loadUrl("https://www.google.com/search?q="+txt);
        }
        hideKeyboard();

    }

    private void initialise()
    {
        toolbar=(Toolbar)findViewById(R.id.toolbar);
        edittext=(EditText)findViewById(R.id.search_load_edit_text);
        webview=(WebView)findViewById(R.id.webview);
        progressbar=(ProgressBar)findViewById(R.id.progressbar);
        //imageview=(ImageView)findViewById(R.id.toolbar_search_imageview_favicon);
    }

    public void hideKeyboard()
    {
        InputMethodManager inputMethodManager= (InputMethodManager)getSystemService(Activity.INPUT_METHOD_SERVICE);
        View view=getCurrentFocus();
        inputMethodManager.hideSoftInputFromWindow(view.getWindowToken(),0);
    }

	public void downloadDialog(final String url,final String userAgent,String contentDisposition,String mimetype)
    {
		//file name
        final String filename = URLUtil.guessFileName(url,contentDisposition,mimetype);

		//Creates AlertDialog.
        AlertDialog.Builder builder=new AlertDialog.Builder(MainActivity.this);
		//title of Dialog
        builder.setTitle("Download");
		//Message of Dialog.
        builder.setMessage("Do you want to save " +filename);

			//if YES button clicks
        builder.setPositiveButton("Yes", new DialogInterface.OnClickListener()
        {
            @Override
            public void onClick(DialogInterface dialog, int which)
            {
				   //DownloadManager.Request created with url.
                DownloadManager.Request request = new DownloadManager.Request(Uri.parse(url));
				   //cookie
                String cookie=CookieManager.getInstance().getCookie(url);
				   //Add cookie and User-Agent to request
                request.addRequestHeader("Cookie",cookie);
                request.addRequestHeader("User-Agent",userAgent);

				   //file scanned by MediaScannar
                request.allowScanningByMediaScanner();
                //Download is visible and its progress, after completion too.
                request.setNotificationVisibility(DownloadManager.Request.VISIBILITY_VISIBLE_NOTIFY_COMPLETED);
				//DownloadManager created
                DownloadManager downloadManager=(DownloadManager)getSystemService(DOWNLOAD_SERVICE);
				//Saving file in Download folder
                request.setDestinationInExternalPublicDir(Environment.DIRECTORY_DOWNLOADS, filename);
				//download enqued
                downloadManager.enqueue(request);
            }
        });
		//If Cancel button clicks
        builder.setNegativeButton("Cancel", new DialogInterface.OnClickListener() {
            @Override
            public void onClick(DialogInterface dialog, int which)
			{
			//cancel the dialog if Cancel clicks
			 dialog.cancel();
            }

        });

		//Shows alertdialog
        builder.create().show();

    }

    }
Hey… Thanks for scrolling. If you find anything useful in this post, please share it.
Conclusion
WebView has an important role in Android programming. With a few lines of code, beginners can also easily load web pages in their app. You have learned to download the file and run javascript using Android WebView. I am sure that these examples make you better dealing with WebView. This is a small guide about WebView. You can also find more information from below links.
how to install or add kotlin plugin in android studio
Finally, Google has accepted Kotlin as the official language for Android app development. This doesn’t mean we have to stop making apps using JAVA. You can, but Kotlin makes the process more simple and efficient.
These are some points I want to discuss with you about Kotlin,
Interoperable – It is based on JVM. So you can use Kotlin wherever you use JAVA
Concise – It is easy to read, write, maintain and need less code when compared with JAVA
Kotlin supports Object-Oriented Programming and Functional Programming
Code is safe – You can say goodbye to NullPointerException. If you assign a null value to an object reference, It will easily found at compile time. But you can assign a null value to a variable by explicitly adding “?” (Question mark) after the data type
reduces boilerplate code –
No more findViewById() calls – Kotlin Extensions plugin helps us to access UI widgets using id.
No need to type data class’s setter ,getter, and toString() like methods (functions in Kotlin). Kotlin compiler will automatically generates these methods.
There is no need for the semi-colon, Actually Kotlin allows it. But does not force it.
Do you think It’s better to start making apps with Kotlin ?. Then we will help you to complete the First step.
Yes, installing the Kotlin plugin in Android Studio.
After installation, Android Studio able to achieve Kotlin code compilation, execution, Unit Testing, and debugging.
You can also convert Java code to Kotlin in a single click. Click below link to find out
If you are using Android Studio 3.0 and above just like me, you don’t need to worry about Kotlin plugin. That’s already set for you. You can create a Kotlin project from now.
If you are using android studio 2.3 or below, you need to perform below steps to work with Kotlin.
Let’s launch Android Studio.
If you are already opened a project, select File-> close project to land welcome page of Android studio.
Click on configure button and select plugins option.
Click Install JetBrains plugin button
1. Search “Kotlin” without quotes or you can scroll down the list and find Kotlin.
2. Click on Kotlin plugin item
3. On the right section of the window, click on the Install button.
Download starts…
After a short time, when download completes. Install button becomes “Restart Android Studio“. Click on that.
Next dialog box appears. Click Restart to activate changes in plugins.
From now, Android Studio is fully compatible with Kotlin.
While creating a project, Check Include Kotlin support, then all are as usual.
Conclusion
One of the simple language Kotlin finally added to Android Development world. Kotlin has lots of advantages over Java. That will ease your development process, at the same time you can make the app more efficient. You can easily start building Android apps in Android Studio by just installing the Kotlin plugin. Since Android Studio 3.0, You don’t need to install it, they come with inbuilt support. Even though Kotlin does not have resources for learning like Java. But it will benefit in the long run. That’s all. Thanks for scrolling… Please share it.
Have you ever seen “touch again to exit” or any other white text in a black capsule shape as pop up in Android???
Those popup messages are toast. In this post, you will learn about it with a simple Android toast example.
Okay… what is toast in Android???
Toast is the subclass of java.lang.Object class, and it helps developers to make notification message that appears at the bottom of the screen by default. The temporary message pops up and fades away after a short time. Just like hot bread pop up from a toaster. While showing toast you can still access your activity.
Okay…Let’s make a toast in android
How to make toast in Android?
You can make toast in 2 simple steps.
Call static method makeText() of Toast class and give
Context
CharSequence or String resource id
Int duration : LENGTH_LONG or LENGTH_SHORT
Call show() method
Toast toast=Toast.makeText(getApplicationContext(),"Yeah!... I am Toast",Toast.LENGTH_LONG);
toast.show();
Make a toast in one statement.
Toast.makeText(getApplicationContext,"Yeah!... I am Toast",Toast.LENGTH_LONG).show();
Don’t forget to add the show() method, because it happens sometimes for me and thinks why the code doesn’t work after a long stare at the bottom of the screen.
You can make toast in the background services. if your application not in the foreground while toast showing up, Toast may confuse the users. So use appropriate text with the toast to assist users to digest easily.
When you call makeText with your parameter value. Internally, it inflates $YOUR_SDK$/platforms/android-22/data/res/layout/transient_notification.xml and set your content to textview which have id message.
android-22 is API level, It may change based on your SDK.
LENGTH_LONG: It shows view or toast for almost 3.5 seconds.
LENGTH_SHORT: It shows view or toast for almost 2 seconds.
Public constructor
Toast(Context context)
It creates a Toast object.
Public methods
i) public void cancel()
It hides the toast if it is already showing or if it isn’t visible yet.
ii) public int getDuration()
It returns the duration of view or toast. (LENGTH_LONG or LENGTH_SHORT)
iii) public void getGravity()
It returns location if that is already set.
iv) public float getHorizontalMargin()
it returns the horizontal margin in float value.
v) public float getVerticalMargin()
it returns the vertical margin in float value.
vi) public View getView()
It returns the view. You can access view items using this method.
vii) public int getXOffset() && public int getYOffset()
It returns X offset and Y offset in Pixels.
viii) public void setDuration(int duration)
Use this method to set the duration of your toast or view.
ix) public void setMargin(float horizontal_margin, float vertical_margin)
Use this method to set margins of your view or toast. actually here margin means how much space needed between toast and side of the screen.
x) public void setText(int Resource_id or CharSequence string)
There are two variations of setText(…) method. One receives parameter as charSequence and other receives as string resource id. You can update the text in the toast that previously you create with makeText() method.
xi) public void setView(View view)
It sets the view for toast. It’s helpful while creating a custom view.
xii) public void show()
It shows the toast or view.
Create a project – Android Toast Example
In this project, we will make a button inside LinearLayout. When the button is tapped, a toast will appear at the center of the screen with application name in it.
File->New->New Project
Application name: Toast Ex
company domain: androidride.com
click Next and select your minimum SDK and empty activity template.
Here, makeText() method returns a toast object and Using toast instance setGravity() method position toast at the center of the screen and show() method helps to display the toast.
In this post, you will learn about the Android Support Library and How to add in your Android Studio project.
In Android app development, support libraries have an important role. Without them, It might difficult to provide a consistent look and feel in all devices.
Okay, tell me in detail.
What is Android support library?
There are many devices still running in Jelly bean and below versions. So you need to give the same importance for old and new devices While making an app. Otherwise, the App in old devices looks dull when compared to new ones.
That may affect the app’s market. To avoid this trouble, Android introduced the Support library. These are set of code libraries that provide backward compatibility and you can find it on Android SDK. These libraries experiences revisions for fresh features and bug fixes. Package name shows which Android Version it supports from.
For example : android.support.v7.app.AppCompatActivity – It can be used with API level 7 and higher.
After the release of support-library 26.0.0, support for minimum API level change it to API level 14 . So Don’t confuse with v* notation
The Android Support library includes
Palette – It used to take out colors from image.
CardView – Provides card look like widget.
leanback – Helps to make UI for TV apps.
Mediarouter – Supports for Media Routes.
gridLayout – Arranges widgets in grid manner.
RecyclerView – New version of ListView and GridView.
AppCompat – Provides support for ActionBars.
support-v4 library – User Interface features and other components.
MultiDex – helps to make apk contains multiple dex files.
RenderScript – Enables latest features of RenderScript .
Annotations – improves code .
If you are a beginner and experimenting with online tutorials, there may be a chance to edit the gradle file directly for adding the library as a dependency, sometimes wait for a download too.
Before doing that you can perform the following procedures to find and add an available version of the same support library. You can use this way to add AppCompat, Design, CardView, RecyclerView and so on.
There are two methods you are going to learn here. First one is simple and fast. The second method is an old one. But it’s good to know about that.
We assume that you have opened Android Studio and your project.
Method 1 – How to add support library in Android Studio
Open build.gradle(Module:app) file
Use ALT + ENTER and select Add library dependency
.
Select from the list, Here I am adding CardView.
CardView is added to my project. Just like this, you can add any library. If there is a sync needed. Just sync it.
Method 2 – How to add support libray in Android Studio
File->Project Structure you can use “Ctrl + Alt + Shift + S ” key combinations.
click the app module.
Click the Dependencies tab, you will see already added libraries below. click the + Button shown in the Right side of the window.
Choose library dependency from available options.
Choose library dependency dialog will be visible now. You can search here or choose the desired library that you want from the list. After your selection, just click OK.
The selected library will be added as a dependency in your dependencies tab list and click OK.
Just look at the build.gradle(Module: app) file dependency section, Android Studio will add your selected library. Please share it and your valuable comments will help us to improve.
Conclusion
The Android Support library helps to reduce the headache of developers by providing backward compatibility. Users also feel fresh and happy with their old device. There is no complexity in adding support library in Android Studio. You can do it in simple steps. I assume the above words might have helped you.
In this post, you will learn how to perform an action using Button and onClick attribute in XML. It is simple and easy to understand. Before creating the project, Let’s know more about android:onClick attribute in Android.
How android:onClick XML attribute works here with Button?
For detecting tap or button click event in android we can use android:onClick attribute. When users tap the views which hold android:onClick , android looks for the method in the activity. If the exact method found, that will start execution. So, provide a valid method name that lives in hosted activity as the XML attribute value. Not only Button It works for ImageButton, CheckBox, and RadioButton too.
Let’s create a project, In this project, we will add a Button and TextView, When the user taps the Button it calls a method in the activity depends on android:onClick value and set text in TextView.
Next screen prompt for making an activity class file and its layout.
Activity Name: MainActivity
Tick the generate the layout checkbox if it’s not checked.
Layout Name: activity_main
Tick Backward Compatibility checkbox and Click finish.
Step 5
open activity_main.xml and paste the below code
You can drag LinearLayout, Button, and TextView wherever you want and give id, onClick attribute as you want or you can simply paste the below code. The layout just contains the Button and TextView inside LinearLayout.
Now you can see android:onClick value (myMethod) is underlined with red color and gives you an error message that “Corresponding method handler ‘public void myMethod(android.view.View) not found.
This is because we didn’t define the method in our MainActivity class.
Step 6
Define myMethod and set text
Obeying all rules specified earlier, create myMethod() and initialize and set the text to textview.
package com.androidride.buttononclickex;

import android.support.v7.app.AppCompatActivity;
import android.os.Bundle;
import android.view.View;
import android.widget.TextView;

public class MainActivity extends AppCompatActivity
{
    @Override
    protected void onCreate(Bundle savedInstanceState)
    {
        super.onCreate(savedInstanceState);
        setContentView(R.layout.activity_main);
        }

    public void myMethod(View view)
    {
		//get the textview
		TextView textView=(TextView)findViewById(R.id.textview);
               //set text to textview
               textView.setText("Button clicked");
    }
}
In this post, you will learn how to create another activity in Android Studio.
When you started the Android Development journey by creating Hello World or any other app. You just filled your First Activity form. But now you want to make another activity, but you don’t know what to do?
Then don’t worry I will help you.
Okay… Actually What is Activity??
In short, Activity is what we have seen in Android apps with the user interface.
Okay, Let’s create a new activity. I assume that you already opened Android Studio and a project.
Step 1 – How to create another Activity in Android Studio
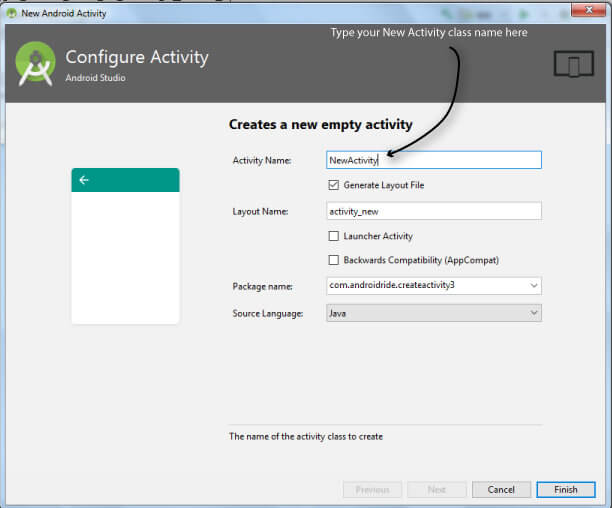
Right click on project package (here com.androidride.createactivity3) in App-> Java. and select New -> Activity -> Empty Activity/Blank activity.
First of all, make sure you are in the Android view in the project explorer. Some views don’t have new activity option. If you are in other views, Just click on the downward arrow and choose Android from the given options.
It’s not a problem if you don’t see Empty Activity option. In older versions of Android studio, you might find Blank activity option. Both of them are the same just a name difference. Don’t use Basic activity now because that’s the advanced version of Empty Activity/Blank activity and contains Floating action button.
Enter your activity name, at the same time layout layout name automatically fills up for you if Generate layout file checkbox is checked.
Then Backwards compatibility(AppCompat) option will give the app a certain look in almost all devices, at the same time your activity will extend AppCompatActivity class. For a beginner like you, you can leave the option as empty that cause your activity to extend Activity class and Click Finish.
Your activity files are created. congrats…
You can also create another activity in the Android Studio using the File menu option.
One of the main building blocks of the Android app is activity. Activity is a class in Android SDK, at the same time it’s just a screen with the user interface of our app. Creating another activity in Android Studio is really simple. If you are a beginner or comes from eclipse, you can easily make a new activity without confusing through the above steps. I think this post might have helped you. If you found anything useful, please share it.
And at last,leads to Application not responding (ANR) dialog ???
Why is this happening?
As a matter of fact, Your application performs a too much intensive task on UI thread, at the same time it takes time to complete. For the sake of user convenience, the Android system will show you ANR dialog and stop your app forcefully.
In more detail, When the app gets started execution, Main thread or UI thread gets created. By default, all lifecycle methods like onCreate(,onStart(), and onClick, UI update works are serially done by UI thread. But When app developer put complex operations like
Network operations.
Disk I/O tasks.
Database Queries.
Other CPU intensive actions.
The app needs more time to perform. So at that time UI thread can’t update or repaint user interface. App freezes, operations exceeds the definite time fixed by the Android system. finally, the system decides to kill the application to make the device available to the user for other acts.
For making a neat and smart app, you should avoid all complex scenarios performing on UI thread.
Then what to do??
Where do we put our code to gets executed ??
You can use threads.
While performing these operations, You should notify the user through UI that something is happening behind. Otherwise, the user doesn’t know what is happening in your app. But you can’t perform any UI updations from your threads, that job is done by one and only Main Thread or UI thread. Then how could we use the main thread to notify the user?
Hello, is there any solution?
Yes, For beginners, use AsyncTask.
What ??
AsyncTask.
Full name, please??
Android.os.AsyncTask
nice name.. Carry on.
AsyncTask is just like a side road, while large-slowly moving truck makes traffic problem on the main road, Asynctask keeps those away to make a better path for other traffic.
For beginners, It’s the first and one of the best option for performing difficult work.
AsyncTask name came from the asynchronous task. It is an abstract class and you can find it on Android SDK. It helps Android app developers to execute operations like
Downloading and uploading files like JSON, XML, images, and small size other files.
.
You can’t perform network operations on main thread since Honeycomb – API level 11. The system will throw android.os.NetworkOnMainThreadException. However, you must use AsyncTask or threads to perform network tasks.
Storing and reading data from large text files.
All Database CRUD(create,read,update,delete) operations.
Other CPU intensive operations.
In background or worker thread. Same time helps to update UI on UI thread. Asynctask makes use of UI thread in a better manner.
It eases the tension of developers from
Thread creation and termination.
UI thread synchronization and management.
How to use AsyncTask in your project
In this part, I will explain in more detail.
First of all, If you
do not know how much time needed for your task or task takes a long time
Want to perform an infinite loop work
AsyncTask is not a better option for you. AsyncTask mostly used for short operations(a few seconds at the most)
To make AsyncTask do work, we want to do 3 most important things.
1)Create a subclass of AsyncTask
2)Override doInBackground() and other methods.
3) Make an instance of AsyncTask subclass & call execute().
1)Create a subclass of AsyncTask
For performing different types of data operations, AsyncTask uses generics. So while making a subclass of AsyncTask, you must specify 3 generic data types.
Params, Progress, Result
1)Params: data used to start background thread execution.
For example, AsyncTask downloading an image file using URL, then specify URL as params.
2) Progress: data that used to notify progress of the task.
While downloading an image, You want to show the user how much percentage of the image has been downloaded. So you can use Integer as Progress.
3)Result : data that return from doInBackground() after execution.
For the same image downloading example, you can use Bitmap if doInBackground() code returns an image.
e.g:
Class Subclass_Name extends Asynctask
In real,
Class MyTask extends AsyncTask
What if you do not want to
Pass parameters to doInBackground()?
Show progress to the user?
Return any result?
You can use Void data type just like other.
Class MyTask extends AsyncTask
Do not use primitive data types as parameters.
Class MyTask extends AsyncTask
This is wrong.
2) Override doInBackground() and other methods
onPreExecute()
Optional. It calls before task executes on the background thread and you can use it to set up a task. It runs on UI thread, so you can access UI elements here. In most cases, the app performs the animation or set visible ProgressBar or ProgressDialog.
doInbackground(Params… params)
Most important method in AsyncTask, After the successful completion of onPreExecute() it leads to doInBackground(). It does all intensive tasks in the background thread. It receives parameters as var args. Varargs means a variable number of arguments(like an array of elements), it can receive a number of parameters. You can access each element using an index just like the array.
.
While performing a repetitive task, you can publish it progresses through onProgressUpdate using publishProgress(). Which data type returns from doInBackground(), that type must be the parameter of onPostExecute().
If you use AsyncTask only for implementing doInBackground(), Use java threads.
publishProgress()
This method is used to connect and pass data from doInbackground() to onProgressUpdate(). Just like a bridge.
onProgressUpdate(Progress… progress)
Optional. It also uses varargs as parameters. It runs on UI thread, so you can use this method to notify task’s progress.
For example. If your app downloading lots of images. There may be a chance to user gets bored. So you can publish each photo to the user through onProgressUpdate(). That must be a great relief to the user.
The progress won’t directly be published on Main Thread. It uses handler internally bound to Main thread looper for execution. If there is lots of work in the Main Thread, progress will not update smoothly.
onPostExecute(Result result)
This is also optional and runs on the Main thread. It’s the most used second method in Asynctask. After successful completion of doInBackground, onpostExecute() starts with result from doInBackground. In some cases, this method uses to stop animation or hide progress bar that you started in onPreExecute().
onCancelled(Result result)
Optional and runs on the Main thread. It invokes only when the cancel() method is called with the instance of AsyncTask subclass. It will not invoke if doInBackground completes. After its completion, it will assign control to onCancelled() with no parameters. Override onCancelled() when nothing returns from doInBackground(). Use this to avoid checking data is null or not.
You can make different UI appearance for successful and fail completion by using onPostExecute() and onCancelled().
Note: Do not call these methods manually, you can. But don’t.
These methods are callbacks except publishProgress, they will invoke automatically by the system at an appropriate time.
3)Make an instance of AsyncTask subclass & call execute()
Android provides 2 methods to start AsyncTask.
1) execute (Params… params)
2) executeOnExecutor (Executor exec, Params… params), added in API level 11.
Call these methods using an instance of the AsyncTask subclass. doInBackground get their parameter data from these methods.
When AsyncTask added at first, execute method preferred serial execution. Later, means API level 4 android engineers change their decision to execute in parallel and it continues to level 12. With the introduction of executeOnExecutor() at API level 11, they give concurrency control to the developer. The app developer can decide how to execute our task in serial or parallel.
Two Executor parameter determines concurrency:
1.SERIAL_EXECUTOR: This executor parameter uses for performing a serial execution, they start each task after completing one by one. They promise that each task will complete in the order they were started or added. Just like a Queue.
2.THREAD_POOL_EXECUTOR: You can pass this executor object to perform a parallel execution, they do not give you any guarantee to complete the task in the order they were started. Asynctask will start as soon as possible when they get a thread from the thread pool
Note: execute() must be invoked on the UI thread and task instance must be created on UI thread
Just like threads, AsyncTask executes only once. If you try to execute more than once with the same reference to AsyncTask subclass you will end with an exception with message Cannot execute task: the task has already been executed (a task can be executed only once)
If you try to execute the same task with the same reference to AsyncTask subclass while it running another exception will be thrown with the message “ Cannot execute task: the task is already running.
If you want to execute the same AsyncTask more than once, just create a new instance and call execute.
new MyTask().execute();
How to cancel AsyncTask
What if the user selected a wrong option and want to cancel a running task?
AsyncTask provides a better cancellation strategy, to terminate currently running task.
cancel(boolean mayInterruptIfitRunning)
myTask.cancel(false)- It makes isCancelled returns true. Helps to cancel the task.
myTask.cancel(true) – It also makes isCancelled() returns true, interrupt the background thread and relieves resources .
It is considered as an arrogant way, If there is any thread.sleep() method performing in the background thread, cancel(true) will interrupt background thread at that time. But cancel(false) will wait for it and cancel task when that method completes.
If you invoke cancel() and doInBackground() hasn’t begun execute yet. onCancelled() will invoke.
After invoking cancel(…) you should check value returned by isCancelled() on doInbackground() periodically. just like shown below.
protected Object doInBackground(Params… params)  {

   while (condition)
   {
      ...
      if (isCancelled())
         break;
   }
   return null;
}
AsyncTask’s Status
Asynctask tells their current state by giving below status.
1. PENDING: In this state, AsyncTask is not started, execute or executeOnExecutor() is not invoked. But you have created an AsyncTask instance.
2. RUNNING: Asynctask started their job, it will remain in this state from onPreExecute to onPostExecute or onCancelled.
3. FINISHED : This state will set when onPostExecute() or onCancelled() is completed.
you can check these statuses by calling getStatus() method using asynctask instance.
Android AsyncTask Example
Let’s make an application and familiar with Asynctask.