Author

admin

Browsing

Stadium Border in Flutter : 4 Examples

In this post, you will learn how to make stadium border-shaped widgets in Flutter. Rounded or stadium border type shape will look fresh and different when compared to rectangle-shaped widgets.

So here, you will see enough examples to learn and will get the confidence to make your own one.

What is Stadium Border in Flutter?

stadium border flutter
A border that looks like a stadium-shaped (a rectangle box with semicircles at the ends). StadiumBorder is frequently used with ShapeDecoration to create borders.

Let’s make one…

StadiumBorder Shape Using Container


Container has decoration property. So use this property with ShapeDecoration and make StadiumBorder shape.

          Container(
                padding: EdgeInsets.symmetric(
                  horizontal: 30,
                  vertical: 10,
                ),
                decoration: ShapeDecoration(
                  color: Colors.red,
                  shape: StadiumBorder(),
                ),
                child: Text(
                  'Container',
                  style: TextStyle(
                    fontSize: 15,
                    color: Colors.white,
                    fontWeight: FontWeight.bold,
                  ),
                ),
              ),

stadium border in flutter using container
Let’s add a small border to the container. In this example, I have added white color to the border.


 Container(
                padding: EdgeInsets.symmetric(
                  horizontal: 30,
                  vertical: 10,
                ),
                decoration: ShapeDecoration(
                  color: Colors.red,
                  shape: StadiumBorder(
                    side: BorderSide(
                      width: 2,
                      color: Colors.white,
                    ),
                  ),
                ),
                child: Text(
                  'Container',
                  style: TextStyle(
                    fontSize: 15,
                    color: Colors.white,
                    fontWeight: FontWeight.bold,
                  ),
                ),
              ),


Let’s make the border a little bit big, add more width inside BorderSide.

              Container(
                padding: EdgeInsets.symmetric(
                  horizontal: 30,
                  vertical: 10,
                ),
                decoration: ShapeDecoration(
                  color: Colors.red,
                  shape: StadiumBorder(
                    side: BorderSide(
                      width: 6,
                      color: Colors.green[200]!,
                    ),
                  ),
                ),
                child: Text(
                  'Container',
                  style: TextStyle(
                    fontSize: 15,
                    color: Colors.white,
                    fontWeight: FontWeight.bold,
                  ),
                ),
              ),

StadiumBorder using Container – II

stadium border container outline


   Container(
                padding: EdgeInsets.symmetric(horizontal: 30, vertical: 10),
                decoration: ShapeDecoration(
                  shape: StadiumBorder(
                    side: BorderSide(width: 2, color: Colors.red),
                  ),
                ),
                child: Text(
                  'Container',
                  style: TextStyle(
                    fontSize: 20,
                    color: Colors.red,
                    fontWeight: FontWeight.bold,
                  ),
                ),
              ),

Stadium Border Using TextButton

textbutton stadiumborder
In this example, you will use TextButton for making StadiumBorder. Use style property with ElevatedButton.styleFrom().


TextButton(
                onPressed: () {},
                child: Text(
                  'TextButton',
                  style: TextStyle(
                    color: Colors.white,
                  ),
                ),
                style: ElevatedButton.styleFrom(
                  primary: Colors.red,
                  shape: StadiumBorder(),
                ),
              ),

StadiumBorder Using TextButton II


              TextButton(
                onPressed: () {},
                child: Text(
                  'TextButton',
                  style: TextStyle(
                    color: Colors.red,
                  ),
                ),
                style: ElevatedButton.styleFrom(
                  shape: StadiumBorder(
                    side: BorderSide(
                      width: 2,
                      color: Colors.red,
                    ),
                  ),
                ),
              ),

stadium border flutter
Most of the apps use StadiumBorder like above. Showing trending, hot or new categories on a horizontal list.


   TextButton(
                onPressed: () {},
                child: Text(
                  '#Trending',
                  style: TextStyle(
                    color: Colors.white,
                  ),
                ),
                style: ElevatedButton.styleFrom(
                  padding: EdgeInsets.symmetric(horizontal: 20, vertical: 10),
                  primary: Colors.red,
                  shape: StadiumBorder(),
                ),
              ),

Let’s show the outline of TextButton with StadiumBorder.


 TextButton(
                onPressed: () {},
                child: Text(
                  '#Trending',
                  style: TextStyle(
                    color: Colors.red,
                  ),
                ),
                style: ElevatedButton.styleFrom(
                  padding: EdgeInsets.symmetric(horizontal: 20, vertical: 10),
                  shape: StadiumBorder(
                    side: BorderSide(
                      width: 2,
                      color: Colors.red,
                    ),
                  ),
                ),
              ),

StadiumBorder Using ElevatedButton

stadium border flutter
This time we can use successor of RaisedButton aka ElevatedButton. It also have shape property. Then you know what to do.

     ElevatedButton(
                child: Text("ElevatedButton"),
                onPressed: () {},
                style: ElevatedButton.styleFrom(
                  primary: Colors.green,
                  shape: StadiumBorder(),
                ),
              ),


   ElevatedButton(
                child: Text(
                  "ElevatedButton",
                  style: TextStyle(
                    color: Colors.black,
                  ),
                ),
                onPressed: () {},
                style: ElevatedButton.styleFrom(
                  primary: Colors.white,
                  shape: StadiumBorder(
                      side: BorderSide(width: 2, color: Colors.green)),
                ),
              ),

StadiumBorder Using OutlinedButton

Just like TextButton and ElevatedButton, you can also create StadiumBorder shape with OutlinedButton.


OutlinedButton(
                child: Text("OutlinedButton"),
                onPressed: () {},
                style: OutlinedButton.styleFrom(
                  side: BorderSide(
                    width: 2,
                    color: Colors.orange,
                  ),
                  shape: StadiumBorder(),
                ),
              ),


Let’s create a Flutter project which contains all above examples.

If you are using Visual Studio – you can create project using Flutter Command and open through Visual Studio.

clear your main.dart file and paste the below code.

  • Column widget is used to show widgets in vertical order.
  • SizedBox widget used to make empty space between widgets.
  • You can remove debug banner using this post.
import 'package:flutter/material.dart';

void main() {
  runApp(MyApp());
}

class MyApp extends StatelessWidget {
  @override
  Widget build(BuildContext context) {
    return MaterialApp(
      title: 'Stadium Border In Flutter',
      home: Scaffold(
        appBar: AppBar(
          title: Text('Flutter StadiumBorder Example'),
        ),
        body: Center(
          child: Column(
            mainAxisAlignment: MainAxisAlignment.center,
            crossAxisAlignment: CrossAxisAlignment.center,
            children: [
              TextButton(
                onPressed: () {},
                child: Text(
                  'TextButton',
                  style: TextStyle(
                    color: Colors.white,
                  ),
                ),
                style: ElevatedButton.styleFrom(
                  primary: Colors.red,
                  shape: StadiumBorder(),
                ),
              ),
              TextButton(
                onPressed: () {},
                child: Text(
                  'TextButton',
                  style: TextStyle(
                    color: Colors.red,
                  ),
                ),
                style: ElevatedButton.styleFrom(
                  shape: StadiumBorder(
                    side: BorderSide(
                      width: 2,
                      color: Colors.red,
                    ),
                  ),
                ),
              ),
              TextButton(
                onPressed: () {},
                child: Text(
                  '#Trending',
                  style: TextStyle(
                    color: Colors.white,
                  ),
                ),
                style: ElevatedButton.styleFrom(
                  padding: EdgeInsets.symmetric(horizontal: 20, vertical: 10),
                  primary: Colors.red,
                  shape: StadiumBorder(),
                ),
              ),
              SizedBox(
                height: 8,
              ),
              TextButton(
                onPressed: () {},
                child: Text(
                  '#Trending',
                  style: TextStyle(
                    color: Colors.red,
                  ),
                ),
                style: ElevatedButton.styleFrom(
                  padding: EdgeInsets.symmetric(horizontal: 20, vertical: 10),
                  shape: StadiumBorder(
                    side: BorderSide(
                      width: 2,
                      color: Colors.red,
                    ),
                  ),
                ),
              ),
              SizedBox(
                height: 8,
              ),
              Container(
                padding: EdgeInsets.symmetric(
                  horizontal: 30,
                  vertical: 10,
                ),
                decoration: ShapeDecoration(
                  color: Colors.red,
                  shape: StadiumBorder(),
                ),
                child: Text(
                  'Container',
                  style: TextStyle(
                    fontSize: 15,
                    color: Colors.white,
                    fontWeight: FontWeight.bold,
                  ),
                ),
              ),
              SizedBox(
                height: 8,
              ),
              Container(
                padding: EdgeInsets.symmetric(
                  horizontal: 30,
                  vertical: 10,
                ),
                decoration: ShapeDecoration(
                  color: Colors.red,
                  shape: StadiumBorder(
                    side: BorderSide(
                      width: 6,
                      color: Colors.green[200]!,
                    ),
                  ),
                ),
                child: Text(
                  'Container',
                  style: TextStyle(
                    fontSize: 15,
                    color: Colors.white,
                    fontWeight: FontWeight.bold,
                  ),
                ),
              ),
              SizedBox(
                height: 8,
              ),
              Container(
                padding: EdgeInsets.symmetric(horizontal: 30, vertical: 10),
                decoration: ShapeDecoration(
                  shape: StadiumBorder(
                    side: BorderSide(width: 2, color: Colors.red),
                  ),
                ),
                child: Text(
                  'Container',
                  style: TextStyle(
                    fontSize: 20,
                    color: Colors.red,
                    fontWeight: FontWeight.bold,
                  ),
                ),
              ),
              ElevatedButton(
                child: Text("ElevatedButton"),
                onPressed: () {},
                style: ElevatedButton.styleFrom(
                  primary: Colors.green,
                  shape: StadiumBorder(),
                ),
              ),
              ElevatedButton(
                child: Text(
                  "ElevatedButton",
                  style: TextStyle(
                    color: Colors.black,
                  ),
                ),
                onPressed: () {},
                style: ElevatedButton.styleFrom(
                  primary: Colors.white,
                  shape: StadiumBorder(
                      side: BorderSide(width: 2, color: Colors.green)),
                ),
              ),
              OutlinedButton(
                child: Text("OutlinedButton"),
                onPressed: () {},
                style: OutlinedButton.styleFrom(
                  side: BorderSide(
                    width: 2,
                    color: Colors.orange,
                  ),
                  shape: StadiumBorder(),
                ),
              ),
            ],
          ),
        ),
      ),
    );
  }
}

That’s all for now. If you like this post, please share it with your family and friends.

Flutter Machine Learning App Tutorial – Dog vs Cat Detector – Kaggle Machine Learning Projects

flutter machine learning app - Kaggle Machine Learning Projects
In this post, you will make a Flutter Machine Learning App – Actually Dog VS Cat Detector.

Don’t worry, there are no complex mathematical calculations or any other works. without wasting time, let’s start.

okay… but some basics first.

What is Machine Learning?

In simple words, Machine learning is a branch of Artificial Intelligence, helps systems to learn from experience like human beings. They learn from data and predict the output and improve themselves. Companies like Google, Facebook, and Amazon are making use of it.
For example: Recommendation Engines, Email spam filtering.

Types of Machine Learning

    1. Supervised Learning.
    2. Unsupervised Learning.
    3. Reinforcement Learning.

I am not going to talk about these machine learnings except Supervised Learning.

Supervised Learning

It’s like teaching a child, for example mom showing images of animals and teaches which is a dog and a which is a cat. Just like this Machine learning algorithm is provided with lots of labeled data and later it will predict the output based on the input.
Dog vs Cat Detector is an example of Supervised Learning.

Google TeachableMachine

It’s a web-based tool that helps to train models without any coding. For beginners, it’s really helpful. The teachable machine supports models based on images, sounds, and poses and you can freely use the models in your site, app, and more.

Kaggle

An online community for machine learners and data scientists. It offers more than 19,000 public datasets and 200,000 public notebooks to do your data science works.

TensorFlow

It’s a Machine learning – open source library made by Google Brains Team. It assists beginners or experts to create machine learning models.

How To Make A Flutter Machine Learning App Which detects Dog or Cat? – In Simple Steps.

    1. go to Kaggle.com and download Cat and Dog datasets.
    2. Using the datasets, make model using Google teachable machine.
    3. Import the model in Flutter app.
    4. Tensorflow lite package detects given image containing a dog or cat.

Flutter Machine Learning App – Dog vs Cat Detector- Step by step tutorial

Flutter Machine Learning App
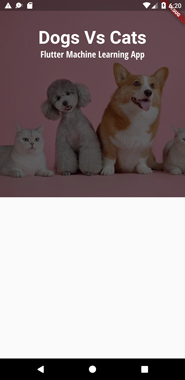
We will make an app like above. How is it? looking nice.

Okay. First of all, let’s make a Machine learning model.

  • As a first step, we need to download Cat and Dog dataset from
    Kaggle.com.

  • Now register using your google or your email.
  • Complete registration using by providing full name and agreeing to Privacy and terms.

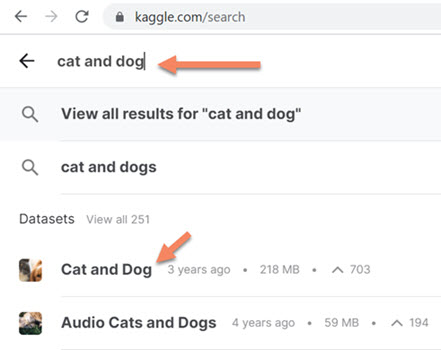
  • Click on search part, and type Cat and Dog.

  • click on Cat and Dog dataset from the list.

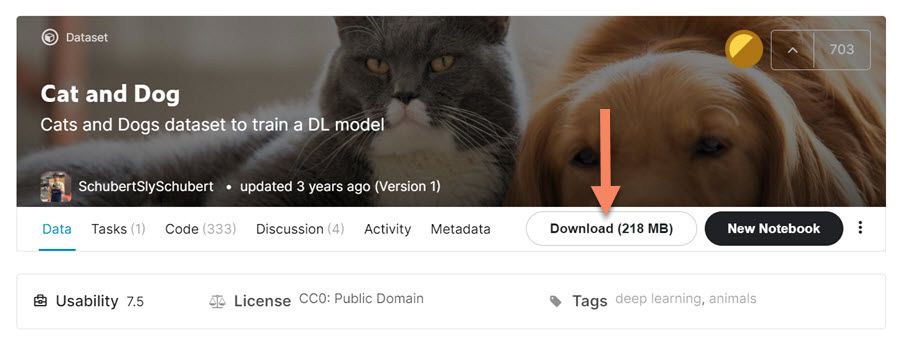
  • It will show a detailed page of Cat and Dog Dataset.
  • Click on the Download button. Now the archive.zip will be downloaded.

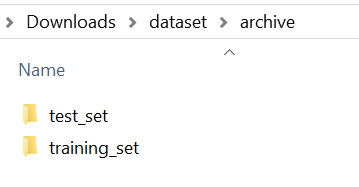
      • Extract the zip file.

      • Inside the archive directory, there are 2 sets. testing_set and training_set.
      • Training Set is for training the model and testing set for testing the model. So simple.
      • In these directories, you will get Cat and Dog images.

Using these images, we can make the model.

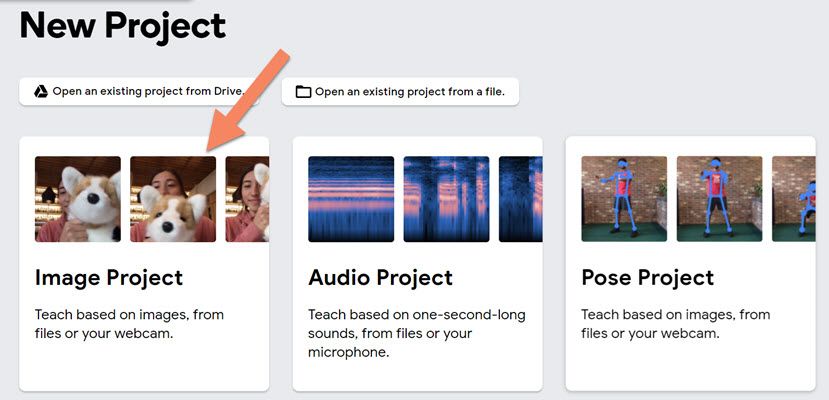
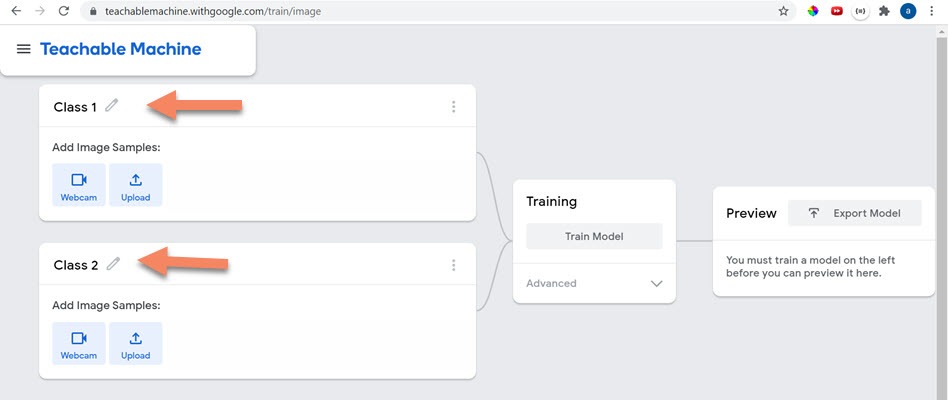
      • Click on Get Started

      • Select Image Project.

      • Choose Standard Image Model.

      • Change Class 1 to Dog, and Class 2 to Cat .
      • Yes, we are labeling it.

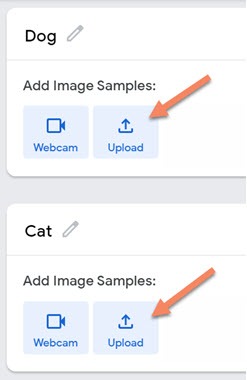
      • You need to upload dog images, in Dogs class.
      • So click on the upload button.

      • Open the training_set directory of Dog, and select all images and click on Open.

      • It takes time to load all images.

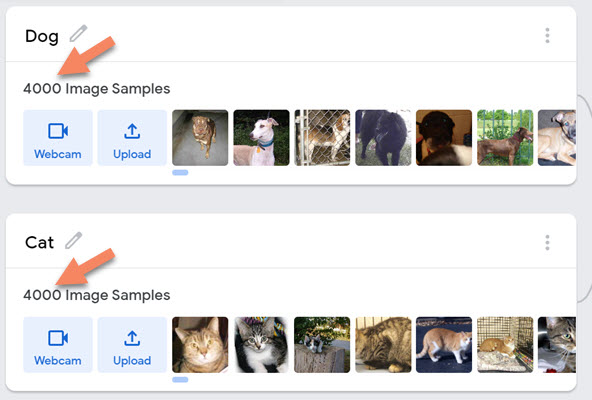
      • Just like Dogs, you need to upload Cats images in Cats class from training_set directory.
      • It’s better to keep same amount of images in both sets, but it won’t change the result that much if one set has 5 extra images.

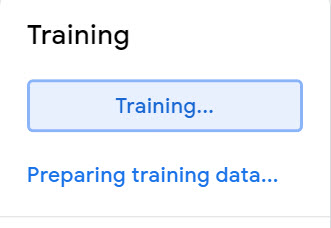
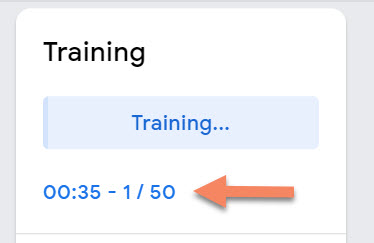
      • Click on Train Model.
      • Using the given images, it will train the model.
      • You can change the additional settings, if you want. But now this is enough.

      • Wait for 50 epoch to complete.

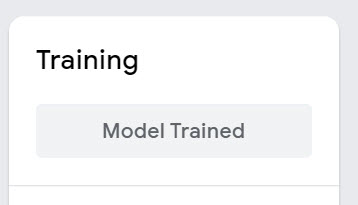
      • Model is completely trained by Google teachable Machine.

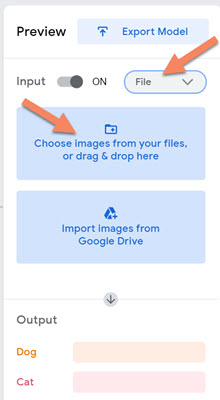
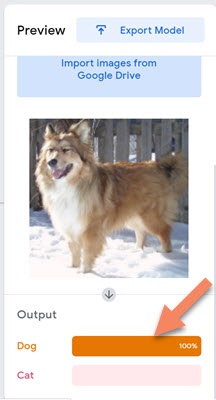
      • Let’s preview the model using a dog image from test_set.
      • Choose File option, upload or drag and drop image.

      • Select the image and click open button.

      • Model predicted Successfully. Use any cat image and check it out.

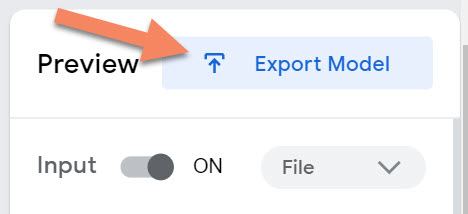
      • For Using this model in apps, you need to export it.
      • Click on Export Model.

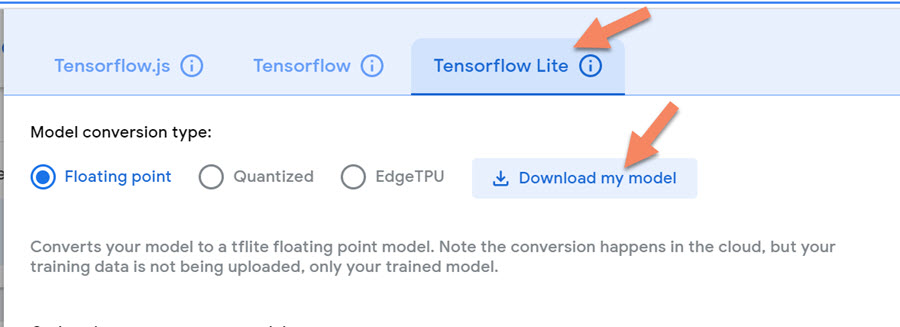
      • Click on Download My Model.

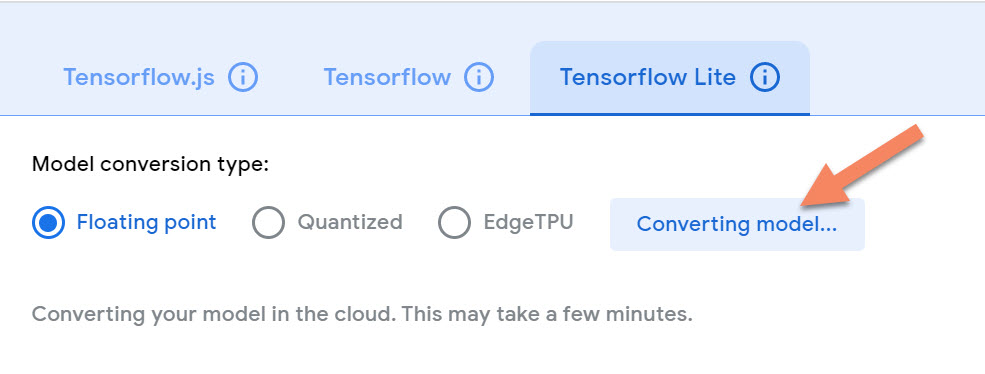
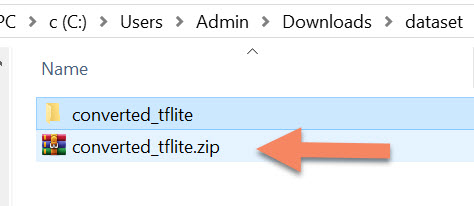
      • After a few seconds, converted_tflite.zip file will be downloaded

      • Extract the converted_tflite.zip file.

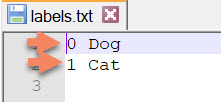
      • Inside converted_tflite directory, you can see there are two files. Open labels.txt

      • We need to remove 0 and 1.
      • Why are we removing it?
      • At the end, we need to show It’s a Cat or It’s a Dog based on the detection. If we didn’t remove the 0,1 and also the space too. It will end up like this: It’s a 1 Cat or It’s a 0 Dog.

      • Save the labels.txt file like above.

So Let’s create a Flutter project. If you haven’t installed Flutter – Read this tutorial

If you are using

      1. Android Studio – Create Project
      2. Visual Studio – If you have installed plugin and set up the SDK like above tutorial. Use Ctrl + Shift + P -> Flutter: New Application Project or
        Create Project Using this Flutter Command and open project using Visual Studio.

project name: flutter_machine_learning_dogvscat.

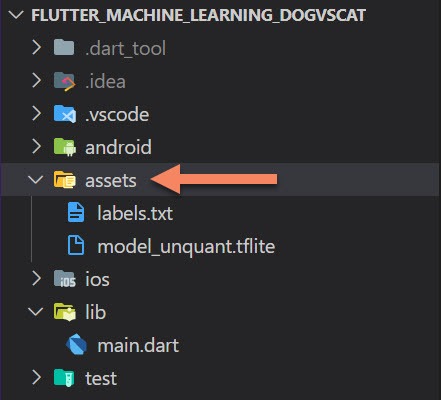
      • Create an assets directory, copy and paste labels.txt and model_unquant.tflite.

          • Open pubspec.yaml file and paste below dependencies. I am using 2.12 Dart, Means Null safety is turned on.
            google_fonts: ^2.1.0
            image_picker: ^0.8.3+3
            tflite: ^1.1.2


      • Add Assets directory in pubspec.yaml file.

      • Open Android/app/build.gradle, and paste the following inside android block.
      aaptOptions {
              noCompress 'tflite'
              noCompress 'lite'
          }


      flutter tensorflow lite requirements

      • Change minSdkVersion to 19

      • For iOS users, You need to add below contents in ios/runner/info.plist file, For ImagePicker.
      NSPhotoLibraryUsageDescription
      	Need to take Picture from Gallery
      	NSCameraUsageDescription
      	Need to take Picture using Camera
      
      • Let’s clear main.dart file and create a Stateful Widget named MachineLearningApp.
      import 'dart:io';
      import 'package:image_picker/image_picker.dart';
      import 'package:flutter/material.dart';
      import 'package:google_fonts/google_fonts.dart';
      import 'package:tflite/tflite.dart';
      import '../constants.dart';
      
      void main() => runApp(
            MaterialApp(
              home: MachineLearningApp(),
            ),
          );
      
      class MachineLearningApp extends StatefulWidget {
        const MachineLearningApp({ Key? key }) : super(key: key);
      
        @override
        _MachineLearningAppState createState() => _MachineLearningAppState();
      }
      
      class _MachineLearningAppState extends State {
        @override
        Widget build(BuildContext context) {
          return Container(
            
          );
        }
      }
      
      
      • To avoid squiggly red line under ../constants.dart, create a constants.dart file and paste the below code.
      import 'package:flutter/material.dart';
      
      var bold = FontWeight.bold;
      //Black color overlay 
      var filter = ColorFilter.mode(
        Colors.black.withOpacity(0.6),
        BlendMode.darken,
      );
      
      • filter used to create black overlay over the image.
      • First of all, we need to load our model and labels to Tflite.
      class _MachineLearningAppState extends State<MachineLearningApp> 
      {
      
        @override
        void initState() {
          super.initState();
          loadModelData().then((output) {
      //after loading models, rebuild the UI.
            setState(() {});
          });
        }
      
        loadModelData() async {
      //tensorflow lite plugin loads models and labels.
          await Tflite.loadModel(
              model: 'assets/model_unquant.tflite', labels: 'assets/labels.txt');
        }


        @override
        Widget build(BuildContext context) {
          return Container(
            
          );
        }
      }


      Let’s start building the UI. So, first, put any image in the assets directory or you can download our code and copy-paste the image. Here I have used pets.jpg. Implement the below code.

      @override
        Widget build(BuildContext context) {
          Size size = MediaQuery.of(context).size;
      
          return Scaffold(
            body: SingleChildScrollView(
              child: Column(
                children: [
                  titleContent(size),
                ],
              ),
            ),
          );
        }
      
        Container titleContent(Size size) {
          return Container(
      //contains 55% of the screen height.
            height: size.height * 0.55,
            width: double.infinity,
            decoration: BoxDecoration(
              image: DecorationImage(
                image: AssetImage("assets/pets.jpg"),
                fit: BoxFit.cover,
      //black overlay filter
                colorFilter: filter,
              ),
            ),
            child: Center(
              child: Column(
                children: [
                  SizedBox(
                    height: 60,
                  ),
                  Text(
                    'Dogs Vs Cats',
                    style: GoogleFonts.roboto(
                      fontSize: 40,
                      color: Colors.white,
                      fontWeight: bold,
                    ),
                  ),
                  Text(
                    'Flutter Machine Learning App',
                    style: GoogleFonts.openSansCondensed(
                      fontWeight: bold,
                      fontSize: 20,
                      color: Colors.white,
                    ),
                  ),
                ],
              ),
            ),
          );
        }


      Define gallery, camera buttons and take images using ImagePicker. In UI, you need to implement below titleContent() inside the Column.

      
                  SizedBox(height: 20),
                  Row(
                    mainAxisAlignment: MainAxisAlignment.center,
                    children:[
                      galleryOrCamera(Icons.camera, ImageSource.camera),
                      galleryOrCamera(Icons.photo_album, ImageSource.gallery),
                    ]
                  )


      • Now you will see the red squiggly line again under the galleryOrCamera. Copy paste or type the below code.
      
      
        MaterialButton galleryOrCamera(IconData icon, ImageSource imageSource) {
          return MaterialButton(
            padding: EdgeInsets.all(14.0),
            elevation: 5,
            color: Colors.grey[300],
            onPressed: () {
              _getImage(imageSource);
            },
            child: Icon(
              icon,
              size: 20,
              color: Colors.grey[800],
            ),
            shape: CircleBorder(),
          );
        }


      • Rounded Button’s UI is complete now.
      • Let’s move to it’s functionality – Code need to trigger the ImagePicker, when it’s tapped.
      • Before defining _getImage(), you need to create File and ImagePicker instances inside State class.
      
       final ImagePicker _picker = ImagePicker();
        File? _image;
      
      • ImagePicker (New API) uses XFile instead of PickedFile.
      
      _getImage(ImageSource imageSource) async {
      //accessing image from Gallery or Camera.
          final XFile? image = await _picker.pickImage(source: imageSource);
      //image is null, then return
          if (image == null) return;
      
          setState(() {
            _image = File(image.path);
         
          });
        }


      • Next we need to set the selected image and hide titleContent. Only when image is not null.
      
        _image != null ? testImage(size, _image) : titleContent(size),
      
      
      • Define testImage().
      
      Widget testImage(size, image) {
          return Container(
            height: size.height * 0.55,
            width: double.infinity,
            decoration: BoxDecoration(
              image: DecorationImage(
                image: FileImage(
                  image!,
                ),
                fit: BoxFit.cover,
              ),
            ),
          );
        }
      }


      flutter machine learning app

      • After implementing these code, just run and select any image.
      • You will get output almost like above.
      • Let’s add Instructions, Submit button and AndroidRide text like below.

      flutter machine learning app

      
          SizedBox(height: 50),
                  Text(
                          '1. Select or Capture the image. \n2. Tap the submit button.',
                          style: GoogleFonts.openSans(fontSize: 16),
                        ),
                        Padding(
                    padding: const EdgeInsets.only(top: 30.0),
                    child: ElevatedButton(
                      style: ElevatedButton.styleFrom(
                        padding: EdgeInsets.symmetric(horizontal: 60),
                        elevation: 4,
                        primary: Colors.grey[300],
                      ),
                      onPressed:(){},
         //             onPressed: detectDogOrCat,
                      child: Text(
                        'Submit',
                        style: GoogleFonts.roboto(
                          color: Colors.black,
                          fontWeight: bold,
                        ),
                      ),
                    ),
                  ),
                SizedBox(height: 45),
                  Text(
                    'androidride.com',
                    style: TextStyle(
                      fontWeight: bold,
                    ),
                  ),
      
      • Let’s create the main part.
      • Define a _result variable, to hold the output from Tflite.runModelOnImage
      List? _result;
       
      
      • Define DetectDogOrCat method.
      void detectDogOrCat() async {
          if (_image != null) {
            try {
              _result = await Tflite.runModelOnImage(
                path: _image!.path,
                numResults: 2,
                threshold: 0.6,
                imageMean: 127.5,
                imageStd: 127.5,
              );
            } catch (e) {}
      
            setState(() {});
          }
        }
      
      
      • call detectDogOrCat() in submit button onPressed Method. Just like below.
      •  Padding(
                      padding: const EdgeInsets.only(top: 30.0),
                      child: ElevatedButton(
                        style: ElevatedButton.styleFrom(
                          padding: EdgeInsets.symmetric(horizontal: 60),
                          elevation: 4,
                          primary: Colors.grey[300],
                        ),
                        onPressed: detectDogOrCat,
                        child: Text(
                          'Submit',
                          style: GoogleFonts.roboto(
                            color: Colors.black,
                            fontWeight: bold,
                          ),
                        ),
                      ),
                    ),
        
      • Set _result to null, then only it shows instructions again and again.
      • _getImage(ImageSource imageSource) async {
            final XFile? _image = await _picker.pickImage(source: imageSource);
        
            if (_image == null) return;
        
            setState(() {
              image = File(_image.path);
              _result = null;
            });
          }
        
      • Hide the instructions, if we get result from detectCatOrDog() method.
      • _result != null
                        ? Text(
                            '$_result', 
                            //style: GoogleFonts.openSansCondensed(
                              //fontWeight: FontWeight.bold,
                             // fontSize: 30,
                            //),
                          )
                        : Text(
                            '1. Select or Capture the image. \n2. Tap the submit button.',
                            style: GoogleFonts.openSans(fontSize: 16),
                          ),
        
      • After submitting a dog image, you will get an output like below.

      flutter machine learning app

      • Extract dog label from the Map and uncomment style.
      Text(
                          'It\'s a ${_result![0]['label']}.',
                          style: GoogleFonts.openSansCondensed(
                            fontWeight: FontWeight.bold,
                            fontSize: 30,
                          ),
                        )
      

      flutter machine learning app

      flutter machine learning app

      • Successfully completed the app.

      Download Source Code


      If you like this post, please share it with your friends and family.
      Thank you.

6 Ways: Flutter Underline Text Example

flutter underline text

In Flutter, underlining a text is easy. This post has listed 6 ways to make it happen.

Let’s start…

1. How To Underline Text in Flutter?

flutter underline text
Flutter provides a constant value to make underlined text – TextDecoration.underline. Use it as value of decoration inside TextStyle.

  • So remember, decoration: TextDecoration.underline.
Text(
                'Flutter Text Underline Example',
                style: TextStyle(
//creates underlined text.
                decoration: TextDecoration.underline,
                ),
              ),

1.1 Dashed Underline

flutter text style underline
Making a dashed underline is easy with Text widget. You just need to use below code inside TextStyle.

  • decoration: TextDecoration.underline – creates underline Text.
  • decorationStyle: TextDecorationStyle.dashed – Makes the underline to dashed line.
Text(
                'Dashed Underline',
                style: TextStyle(
                  //fontSize: 30,
                  decoration: TextDecoration.underline,
                  decorationStyle: TextDecorationStyle.dashed,
                ),
              ),

1.2. Dotted Underline

For dotted underline, use TextDecorationStyle.dotted.

Text(
                'Dotted Underline',
                style: TextStyle(
                  fontSize: 30,
                  decoration: TextDecoration.underline,
                  decorationStyle: TextDecorationStyle.dotted,
                ),
              ),

1.3. Flutter Double Underline Example


If a single underline is not enough for you, want a double underline?. You can use TextDecorationStyle.double inside TextStyle.

Text(
                'Double underline',
                style: TextStyle(
                  fontSize: 30,
                  decoration: TextDecoration.underline,
                  decorationStyle: TextDecorationStyle.double,
                ),
              ),

1.4. Flutter Wavy Underline

If you have used word, you may have seen wavy underlines when the content have spelling or grammatical errors. Do you want to make a wavy underline like that using Text widget? use TextDecorationStyle.wavy.

Text(
                ' Wavy underline',
                style: TextStyle(
                  fontSize: 30,
                  decoration: TextDecoration.underline,
                  decorationStyle: TextDecorationStyle.wavy,
                ),
              ),

2. How To Increase Space Between Underline And Text In Flutter?

flutter text style underline

The above-mentioned examples don’t have enough space between text and underline. In this and the next example, you can adjust the space between them.

  • Here, the visible text content is shadow of real text content. The real text is invisible due to transparent color.
  • Offset determines the text’s shadow location.
  • Offset second argument controls the vertical space difference.
  • Change -20 with other values and check.
                            Text(
                "Text Underline",
                style: TextStyle(
                  color: Colors.transparent,
                  decorationColor: Colors.red,
                  decorationThickness: 5,
                  decoration: TextDecoration.underline,
                  decorationStyle: TextDecorationStyle.solid,
                  fontSize: 30,
                  shadows: [
                    Shadow(
                      color: Colors.black,
                      offset: Offset(0, -20),
                    ),
                  ],
                ),
              ),

3. Underline Text Using Container

container text underlined flutter
In this method, You will use Container widget and creates a border at the bottom. This border will act as underline to the Text widget.

  • Here, using bottom border padding value, can increase the space between them.
Container(
                padding: EdgeInsets.only(
                  //using bottom property, can control the space between underline and text
                  bottom: 7,
                ),
                decoration: BoxDecoration(
                  border: Border(
                    bottom: BorderSide(
                      color: Colors.red,
                      width: 2.0,
                    ),
                  ),
                ),
                child: Text(
                  "Text Underline Using Container",
                  style: TextStyle(
                    fontSize: 20,
                    color: Colors.black,
                  ),
                ),
              ),

4. Flutter Underline Text Using Text.rich

text.rich underline
Using Text.rich constructor, you can underline the word or character in a sentence or paragraph as you like.

  • Text.rich uses TextSpan to show text, Almost same as Text widget.
  • Using style property, you can create underline.
          Text.rich(
                TextSpan(
                  text: ' Underline using ',
                  style: TextStyle(fontSize: 30),
                  children: [
                    TextSpan(
                      text: 'Text.rich',
                      style: TextStyle(
                        decoration: TextDecoration.underline,
                        fontSize:30,
                      ),
                    ),
                    
                  ],
                ),
              ),

5. Underline text using RichText

richtext underline
This method almost same as Text.rich() method. Here, we will use RichText widget and TextSpan to make the underline.

RichText(
                text: TextSpan(
                    text: "Underline Using ",
                    style: TextStyle(
                      fontSize: 25,
                      color: Colors.black,
                    ),
                    children: [
                      TextSpan(
                        text: 'RichText',
                        style: TextStyle(
                          fontSize: 25,
                          color: Colors.black,
                          decoration: TextDecoration.underline,
                        ),
                      )
                    ]),
              ),

6. Underline Using Divider

underline using divider

This is a simple hack. Divider widget can used to make horizontal lines or separate content. Here Divider widget make a yellow line below the Text widget.

  • indent: amount of empty space to the leading edge.
  • endIndent: amount of empty space to the trailing edge.
 Text(
                'Underline using Divider',
                style: TextStyle(fontSize: 20),
              ),
              Divider(
                color: Colors.yellow,
                thickness: 10,
                indent: 70,
                endIndent: 70,
              ),

7. All In One Example

flutter underline text

In this example, we will create all examples and shown them one by one below.

import 'package:flutter/material.dart';

void main() {
  runApp(MyApp());
}

class MyApp extends StatelessWidget {
  @override
  Widget build(BuildContext context) {
    return MaterialApp(
      title: 'Flutter Demo',
      theme: ThemeData(
        primarySwatch: Colors.blue,
      ),
      home: Scaffold(
        appBar: AppBar(
          title: Text('Flutter Text Underline Example'),
        ),
        body: Center(
          child: Column(
            mainAxisAlignment: MainAxisAlignment.center,
            children: [
              Text(
                'Flutter Text Underline Example',
                style: TextStyle(
                  fontSize: 25,
                  decoration: TextDecoration.underline,
                ),
              ),
              SizedBox(
                height: 30,
              ),
              Text(
                'Dashed Underline',
                style: TextStyle(
                  fontSize: 30,
                  decoration: TextDecoration.underline,
                  decorationStyle: TextDecorationStyle.dashed,
                ),
              ),
              SizedBox(
                height: 20,
              ),
              Text(
                "Dashed Underline - 2",
                style: TextStyle(
                  fontSize: 30,
                  shadows: [
                    Shadow(
                      color: Colors.black,
                      offset: Offset(0, -5),
                    ),
                  ],
                  color: Colors.transparent,
                  decoration: TextDecoration.underline,
                  decorationColor: Colors.red,
                  decorationThickness: 5,
                  decorationStyle: TextDecorationStyle.dashed,
                ),
              ),
              SizedBox(
                height: 30,
              ),
              Text(
                'Dotted Underline',
                style: TextStyle(
                  fontSize: 30,
                  decoration: TextDecoration.underline,
                  decorationStyle: TextDecorationStyle.dotted,
                ),
              ),
              SizedBox(
                height: 20,
              ),
              Text(
                'Double underline',
                style: TextStyle(
                  fontSize: 30,
                  decoration: TextDecoration.underline,
                  decorationStyle: TextDecorationStyle.double,
                ),
              ),
              SizedBox(
                height: 20,
              ),
              Text(
                ' Wavy underline',
                style: TextStyle(
                  fontSize: 30,
                  decoration: TextDecoration.underline,
                  decorationStyle: TextDecorationStyle.wavy,
                ),
              ),
              SizedBox(
                height: 30,
              ),
              RichText(
                text: TextSpan(
                    text: "Underline Using ",
                    style: TextStyle(
                      fontSize: 25,
                      color: Colors.black,
                    ),
                    children: [
                      TextSpan(
                        text: 'RichText',
                        style: TextStyle(
                          fontSize: 25,
                          color: Colors.black,
                          decoration: TextDecoration.underline,
                        ),
                      )
                    ]),
              ),
              SizedBox(height: 30),
              Text.rich(
                TextSpan(
                  text: ' Underline using ',
                  style: TextStyle(fontSize: 30),
                  children: [
                    TextSpan(
                      text: 'Text.rich',
                      style: TextStyle(
                        decoration: TextDecoration.underline,
                        fontSize: 30,
                      ),
                    ),
                  ],
                ),
              ),
              SizedBox(
                height: 20,
              ),
              Container(
                padding: EdgeInsets.only(
                  //using bottom property, can control the space between underline and text
                  bottom: 7,
                ),
                decoration: BoxDecoration(
                  border: Border(
                    bottom: BorderSide(
                      color: Colors.red,
                      width: 2.0,
                    ),
                  ),
                ),
                child: Text(
                  "Text Underline Using Container",
                  style: TextStyle(
                    fontSize: 20,
                    color: Colors.black,
                  ),
                ),
              ),
              SizedBox(
                height: 20,
              ),
              Text(
                'Underline using Divider',
                style: TextStyle(fontSize: 20),
              ),
              Divider(
                color: Colors.yellow,//color of the divider
                thickness: 10,//thickness of the divider
                indent: 70,
                endIndent: 70,
              ),
            ],
          ),
        ),
      ),
    );
  }
}


If you like this post, please share it with your family and friends.
Thank You.

Flutter Underline Constant Docs

3 Ways To Create Hyperlink Text In Flutter

flutter hyperlink text
In Web, Hyperlink takes us to a web page or any other section of the same webpage. Sometimes, we need to implement hyperlinks in our app. For further reading more content or showing your website or Facebook page.

In this post, you will learn how to create hyperlinks in Flutter.

We already discussed about Clickable Text in Flutter. Recommended to read that first, if you didn’t.

1. HyperLink using Link widget And Url_launcher

flutter hyperlink text
In Flutter 2.0, We got a new Widget – Link Widget. Using url_launcher package and Link widget, you can easily navigate to a web page and also launch different screens in your app.

Before Using the Link widget, you must add url_launcher dependency in pubspec.yaml file.

url_launcher: ^6.0.8

If you are targeting Android Devices which has an API level of 30 and above. Just add this in android/app/src/main/AndroidManifest.xml.

<uses-permission android:name="android.permission.QUERY_ALL_PACKAGES"/>

<queries>
  <!-- If your app opens https URLs -->
  <intent>
    <action android:name="android.intent.action.VIEW" />
    <data android:scheme="https" />
  </intent>
  <!-- If your app makes calls -->
  <intent>
    <action android:name="android.intent.action.DIAL" />
    <data android:scheme="tel" />
  </intent>
  <!-- If your app emails -->
  <intent>
    <action android:name="android.intent.action.SEND" />
    <data android:mimeType="*/*" />
  </intent>
</queries>

iOS
Add below code in iOS/Runner/info.plist file.

<key>LSApplicationQueriesSchemes</key>
<array>
  <string>https</string>
  <string>http</string>
</array>

flutter hyperlink text

    • In this example, There are 2 Link widgets. One for launching webpage and other for navigating to a new screen.
    • uri property: specify webpage URL or route.
    • builder : Using this property, you can build the link.
    • target property: By default, it uses LinkTarget.defaultTarget
      • Android: opens the link in the browser or any other related app.
      • iOS: opens the link in the webview for web urls.
      • web: Opens in the same tab where Flutter app is running.
    • uri: Uri.parse(‘/second’) – Flutter checks for routes property defined in MaterialApp and navigate to SecondScreen.
 target: LinkTarget.self

  • You can also use self, blank
  • self: On iOS and Android, opens link in the webview inside the app. Web uses the same tab.
Link(
                  uri: Uri.parse('https://androidride.com'),
                  //target: LinkTarget.self,
                  builder: (context, followLink) {
                    return RichText(
                      text: TextSpan(children: [
                        TextSpan(
                          text: 'Click here: ',
                          style: TextStyle(
                            fontSize: 20,
                            color: Colors.black,
                          ),
                        ),
                        TextSpan(
                          text: 'AndroidRide',
                          style: TextStyle(
                            color: Colors.blue,
                            decoration: TextDecoration.underline,
                            fontWeight: FontWeight.bold,
                            fontSize: 21,
                          ),
                          recognizer: TapGestureRecognizer()
                            ..onTap = followLink,
                        ),
                      ]),
                    );
                  }),
            ),
            SizedBox(
              height: 20,
            ),
            Link(
              uri: Uri.parse('/second'),
              builder: (context, followLink) {
                return InkWell(
                  onTap: followLink,
                  child: Text(
                    'Go to Second Screen',
                    style: TextStyle(
                      fontSize: 20,
                      color: Colors.blue,
                      decoration: TextDecoration.underline,
                    ),
                  ),
                );
              },
            ),

complete source code is given below.

import 'package:flutter/gestures.dart';
import 'package:flutter/material.dart';
import 'package:url_launcher/link.dart';

void main() {
  runApp(MyApp());
}

class MyApp extends StatelessWidget {
  @override
  Widget build(BuildContext context) {
    return MaterialApp(
      title: 'Flutter Hyperlink Text Example',

      routes: {
        '/': (context) => FirstScreen(),
        '/second': (context) => SecondScreen()
      },
    );
  }
}

class FirstScreen extends StatelessWidget {
  const FirstScreen({Key? key}) : super(key: key);

  @override
  Widget build(BuildContext context) {
    return Scaffold(
      appBar: AppBar(
        title: Text('Flutter Hyperlink Text Using Link Widget'),
      ),
      body: Padding(
        padding: EdgeInsets.all(8.0),
        child: Column(
          mainAxisAlignment: MainAxisAlignment.center,
          children: [
            Center(
              child: Link(
                  uri: Uri.parse('https://androidride.com'),
                  //target: LinkTarget.self,
                  builder: (context, followLink) {
                    return RichText(
                      text: TextSpan(children: [
                        TextSpan(
                          text: 'Click here: ',
                          style: TextStyle(
                            fontSize: 20,
                            color: Colors.black,
                          ),
                        ),
                        TextSpan(
                          text: 'AndroidRide',
                          style: TextStyle(
                            color: Colors.blue,
                            decoration: TextDecoration.underline,
                            fontWeight: FontWeight.bold,
                            fontSize: 21,
                          ),
                          recognizer: TapGestureRecognizer()
                            ..onTap = followLink,
                        ),
                      ]),
                    );
                  }),
            ),
            SizedBox(
              height: 20,
            ),
            Link(
//when taps the link, moves to second screen.
              uri: Uri.parse('/second'),
              builder: (context, followLink) {
                return InkWell(
                  onTap: followLink,
                  child: Text(
                    'Go to Second Screen',
                    style: TextStyle(
                      fontSize: 20,
                      color: Colors.blue,
                      decoration: TextDecoration.underline,
                    ),
                  ),
                );
              },
            ),
          ],
        ),
      ),
    );
  }
}

class SecondScreen extends StatelessWidget {
  const SecondScreen({Key? key}) : super(key: key);

  @override
  Widget build(BuildContext context) {
    return Scaffold(
      appBar: AppBar(
        title: Text('Second Screen'),
      ),
      body: Center(
        child: ElevatedButton(
          onPressed: () {
//poping the current screen from the stack, Shows First Screen.
            Navigator.pop(context);
          },
          child: Text('Go Back To First Screen'),
        ),
      ),
    );
  }
}


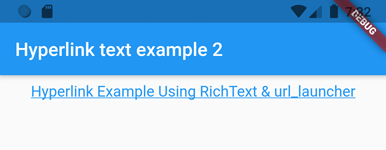
2. Flutter Hyperlink Text Using RichText And url_launcher

flutter hyperlink example
This method also uses Url_launcher package.

url_launcher: ^6.0.8

  • Android 10 and above, import below code in android/app/src/main/AndroidManifest.xml
<uses-permission android:name="android.permission.QUERY_ALL_PACKAGES"/>

<queries>
  <!-- If your app opens https URLs -->
  <intent>
    <action android:name="android.intent.action.VIEW" />
    <data android:scheme="https" />
  </intent>
  <!-- If your app makes calls -->
  <intent>
    <action android:name="android.intent.action.DIAL" />
    <data android:scheme="tel" />
  </intent>
  <!-- If your app emails -->
  <intent>
    <action android:name="android.intent.action.SEND" />
    <data android:mimeType="*/*" />
  </intent>
</queries>


  • iOS – url_launcher
    Add below code in iOS/Runner/info.plist file.
<key>LSApplicationQueriesSchemes</key>
<array>
  <string>https</string>
  <string>http</string>
</array>


  • Using RichText, we can make the hyperlink text.
  • Using TapGestureRecognizer‘s onTap method, we can make it clickable.
  • Using URL launcher’s launch() method, we can open the urls.
RichText(
              text: TextSpan(
                  text: "Hyperlink Example Using RichText & url_launcher",
                  style: TextStyle(
                    color: Colors.blue,
                    decoration: TextDecoration.underline,
                    fontSize: 16,
                  ),
                  recognizer: TapGestureRecognizer()
                    ..onTap = () async {
                      var url = 'https://androidride.com';
                      if (await canLaunch(url)) {
                        await launch(url);
                      } else {
                        throw 'Could not launch $url';
                      }
                    }),
            ),

Complete source code is given below.

  • if canLaunch(URL) method is true, it launches the url.
import 'package:flutter/gestures.dart';
import 'package:flutter/material.dart';
import 'package:url_launcher/url_launcher.dart';

void main() {
  runApp(MyApp());
}

class MyApp extends StatelessWidget {
  @override
  Widget build(BuildContext context) {
    return MaterialApp(
      title: 'Flutter Demo',
      theme: ThemeData(
        primarySwatch: Colors.blue,
      ),
      home: Scaffold(
        appBar: AppBar(
          title: Text('Hyperlink text example 2'),
        ),
        body: Padding(
          padding: const EdgeInsets.all(8.0),
          child: Align(
            alignment: Alignment.topCenter,
            child: RichText(
              text: TextSpan(
                  text: "Hyperlink Example Using RichText & url_launcher",
                  style: TextStyle(
                    color: Colors.blue,
                    decoration: TextDecoration.underline,
                    fontSize: 16,
                  ),
                  recognizer: TapGestureRecognizer()
                    ..onTap = () async {
                      var url = 'https://androidride.com';
                      if (await canLaunch(url)) {
                        await launch(url);
                      } else {
                        throw 'Could not launch $url';
                      }
                    }),
            ),
          ),
        ),
      ),
    );
  }
}


3. Flutter HyperLink Using flutter_linkify

flutter linkify example

In this example, we will use flutter_linkify package. It turns our text URLs and email address into clickable inline links in texts.

again we use url_launcher package.

url_launcher: ^6.0.8

If you are targeting Android Devices which has an API level of 30 and above. Just add this in android/app/src/main/AndroidManifest.xml.


<uses-permission android:name="android.permission.QUERY_ALL_PACKAGES"/>

<queries>
  <!-- If your app opens https URLs -->
  <intent>
    <action android:name="android.intent.action.VIEW" />
    <data android:scheme="https" />
  </intent>
  <!-- If your app makes calls -->
  <intent>
    <action android:name="android.intent.action.DIAL" />
    <data android:scheme="tel" />
  </intent>
  <!-- If your app emails -->
  <intent>
    <action android:name="android.intent.action.SEND" />
    <data android:mimeType="*/*" />
  </intent>
</queries>

iOS
Add below code in iOS/Runner/info.plist file.

<key>LSApplicationQueriesSchemes</key>
<array>
  <string>https</string>
  <string>http</string>
</array>

hyperlink using flutter_linkify

  • Here Linkify widget makes https://androidride.com as link in text.
Linkify(
            onOpen: (link) async {
              if (await canLaunch(link.url)) {
                await launch(link.url);
              } else {
                throw 'Could not launch $link';
              }
            },
            text: 'Click the link: https://androidride.com',
                   ),

Complete source code is given below.

import 'package:flutter/material.dart';
import 'package:flutter_linkify/flutter_linkify.dart';
import 'package:url_launcher/url_launcher.dart';

void main() {
  runApp(MyApp());
}

class MyApp extends StatelessWidget {
  @override
  Widget build(BuildContext context) {
    return MaterialApp(
      title: 'Flutter Demo',
      home: Scaffold(
        appBar: AppBar(
          title: Text('Hyperlink Using Flutter_linkify'),
        ),
        body: Padding(
          padding: const EdgeInsets.all(8.0),
          child: Linkify(
            onOpen: (link) async {
              if (await canLaunch(link.url)) {
                await launch(link.url);
              } else {
                throw 'Could not launch $link';
              }
            },
            text: 'Click the link: https://androidride.com',
                   ),
        ),
      ),
    );
  }
}


If you like this post, please share it with your family and friends.

Link Widget Docs

3 Ways To Make Clickable Text In Flutter

flutter clickable text
In this post, you will learn how to make clickable text in Flutter. Many apps use clickable text in the signup/login form. After completing this tutorial, you can also make one like that.

Let’s go then.

How To Make Text Clickable Using RichText Widget?

flutter text clickable

In this example, You will use the RichText widget. RichText…, just like the name it’s rich in features when compared to a Text widget.

Let’s check it out.

I have already discussed about clickable text in Flutter Notes App

  • TextSpan used to show text inside RichText.
  • Using recognizer property, we can make the text clickable.
  • Cascade notation(..) allows to perform sequence of operations on same object, here TapGestureRecognizer.
  • When the Login text clicked, onTap method gets called.
  • Don’t forget to add this statement : import ‘package:flutter/gestures.dart’;

RichText(
            text: TextSpan(children: [
              TextSpan(
                text: 'Already have account? ',
                style: TextStyle(
                  color: Colors.black,
                ),
              ),
              TextSpan(
                  text: 'Login',
                  style: TextStyle(
                    color: Colors.blue,
                  ),
                  recognizer: TapGestureRecognizer()
                    ..onTap = () {
                      print('Login Text Clicked');
                    }),
            ]),
          ),

The complete source code is given below.


import 'package:flutter/gestures.dart';
import 'package:flutter/material.dart';

void main() {
  runApp(MyApp());
}

class MyApp extends StatelessWidget {
  const MyApp({Key? key}) : super(key: key);

  @override
  Widget build(BuildContext context) {
    return MaterialApp(
      title: 'Flutter Clickable Text Using RichText',
      home: Scaffold(
        appBar: AppBar(
          title: Text('Flutter Clickable Text Using RichText'),
        ),
        body: Center(
          child: RichText(
            text: TextSpan(children: [
              TextSpan(
                text: 'Already have account? ',
                style: TextStyle(
                  color: Colors.black,
                ),
              ),
              TextSpan(
                  text: 'Login',
                  style: TextStyle(
                    color: Colors.blue,
                  ),
                  recognizer: TapGestureRecognizer()
                    ..onTap = () {
                      print('Login Text Clicked');
                    }),
            ]),
          ),
        ),
      ),
    );
  }
}
 

Flutter Clickable Text Using InkWell Example

clickable text nkwell
InkWell widget helps to listen for tap events. Wrapping with Text widget we can easily find out the tap events.

  • When text gets clicked, onTap gets called.

InkWell(
            onTap: () {
              print('Text Clicked');
            },
            child: Text('Clickable Text Using InkWell'),
          ),

complete source code is given below.


import 'package:flutter/material.dart';

void main() {
  runApp(MyApp());
}

class MyApp extends StatelessWidget {
  @override
  Widget build(BuildContext context) {
    return MaterialApp(
      title: 'Flutter Clickable Text Using InkWell',
      home: Scaffold(
        appBar: AppBar(
          title: Text('Flutter Clickable Text Example'),
        ),
        body: Center(
          child: InkWell(
            onTap: () {
              print('Text Clicked');
            },
            child: Text('Clickable Text Using InkWell'),
          ),
        ),
      ),
    );
  }
}


Flutter Clickable Text Using GestureDetector

text click flutter gesturedetector
Just like InkWell, GestureDetector can also used to listen for tap events. So just wrap Text widget with GestureDetector.

  • When the text tapped, GestureDetector’s onTap method gets called.

GestureDetector(
            onTap: () {
              print('Text Clicked');
            },
            child: Text('Clickable Text Using GestureDetector'),
          ),

Complete source code given below.


import 'package:flutter/material.dart';

void main() {
  runApp(MyApp());
}

class MyApp extends StatelessWidget {
  @override
  Widget build(BuildContext context) {
    return MaterialApp(
      title: 'Flutter Clickable Text Using GestureDetector',
      home: Scaffold(
        appBar: AppBar(
          title: Text('Flutter Clickable Text Example'),
        ),
        body: Center(
          child: GestureDetector(
            onTap: () {
              print('Text Clicked');
            },
            child: Text('Clickable Text Using GestureDetector'),
          ),
        ),
      ),
    );
  }
}


That’s all for now.

If you like this post, please share it with your family and friends. If you got any other ways, feel free to comment.
Thank you.

RichText Widget Docs

4 Ways To Set Background Color Of A Screen In Flutter

set background color in flutter
UI/UX has an importance in your app’s success. A likable user interface can win customers’ trust and love. Therefore sometimes you need to change the default look of the app. So in this post, as a first step, you will learn how to set background color in Flutter.

In Flutter, you can achieve a simple thing in different ways. setting background color too.

Let’s check it out, then.

1. How To Set Background Color Using scaffoldBackgroundcolor property

flutter background color
Scaffold widget provides backgroundColor property to change the background color. By default, it uses Theme.scaffoldBackgroundColor.

  • You can use Colors class values or hex code values.
  • Use hex code like this: 0xff+Hex Code

Scaffold(
         backgroundColor: Color(0xfff57d7c),
         //backgroundColor: Colors.red,

...)

Complete source code is given below.


import 'package:flutter/material.dart';

void main() {
  runApp(MyApp());
}

class MyApp extends StatelessWidget {
  @override
  Widget build(BuildContext context) {
    return MaterialApp(
      home: Scaffold(
        backgroundColor: Color(0xfff57d7c),
        // backgroundColor: Colors.red,
        body: Center(
          child: Text(
            'Set Background Color Example',
            style: TextStyle(fontWeight: FontWeight.bold),
          ),
        ),
      ),
    );
  }
}

2. Set Background Color Using MaterialApp property

flutter materialapp background color
In this example, we will use scaffoldBackgroundColor to change background color. It affects all scaffolds in your app.


MaterialApp(
      theme: ThemeData(
        scaffoldBackgroundColor: Colors.orange,
      ),
      home: MyApp(),
    )

The complete source code is given below.


import 'package:flutter/material.dart';

void main() {
  runApp(
    MaterialApp(
      theme: ThemeData(
        scaffoldBackgroundColor: Colors.orange,
      ),
      home: MyApp(),
    ),
  );
}

class MyApp extends StatelessWidget {
  @override
  Widget build(BuildContext context) {
    return Scaffold(
      appBar: AppBar(
        title: Text('Set Background Color Example 2'),
      ),
      body: Center(
        child: Text(
            'Set Background Color Using \n\nscaffoldBackgroundColor Property'),
      ),
    );
  }
}


3. Change Background Color Using Theme class

background color using theme
In this example, You will use Theme class. Using Theme class, You can change background color using scaffoldBackgroundColor property.

  • copyWith() method takes properties which need to change and return new object.

Theme(
        data: Theme.of(context).copyWith(
          scaffoldBackgroundColor: Colors.indigo,
        )
....

Complete Source code is given below.


import 'package:flutter/material.dart';

void main() {
  runApp(MyApp());
}

class MyApp extends StatelessWidget {
  @override
  Widget build(BuildContext context) {
    return MaterialApp(
      home: Theme(
        data: Theme.of(context).copyWith(
          scaffoldBackgroundColor: Colors.indigo,
        ),
        child: Scaffold(
          body: Center(
            child: Text(
              'Set Background Color Using Theme Class',
              style: TextStyle(
                color: Colors.white,
                fontWeight: FontWeight.bold,
              ),
            ),
          ),
        ),
      ),
    );
  }
}


4.1 Set Background Color Using Container


In this example, we will use Container widget to set background color. Container uses complete height and width of the screen.


Scaffold(
        body: Container(
          width: double.infinity,
          height: double.infinity,
          color: Colors.yellow,
          child: Center(child: Text('Set Background Color Using Container')),
        ),
      ),

Complete Source code is given below.


import 'package:flutter/material.dart';

void main() {
  runApp(MyApp());
}

class MyApp extends StatelessWidget {
  @override
  Widget build(BuildContext context) {
    return MaterialApp(
      home: Scaffold(
        body: Container(
          width: double.infinity,
          height: double.infinity,
          color: Colors.yellow,
          child: Center(child: Text('Set Background Color Using Container2')),
        ),
      ),
    );
  }
}


4.2 Set Background Color Using Container and SizedBox

  • SizedBox.expand() become large as parent allows.

import 'package:flutter/material.dart';

void main() {
  runApp(MyApp());
}

class MyApp extends StatelessWidget {
  @override
  Widget build(BuildContext context) {
    return MaterialApp(
      home: Scaffold(
        body: SizedBox.expand(
          child: Container(
            color: Colors.yellow,
            child: Center(
              child: Text('Set Background Color Using Container & SizedBox'),
            ),
          ),
        ),
      ),
    );
  }
}


That’s all for now. If you like this post, please share it with your family and friends.
Thank you.

2 Ways To Break Text Line In Flutter

Displaying large blocks of text without breaks can make an app visually unappealing. Users often find it tiring to read. Most users scan content quickly, and if they don’t immediately find what they’re looking for, they tend to click back.

It’s the developer’s responsibility to ensure the app’s content is easy to read and visually appealing.
This post describes two simple but effective ways to break the content.

How To Break Text Line In Flutter? – Using New Line character

flutter text line break
For those who don’t know new line. \n is the new line character. Using this character, we can easily make a new line.

Let’s create a simple example like above.


Text('Like\nAndroidRide\n\nShare Posts')

  • When first \n added, “AndroidRide” text moved to next line.
  • When \n added twice, content placed to second line.

Here is the full source code.


import 'package:flutter/material.dart';

void main() {
  runApp(MyApp());
}

class MyApp extends StatelessWidget {
  @override
  Widget build(BuildContext context) {
    return MaterialApp(
      title: 'Flutter Demo',
      theme: ThemeData(
        primarySwatch: Colors.blue,
      ),
      home: Scaffold(
        appBar: AppBar(
          title: Text('Flutter Text Line Break Example 1'),
        ),
        body: Center(
          child: Text('Like\nAndroidRide\n\nShare Posts'),
        ),
      ),
    );
  }
}


How to break Text line using triple quotes?

text line break in flutter using triple quotes
In this example, you will learn how to break text line using triple quotes.

It’s another easy method, you don’t need to do anything extra. Just place your content inside the triple quotes like below.

  • ”’Content”’
  • Padding used to get some white space around the Text widget.

import 'package:flutter/material.dart';

void main() {
  runApp(MyApp());
}

class MyApp extends StatelessWidget {
  final dataString =
      '''Lorem ipsum dolor sit amet, consectetur adipiscing elit, sed do eiusmod tempor incididunt ut labore et dolore magna aliqua.  

Pretium quam vulputate dignissim suspendisse in est. Ipsum dolor sit amet consectetur adipiscing elit. Urna porttitor rhoncus dolor purus non enim praesent elementum. Arcu ac tortor dignissim convallis. Sed libero enim sed faucibus. Amet venenatis urna cursus eget. 

Aliquet porttitor lacus luctus accumsan tortor. Suscipit adipiscing bibendum est ultricies. Dolor magna eget est lorem ipsum. Ac tortor dignissim convallis aenean et tortor. 
 ''';

  @override
  Widget build(BuildContext context) {
    return MaterialApp(
      title: 'Flutter Demo',
      theme: ThemeData(
        primarySwatch: Colors.blue,
      ),
      home: Scaffold(
        appBar: AppBar(
          title: Text('Flutter Text Line Break Example 2'),
        ),
        body: Center(
          child: Padding(
            padding: const EdgeInsets.all(12.0),
            child: Text(dataString),
          ),
        ),
      ),
    );
  }
}

That’s all for now. If you got any other methods, feel free to share with us.

If you like this post, please share it with your family and friends.

Thank You.

2 Examples: Scan, Generate & Share QR Code In Flutter

scan qr code flutter generate example
QR code is a special type of barcode. Most of the apps we use, have QR code scanning feature.

So if you are planning to add QR code reading or generating feature.

Then you are in the right place.

Scan QR Code In Flutter Example

flutter read qr code
Let’s create a simple QR scanning app using qr_code_scanner package. This package also provides

  • Turning on/off flashlight
  • Flip camera

You can achieve these features in just one line of code.

I assume you have created Flutter project, let’s add QR code dependency in pubspec.yaml file.

  • Dependency requires Android API 21. For iOS devices, requires iOS 8.

cupertino_icons: ^1.0.2
qr_code_scanner: ^0.5.1

Indentation is important.

For iOS devices


io.flutter.embedded_views_preview

NSCameraUsageDescription
Need to access Camera for scanning QR codes

In main.dart file, just import this dependecy in your code.


import 'package:qr_code_scanner/qr_code_scanner.dart';

  • In this example, There are 2 sections.
  • First section which holds QRView, flip camera and flash icons.
  • 2nd section for displaying QR code data.

Let’s learn about QRView widget.

QRView

QRView widget scans the QR code and return its information.

  • onQRViewCreated: When the view get’s created, it invokes with QRViewController. So we will use this property to get the QR code data and display it in Text.
  • overlay: Use this property to make a certain scan area. Using QrScannerOverlayShape, we can make a rectangular area.
    • Teal color used for border color.
    • As cutOutSize, we will use 80% of the width.
  • controller.flipCamera(): Flip FrontCamera/Backcamera.
  • controller.toggleFlash(): Turn on/off Flashlight

import 'dart:io';

import 'package:flutter/material.dart';
import 'package:qr_code_scanner/qr_code_scanner.dart';

void main() {
  runApp(MyApp());
}

class MyApp extends StatelessWidget {
  @override
  Widget build(BuildContext context) {
    return MaterialApp(
      title: 'Scan QR Code - Flutter Example',
      theme: ThemeData(
        primarySwatch: Colors.blue,
      ),
      home: ScanQRPage(),
    );
  }
}

class ScanQRPage extends StatefulWidget {
  const ScanQRPage({Key? key}) : super(key: key);

  @override
  _ScanQRPageState createState() => _ScanQRPageState();
}

class _ScanQRPageState extends State {
  final GlobalKey qrKey = GlobalKey();
  late QRViewController controller;
  Barcode? result;
//in order to get hot reload to work.
  @override
  void reassemble() {
    super.reassemble();
    if (Platform.isAndroid) {
      controller.pauseCamera();
    } else if (Platform.isIOS) {
      controller.resumeCamera();
    }
  }

  @override
  Widget build(BuildContext context) {
    return Scaffold(
      appBar: AppBar(
        title: Text('Scan QR Code - Flutter Example'),
      ),
      body: Column(
        children: [
          Expanded(
            flex: 4,
            child: Stack(
              children: [
                QRView(
                  key: qrKey,
                  onQRViewCreated: onQRViewCreated,
                  overlay: QrScannerOverlayShape(
//customizing scan area
                    borderWidth: 10,
                    borderColor: Colors.teal,
                    borderLength: 20,
                    borderRadius: 10,
                    cutOutSize: MediaQuery.of(context).size.width * 0.8,
                  ),
                ),
                Positioned(
                  left: 0.0,
                  right: 0.0,
                  bottom: 0.0,
                  child: Container(
                    width: 50,
                    height: 50,
                    decoration: BoxDecoration(
                      color: Colors.black26,
                    ),
                    child: Row(
                      mainAxisAlignment: MainAxisAlignment.center,
                      children: [
                        IconButton(
                            icon: Icon(
                              Icons.flip_camera_ios,
                              color: Colors.white,
                            ),
                            onPressed: () async {
                              await controller.flipCamera();
                            }),
                        IconButton(
                            icon: Icon(
                              Icons.flash_on,
                              color: Colors.white,
                            ),
                            onPressed: () async {
                              await controller.toggleFlash();
                            })
                      ],
                    ),
                  ),
                )
              ],
            ),
          ),
          Expanded(
            flex: 1,
            child: Container(
              margin: EdgeInsets.all(8.0),
              width: double.infinity,
              color: Colors.white,
              child: Center(
                child: result != null
                    ? Column(
                        children: [
                          Text('Code: ${result!.code}'),
                          SizedBox(
                            height: 8.0,
                          ),
                          Text('Format: ${result!.format}'),
                        ],
                      )
                    : Text('Scan Code'),
              ),
            ),
          ),
        ],
      ),
    );
  }

  void onQRViewCreated(QRViewController p1) 
{
//called when View gets created. 
    this.controller = p1;

    controller.scannedDataStream.listen((scanevent) {
      setState(() {
//UI gets created with new QR code.
        result = scanevent;
      });
    });
  }

  @override
  void dispose() {
    controller.dispose();
    super.dispose();
  }
}


QR Code Generator & Share Example

qr code generator share

In this example, You will learn how to generate a QR Code from given data in TextField using qr_flutter and Share it using share_plus.

path_provider: Used for finding usually used locations on filesystem.

Let’s add these packages in as dependencies in pubspec.yaml file.


  qr_flutter: ^4.0.0
  path_provider:
  share_plus: ^2.1.2

Use flutter pub get command.

Import these lines in your main.dart file.


import 'package:qr_flutter/qr_flutter.dart';
import 'package:path_provider/path_provider.dart';
import 'package:share_plus/share_plus.dart';

  • QrImage widget creates code using value in data property.
  • First ElevatedButton, resets UI with new QR code.
  • Share ElevatedButton creates a QR code image in app’s directory and share it with using Share_plus.
  • This example, stores qr image in app documents directory. You can also use temporary directory.
  • Share.shareFiles(): For sharing QR code image, we need to pass path of the image, type and text for sharing.

import 'dart:typed_data';
import 'dart:ui';
import 'dart:io';
import 'package:flutter/material.dart';
import 'package:flutter/rendering.dart';
import 'package:flutter/services.dart';
import 'package:qr_flutter/qr_flutter.dart';
import 'package:path_provider/path_provider.dart';
import 'package:share_plus/share_plus.dart';

void main() {
  runApp(MyApp());
}

class MyApp extends StatelessWidget {
  @override
  Widget build(BuildContext context) {
    return MaterialApp(
      title: 'Flutter QR Code Generator With Share',
      theme: ThemeData(
        primarySwatch: Colors.blue,
      ),
      home: QRGeneratorSharePage(),
    );
  }
}

class QRGeneratorSharePage extends StatefulWidget {
  const QRGeneratorSharePage({Key? key}) : super(key: key);

  @override
  _QRGeneratorSharePageState createState() => _QRGeneratorSharePageState();
}

class _QRGeneratorSharePageState extends State {
  final key = GlobalKey();
  String textdata = 'androidride.com';
  final textcontroller = TextEditingController();
  File? file;

  @override
  Widget build(BuildContext context) {
    return Scaffold(
      resizeToAvoidBottomInset: false,
      appBar: AppBar(
        title: Text('QR Code Generator With Share Example'),
      ),
      body: Column(
        children: [
          RepaintBoundary(
            key: key,
            child: Container(
              color: Colors.white,
              child: QrImage(
                size: 300,//size of the QrImage widget.
                data: textdata,//textdata used to create QR code
              ),
            ),
          ),
          SizedBox(
            height: 50,
          ),
          Padding(
            padding: const EdgeInsets.all(8.0),
            child: TextField(
              controller: textcontroller,
            ),
          ),
          ElevatedButton(
            child: Text('Create QR Code'),
            onPressed: () async {
              setState(() {
//rebuilds UI with new QR code
                textdata = textcontroller.text;
              });
            },
          ),
          ElevatedButton(
            child: Text('Share'),
            onPressed: () async {
              try {
                RenderRepaintBoundary boundary = key.currentContext!
                    .findRenderObject() as RenderRepaintBoundary;
//captures qr image 
                var image = await boundary.toImage();

                ByteData? byteData =
                    await image.toByteData(format: ImageByteFormat.png);

                Uint8List pngBytes = byteData!.buffer.asUint8List();
//app directory for storing images.
                final appDir = await getApplicationDocumentsDirectory();
//current time
                var datetime = DateTime.now();
//qr image file creation
                file = await File('${appDir.path}/$datetime.png').create();
//appending data
                await file?.writeAsBytes(pngBytes);
//Shares QR image
                await Share.shareFiles(
                  [file!.path],
                  mimeTypes: ["image/png"],
                  text: "Share the QR Code",
                );
              } catch (e) {
                print(e.toString());
              }
            },
          )
        ],
      ),
    );
  }
}


flutter qr code

This QR image created using the above example.

That’s all for now. If you like this post, please share it.

3 Examples: Draw Circle In Flutter Using CustomPaint

flutter draw circle example
In this post, you will learn how to draw circle using CustomPaint in Flutter.

Before drawing Circle, you must know about CustomPaint widget. Because below examples uses CustomPaint.

What is CustomPaint Widget?

CustomPaint widget gives canvas to draw. For drawing circle, we will use that canvas. This widget provides a property called painter, we need to assign a subclass of CustomPainter.

  • The CustomPainter class gives two methods, paint() and shouldRepaint().
  • When CustomPainter needs to paint, paint() method gets called. Inside paint() method we will implement code to draw circle.
  • Canvas provides lots of draw methods like drawLine(), drawOval, drawRect, drawArc() and drawCircle. There’s more you can check out the documentation.

void drawCircle(
Offset c,
double radius,
Paint paint
)

  • Offset: Where to draw circle center point in the canvas.
  • radius: Radius of the circle.
  • Paint: styling attributes for the circle.

Basics is ready now. So let’s start drawing…

Draw Circle Using CustomPaint – Simple Example

draw cirlce in flutter

  • Scaffold body takes CustomPaint as it’s child with CustomPainter’s subclass.
  • When Flutter started to paint, CustomPainter’s paint() method get called.
  • Using Paint object, made circle color red.
  • Radius of circle is 50.
  • Center of the circle is Offset(0.0, 0.0)

import 'package:flutter/material.dart';

void main() {
  runApp(MyApp());
}

class MyApp extends StatelessWidget {
  @override
  Widget build(BuildContext context) {
    return MaterialApp(
      title: 'Flutter Draw Circle',
      theme: ThemeData(
        primarySwatch: Colors.blue,
      ),
      home: Scaffold(
        appBar: AppBar(
          title: Text('Draw Circle Using CustomPaint'),
        ),
        body: Center(
          child: CustomPaint(
            painter: DrawCircle(),
          ),
        ),
      ),
    );
  }
}

class DrawCircle extends CustomPainter {
  @override
  void paint(Canvas canvas, Size size) {
    var paint = Paint();
    paint.color = Colors.red;

    canvas.drawCircle(Offset(0.0, 0.0), 50, paint);
  }

  @override
  bool shouldRepaint(covariant CustomPainter oldDelegate) 
{//false : paint call might be optimized away.
    return false;
  }
}


Draw Circle inside another Circle Example

draw circle inside another circle flutter

  • Here You will create two Paint objects. One for Red circle and other for yellow circle.
  • Just like the first example, Provided CustomPainter subclass as Scaffold’s body value.
  • Both circle has same center point, different radius will show one circle is inside another circle.

import 'package:flutter/material.dart';

void main() {
  runApp(MyApp());
}

class MyApp extends StatelessWidget {
  @override
  Widget build(BuildContext context) {
    return MaterialApp(
      title: 'Flutter Draw Circle - Second Example',
      theme: ThemeData(
        primarySwatch: Colors.blue,
      ),
      home: Scaffold(
        appBar: AppBar(
          title: Text('Draw Circle Inside Another Circle In Flutter'),
        ),
        body: Center(
          child: CustomPaint(
            painter: DrawCircle(),
          ),
        ),
      ),
    );
  }
}

class DrawCircle extends CustomPainter {
  var paint1 = Paint()..color = Colors.redAccent;
  var paint2 = Paint()..color = Colors.amber[100];
  // ..strokeWidth = 16
  // ..style = PaintingStyle.stroke;

  @override
  void paint(Canvas canvas, Size size) {
    canvas.drawCircle(Offset(0.0, 0.0), 50, paint1);
    canvas.drawCircle(Offset(0.0, 0.0), 40, paint2);
  }

  @override
  bool shouldRepaint(covariant CustomPainter oldDelegate) {
    return false;
  }
}


Let’s change the code and make it look like below.
circle inside another circle stroke flutter

  • Add some strokewidth and style using Paint.

 var paint2 = Paint()
    ..color = Colors.amber[100]
    ..strokeWidth = 16
    ..style = PaintingStyle.stroke;

Run now.

3. Gradient Circle Using CustomPaint

gradient circle in flutter

  • Paint class helps to make gradient. Just provide it’s object while drawing circle.
  • This example uses LinearGradient.

import 'package:flutter/material.dart';

void main() {
  runApp(MyApp());
}

class MyApp extends StatelessWidget {
  @override
  Widget build(BuildContext context) {
    return MaterialApp(
      title: 'Flutter Gradient Circle Demo',
      theme: ThemeData(
        primarySwatch: Colors.blue,
      ),
      home: Scaffold(
        appBar: AppBar(
          title: Text('Draw Gradient Circle'),
        ),
        body: Center(
          child: CustomPaint(
            painter: DrawCircle(),
          ),
        ),
      ),
    );
  }
}

class DrawCircle extends CustomPainter {
  @override
  void paint(Canvas canvas, Size size) 
  {
    final paint = Paint()
      ..shader = LinearGradient(colors: [
        Colors.blue,
        Colors.blueGrey,
      ]).createShader(Rect.fromCircle(center: Offset(0.0, 0.0), radius: 50));

    canvas.drawCircle(Offset(0.0, 0.0), 50, paint);

  }

  @override
  bool shouldRepaint(covariant CustomPainter oldDelegate) {
    return false;
  }
}


Thank you for scrolling. If you like this post, please share it with your family and friends.

CustomPaint Flutter Docs

3 Vertical Divider Examples in Flutter

vertical divider flutter example
In this post, you will learn how to make a vertical divider in Flutter.

let’s create a simple one.

Simple Vertical Divider Example

divider vertical flutter

If you check the code, you can find out that VerticalDivider is just a SizedBox. You can use Vertical Divider with horizontal ListView.

  • Align widget is used to align the Container to top of the App.
  • In this example, divider height depends on the Container height.
  • Here color of the divider is black.
  • Given 20 empty space above the divider.
  • Divider width is also 20.

import 'package:flutter/material.dart';

void main() => runApp(MyApp());

/// This is the main application widget.
class MyApp extends StatelessWidget {
  static const String _title = 'Flutter Vertical Divider Example';

  @override
  Widget build(BuildContext context) {
    return MaterialApp(
      title: _title,
      home: Scaffold(
        appBar: AppBar(title: const Text(_title)),
        body: MyStatelessWidget(),
      ),
    );
  }
}

class MyStatelessWidget extends StatelessWidget {
  @override
  Widget build(BuildContext context) {
    return Align(
      alignment: Alignment.topCenter,
      child: Container(
        height: 80,
        padding: const EdgeInsets.all(10),
        child: VerticalDivider(
          color: Colors.black,
          thickness: 3,
          indent: 20,
          endIndent: 0,
          width: 20,
        ),
      ),
    );
  }
}


Properties

Color color : Color of the vertical divider line.

double endIndent: total empty space under the divider.

double indent: sum of empty space on top of the divider.

double thickness: Thickness of the divider

double width: Width of the divider.

Vertical Divider Example 2

divider vertical flutter

Let’s make a red color divider inside Row widget. Yes, just like above image.

  • Row widget aligns Text widgets.
  • Here VerticalDivider’s height depends on the SizedBox’s height.

import 'package:flutter/material.dart';

void main() => runApp(MyApp());

class MyApp extends StatelessWidget {
  static const String _title = 'Flutter Vertical Divider Example 2';

  @override
  Widget build(BuildContext context) {
    return MaterialApp(
      title: _title,
      home: Scaffold(
        appBar: AppBar(title: const Text(_title)),
        body: MyStatelessWidget(),
      ),
    );
  }
}

class MyStatelessWidget extends StatelessWidget {
  @override
  Widget build(BuildContext context) {
    return Padding(
      padding: EdgeInsets.all(8.0),
      child: Row(
        crossAxisAlignment: CrossAxisAlignment.center,
        mainAxisAlignment: MainAxisAlignment.center,
        children: [
          Text('May 1, 2021'),
          SizedBox(
            height: 25,
            child: VerticalDivider(
              color: Colors.red,
              thickness: 2,
              indent: 5,
              endIndent: 0,
              width: 20,
            ),
          ),
          Text('Saturday'),
        ],
      ),
    );
  }
}


Vertical Divider Using Container

vertical divider using container
In this example, you will not use VerticalDivider() widget, but you will use Container. It’s really simple to make.

  • Here Align widget used to Align the Padding and VerticalDivider.
  • Depends on Container properties values, you can make your Divider.
  • You can also use other widgets, Just like Container

import 'package:flutter/material.dart';

void main() => runApp(MyApp());

class MyApp extends StatelessWidget {
  static const String _title = 'Vertical Divider Using Container';

  @override
  Widget build(BuildContext context) {
    return MaterialApp(
      title: _title,
      home: Scaffold(
        appBar: AppBar(title: const Text(_title)),
        body: Align(
          alignment: Alignment.topCenter,
          child: Padding(
            padding: const EdgeInsets.all(8.0),
            child: VerticalDividerWidget(),
          ),
        ),
      ),
    );
  }
}

class VerticalDividerWidget extends StatelessWidget {
  @override
  Widget build(BuildContext context) {
    return Container(
      height: 40,
      width: 3,
      color: Colors.brown,
    );
  }
}


That’s all for now. If you like this post, please share it with your family and Friends. If there is any doubts, please comment.
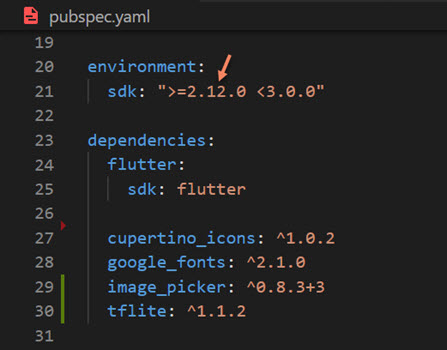
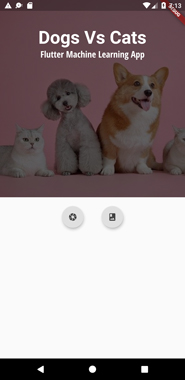
Thank you for scrolling.