This post contains affiliate links. If you use these links to buy something I may earn a commission. Thanks.”
Let’s learn more about Flutter by making a Note-taking app. Using this app
It’s going to be a long tutorial. So grab a cup of coffee and snacks.
Okay…Let’s start.
In this post, you will learn about more widgets and flutter packages like Provider, Sqflite, Path Provider and ImagePicker.
.
.
.
.
A quick demo
Okay… Let’s make a simple Flutter project named “flutter_notes“.
If you don’t know how to make a Flutter project read this command guide and Flutter Android Studio setup guide.
Now just open pubspec.yaml file and put below packages like given below in dependencies section.
Spacing or indent is more important here, so if you don’t do it well, it will give you an error. Save the file and click on pub get.
So now you got the idea of how this Flutter notes app works. Then let’s start coding… Now we will create each file one by one and explaining how the code works. So keep calm and code… Let’s partially make 3 screens. I assume that you have created all directories and files. So it’s time to code note_list_screen.dart.
This is just a start.. let’s create Note model. note.dart
import 'package:intl/intl.dart';

class Note {
  int _id;
  String _title;
  String _content;
  String _imagePath;

  Note(this._id, this._title, this._content, this._imagePath);

  int get id => _id;
  String get title => _title;
  String get content => _content;
  String get imagePath => _imagePath;

  String get date {
    final date = DateTime.fromMillisecondsSinceEpoch(id);
    return DateFormat('EEE h:mm a, dd/MM/yyyy').format(date);
  }
}
Here _id should be unique one. So It’s better to use note created time.
_title stores title of the note, _content – content of the note and _imagePath stores location of image
okay… Now move to the backend and create a database. database_helper.dart
databasePath stores location of both Android and iOS directory location and we will add it with our database name notes_database.db using path package join() method
stores id as Integer, others as TEXT format. Using id as Primary Key is considered as good practice.
In getNotesFromDB() method – just create a database instance and calls query() method in Descending order
id must be DateTime integer value, So we can sort notes based on Descending order of dates.
getNotesFromDB() method finally returns List of Map values
note_provider.dart
import 'package:flutter/material.dart';
import 'package:flutter_notes/helper/database_helper.dart';
import '../models/note.dart';

class NoteProvider with ChangeNotifier {
  List _items = [];

  List get items {
    return [..._items];
  }

  Future getNotes() async {
    final notesList = await DatabaseHelper.getNotesFromDB();

    _items = notesList
        .map(
          (item) =>
          Note(
              item['id'], item['title'], item['content'], item['imagePath']),
    )
        .toList();

    notifyListeners();
  }
}
Using getNotes() method, we can get our notes fromDatabase. After converting to List objects it passes to _items list.
Calling notifyListeners() will rebuild the listeners.
Now we need to provide the provider inside main.dart file. So let’s move on to main.dart. Clear the whole code inside that and paste the below code. main.dart
Just implement the loading screen inside NoteListScreen like below. don’t worry about those red lines, after you importing the packages declarations it will be okay.
Here that will be import ‘package:flutter_notes/helper/note_provider.dart’;, import ‘package:provider/provider.dart’;
Header Item will show ANDROIDRIDE’S NOTES – when You tap on it, it will show you AndroidRide’s home page. Let’s create a method called header() inside NoteListScreen and don’t forget to import constants.dart file.
Here I used GestureDetector that help us to detect if someone taps on it Then it will trigger onTap.
Now you will get a small error due to launchUrl. because We haven’t defined that one. Let’s check how to do that? First we need to import the below line:
_launchUrl() loads ‘https://www.androidride.com’ in your browser, if not it will throw an error.
Okay…Now our NoteListScreen shows CircularProgressIndicator when getting Notes. We don’t need to show a Container if the process is done?
Let’s change it and Show a UI indicating that shows there is no note available.
Let’s create another method that shows a loud crying emoji with no notes available message. before that, we must include emoji image, other styling constants, and import flutter gestures.dart’ too.
Let’s add the image. Create an assets folder and paste it there.
You can use any image, if you want an emoji image – you can download our code through subscribing our email.
Add the image in pubspec.yaml file then only the app knows where is your image file.
  # To add assets to your application, add an assets section, like this:
  assets:
     - crying_emoji.png
  #   - images/a_dot_ham.jpe
We have already implemented creating database and showing CircularProgressIndicator. You know that we haven’t created any notes. So It’s time to show noNotesUI() method. So just copy and replace the code with existing build method inside NoteListScreen.
If you run the project now, After showing progress, It will show noNotesUI such as header, emoji, and message. It’s time to create NoteEditScreen. Just paste the below code. note_edit_screen.dart
database instance created and Note map value is inserted into database
ConflictAlgorithm.replace – It will replace the data when a unique constraint violation occurs. Here when id found twice.
You can run now. When the note is saved a black screen will appear that’s our NoteViewScreen. What we need now? We need to show the note in ListView. The note will represent in ListItem widget, let’s create that one.
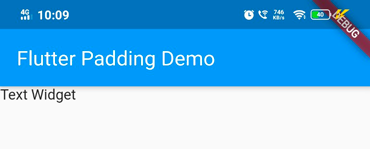
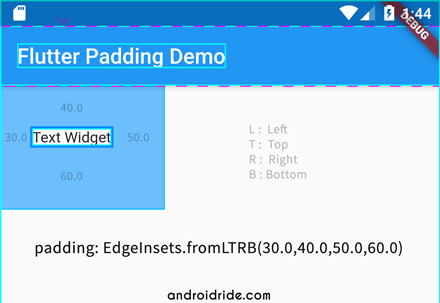
The padding widget gives empty space around the child widget. So if your widgets are colliding with each other and you think it is nice to add space around your widget, give it a go with Padding. Simply make your widget as a child of the Padding and give value.
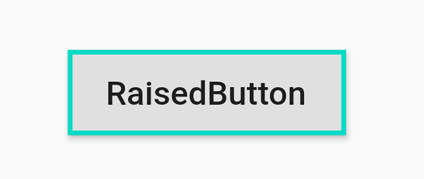
From the title, you can understand that It’s a raised button.
Yes, it is.
Actually the button appears elevated or in more detail, it placed higher than the surrounding area or page. It shows more shadow when the button is tapped.
Sometimes you need to disable the button and change it’s color, then apply disabledColor property like shown below. Just specify color as disabledColor property value.
It’s a focus related property, utilize focusNode property to set focus to RaisedButton. Look at the focusColor property, the given below how to use focusNode.
9.Color focusColor
When RaisedButton gets the focus, focusColor property helps us to change the color of RaisedButton.
When you enter a key in TextField, it calls onChanged and make request to the _raisedFocusNode
RaisedButton’s focusNode value is _raisedFocusNode. When the RaisedButton gets focus, focusColor invokes and shows Red color
10.Color hoverColor
Use this property to change color when the pointer is hovering over the button. There is no hovering action in Mobile devices.
11.Color highlightColor
highlightColor property uses to highlight the RaisedButton When it tapped.
RaisedButton(
          padding: EdgeInsets.all(25),
          highlightColor: Colors.redAccent,
          child: Text('RaisedButton - highlight Color'),
          onPressed: () {
            //onpressed gets called when the button is tapped.
            print("RaisedButton tapped");
          },
        ),
12. Color splashColor
splashColor property shows animation when touches the button, Like something falls into liquid.
RaisedButton(
          padding: EdgeInsets.all(100),
          splashColor: Colors.redAccent,
          child: Text('RaisedButton - Splash Color'),
          //makes background color white
          onPressed: () {
            //onpressed gets called when the button is tapped.
            print("FlatButton tapped");
          },
        ),
13. Brightness colorBrightness
If colorBrightness is Brightness.light, then text color set to Black, otherwise text color set to white.
RaisedButton(
                child: Text('RaisedButton - Brightness.light'),
                colorBrightness: Brightness.light,
                color: Colors.blue[100],
                onPressed: () {
                  //onpressed gets called when the button is tapped.
                  print("RaisedButton tapped");
                },
              ),
              RaisedButton(
                child: Text('RaisedButton - Brightness.dark'),
                colorBrightness: Brightness.dark,
                color: Colors.black,
                onPressed: () {
                  //onpressed gets called when the button is tapped.
                  print("RaisedButton tapped");
                },
              ),
14. double elevation
By increasing elevation, you can see RaisedButton is more floating above the page and shadow spreads too.
RaisedButton(
          elevation: 5.0,
          color: Color(0xFFCE93D8),
          child: Text('RaisedButton - Elevation'),
          onPressed: () {
            //onpressed gets called when the button is tapped.
            print("RaisedButton tapped");
          },
        ),
15. double focusElevation
This property used to elevate or make shadow when the RaisedButton gets focus.
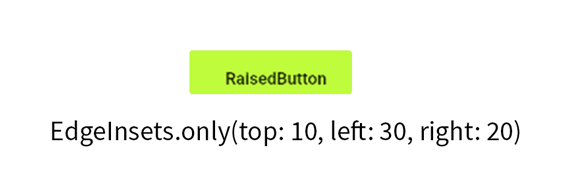
If you want to move text child to certain sides only, then you can use EdgeInsets.only()
You can specify more than one side.
You can specify horizontal or vertical sides by applying EdgeInsets.symmetric().
20. Widget child
Just like almost other Flutter widgets, RaisedButton also gives child property to hold other widget.
Most of the time the child must be Text. But you can use others too. For example, the Image.
21. autofocus
RaisedButton’s autofocus is false by default. you can turn it on by adding autofocus:true.
Yes, Because by default, it’s just a black text or label without any
borders
elevation
You can use flatbutton in toolbars, dialogs, cards, and where ever enough space to add. Flatbutton also make the icon widget using FlatButton.icon().
FlatButton Simple Example
So let’s start programming and make a simple FlatButton like below. You can create flutter project using flutter command or with the help of Android Studio.
You don’t need to give parentheses ‘()’ here. Only the function name. Download all source code from the top link.
2. VoidCallback onLongPress
This property gets called when a long tap occurs. Just like onPressed property, pass an anonymous function or method name.
FlatButton(onLongPress: (){},
3. ValueChanged onHighlightChanged
onHighlightChanged calls when you click down or up the button. When the button clicks down, it gives true value. false when button clicks up.
FlatButton(
            child: Text('FlatButton'),
            onHighlightChanged: (value) {
              print('onHighlightChanged value : $value');
            },
            onPressed: () {
              //onpressed gets called when the button is tapped.
            },
          ),
4. ButtonTextTheme textTheme
It control the button’s text color based on the theme. There are 3 values
EdgeInsets.all() – Give enough padding to all sides of button’s text. Above code will apply 50 padding for all sides of the Text(Top, Bottom, Left and Right).
EdgeInsets.only() – It gives padding to the only specified side. You can specify one or more sides like below.
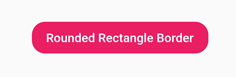
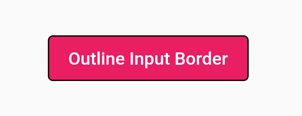
Shape property gives different options to make different shapes of flatbutton. Let’s make a rectangle FlatButton using shape property with the help of Border.all().
In this post, you will learn about flutter terminal commands and command-line options. Using Flutter command-line interface (CLI), you can perform lots of operations in your project.
Before that make sure you have downloaded Flutter SDK and updated path variable if you are using Windows.
7. Flutter clean – Reduces Project Size by deleting build and .dart_tool directories.
When I created a simple flutter app, it’s size only below 200 kb but after a run in an emulator, Its size largely increases and takes more than 300 MB.
So if you have a low-configuration PC and you are learning flutter by making different apps. That might takes lots of memory in your device.
So just use below command in the root folder of the project.
flutter clean
flutter clean command
Using “flutter clean” command, you can reduce flutter project size. The command just deletes the build directory and some other files.
6.Flutter build – List Build Commands
For publishing your flutter app, you need to make binaries for Android and Ios. The build command by default makes a release flavor of the app.
flutter build
It helps to list build formats of flutter
flutter build appbundle - build an appbundle
Recommended to build appbundle than apk.
flutter build apk
It builds fat apk.
flutter build apk --split-per-abi
Above command creates apks based on ABI.
flutter build ios
Creates binaries for Ios.
5. Flutter channel – List Different Flutter Source Code Branches
Flutter channel means a git branch where we get Flutter source code. It could be used to change different branches such as master, dev, beta, and stable.
Just run “flutter channel” to find out.
flutter channel
The channel with star symbol is you are currently using.
Here I am using stable channel and stable is recommended for product development.
Let’s change the channel…
flutter channel [channel_name] – this is syntax, let’s change stable to master.
flutter channel master
change flutter channel to master
run “flutter upgrade” to ensure you are on the latest build.
4. Flutter run – Run Flutter Project
If you have created your flutter project, then you can run it on any devices or emulators using the run command. While using the run command, it must be called from the root directory of the project. you can use cd command for that purpose.
cd flutter_app
flutter run
If there are no emulators and devices connected, cmd will show “No supported devices connected”.
The app will get loaded and start running, If single device get connected,.
Multiple devices get connected, specify one device id with “flutter run -d” command
flutter run & fluttter run -d
Just look at the above image, I just run “flutter run” and I got two devices, emulator and a physical device.
flutter run -d emulator-5554
Here I use emulator-5554 as device id.
If you want to run app on all devices, run “flutter run -d all” command.
By default, the debug version of the app will run on your device. It supports hot reload and fine for testing purposes.
There are other build flavors you can use like profile, flavor, and release.
the release version is for when you ready to publish it in play store or Appstore and it is not supported for emulators.
flutter run --release
If you use above command, you could see that the debug banner is gone.
3.flutter create – Create new flutter project Using Command Line
This command is used to create flutter projects, such as Flutter application, package, plugin, and module.
flutter create [output_directory_name or project_name]
Creates a Flutter app project
flutter create flutter_app
Creates a flutter app named “flutter_app”.
flutter create new project command line
After running above command, necessary files will be created on the specified name.
project name – It’s recommended to use lowercase with underscores.
If you run flutter create with existing flutter project name then the project will be recreated and if there are any files is missing, that too recreated again.
flutter recreates project
I have deleted main.dart file in the lib folder, now it recreated.
Let’s create a project with our own package name and description, use below code
It creates a package name with “com.androidride”, you can view description in README.md
Let’s check how to create a package using flutter commands.
flutter create -t package flutter_package
Creates a package named flutter_package.
flutter create package
You can use -t or –template to specify the flutter project.
Let’s create a plugin project with flutter create command.
flutter create -t plugin flutter_plugin
It creates plugin project named flutter_plugin.
By default, swift is used as ios language, Kotlin for Android.
we can change that by using the below command.
flutter create -t plugin -i objc -a java my_flutter_plugin
Here -i means ios language – objc used, -a means android language.
You can remove -t plugin, if you are making Flutter application
2.Flutter doctor – Diagnoses Flutter system environment.
This command diagnoses our system and tells us is everything fine or any issues need to treat just like a doctor.
If there are no issues, you are good to go. You don’t need to worry about all issues. For example, you are making a flutter app in VS Code, So you can avoid problems associated with Android Studio.
For example, Flutter plugin not installed in Android Studio like error.
flutter doctor
Here I have one issue because I haven’t connected any devices.
Okay… Let’s know more details by running
flutter doctor -v
Using the above image, we can understand that flutter doctor -v gave more details about our Flutter development environment and tools.
1. flutter help
Just like the name it helps developers to find other commands and tells us how to use them just like a senior developer who is sitting nearby you. So I think, you don’t need to remember all commands I told above, Just remember this one.
flutter help
flutter -h and flutter –help give you the same results.
flutter help
flutter help -v
The above command gives a verbose output of flutter help.
flutter help [command]
Using the above syntax, we can check how other commands work.
flutter help create
Above command helps us to know more about create command.
flutter help create
Flutter Other Commands
Now I will show you some other commands with fewer details that helped me while I create flutter apps.
flutter doctor –android-licenses – It helps to accept all android licenses. If it didn’t work, use (your android_sdk directory)\tools\bin\sdkmanager –licenses
flutter logs – Shows logs generated by flutter apps in emulators and devices.
flutter analyze – It guides to make better code.
flutter config – Configures Flutter SDK and other settings.
flutter config –android-sdk “SDK_PATH” – set Android SDK path.
flutter config –android-studio-dir “ANDROID_STUDIO_DIRECTORY_LOCATION” – sets Android Studio directory location
flutter upgrade – upgrade Flutter SDK to latest version
flutter downgrade – downgrade Flutter SDK to lower version
flutter pug get – pub is dart’s package manager, this command installs packages. The same function as packages get in Android Studio and Get packages in VS code.
flutter pub upgrade – upgrade packages to the latest version.
flutter emulators – shows available emulators.
flutter devices – shows connected emulators and devices
flutter screenshot – Takes screenshot from emulator or device
flutter screenshot -o C:\Users\Admin\Desktop\screenshot.png – Takes screenshot and stores in Desktop. (Windows users)
That’s all for now. Thank you. If you like this post, please share it with your friends and family.
Welcome to our first Flutter Android Studio tutorial.
Let’s start by talking about Flutter.
Google has introduced its software development kit Flutter in 2017. Using Flutter, you can develop applications for Android, ios, Mac, Windows, Linux, and More.
If you are making an app for Android and ios. You can consider using Flutter, which helps you to make both in one codebase.
While scrolling down, you will see a blue button with flutter latest SDK version in a zip file, just click on it.
Download begins…
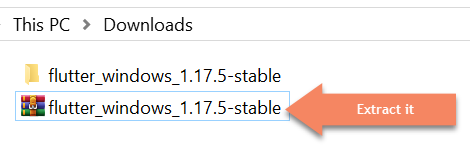
After the download, Extract the zip file
Just cut and paste the extracted file in C drive, just like above. You can choose your suitable location except for Program Files in C drive.
Just click on the extracted directory.
Click on flutter.
This is Flutter software development kit. Here you can click on flutter console and check flutter commands.
This is flutter console window.
click on bin folder.
We need to update the PATH variable with “…/flutter/bin”, then only we can run flutter commands from any command prompt.
So copy the path with “flutter/bin” like shown above.
How To Update Path Variable With Flutter SDK Path In Windows
Search “env” on the search bar and click on “Edit environment variables for your account”.
Click on the path field -> Edit -> New -> Paste it in the empty field. Just like above.
Click Ok.
If the Path variable doesn’t exist, you need to create one. By clicking New->Providing values in each field (name and value) and click OK (just like shown above).
Open the command prompt, and run the “flutter doctor” command.
If there is any problem you will see the red cross mark.
Here I got errors because flutter and dart plugin are unavailable, let’s clear it now.
How To Install Flutter Plugin In Android Studio
Open Android Studio
If you don’t get a window like the above image.
You may not close your last opened project. So just close your project, File -> Close Project.
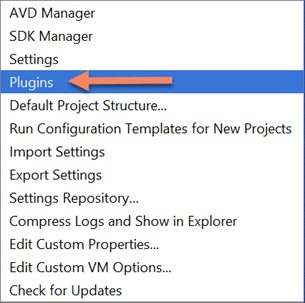
Click on “Configure“.
Next click on the “plugins” items from the drop-down menu.
Next, we have to find the flutter plugin from the marketplace. Make sure you are on the marketplace tab.
Then search “Flutter” in the search box and press Enter.
Click on the install button to install the flutter plugin.
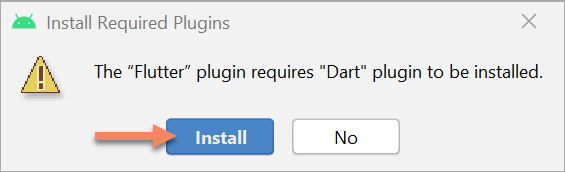
Dart plugin is also needed to make flutter applications. You don’t need to install separately. Just click on ‘Install‘ on the dialog box.
It will automatically download both.
Now click on the Restart IDE button to restart the Android Studio.
In the next alert dialog box, “Restart Android Studio to activate changes in plugins?“. Click on Restart.
After the restart, now you can see “Start a new flutter project” item in the window.
That means you have successfully installed a flutter plugin in Android Studio.
But check again to confirm our system is ready to create flutter applicaions using flutter doctor command.
Everything fine now.
How To Create Flutter Project In Android Studio
Click on “Start a new Flutter project”.
Select “Flutter Application” and click “Next”.
How To Change Flutter SDK Path In Android Studio
I just let the project name as ‘flutter_app’. After that, one of the important step is to change the Flutter SDK path.
Click on Flutter SDK path …(3 dot) button.
Now you have to select the flutter SDK location, for me, it’s in C drive. Expand drives by clicking on it.
After selecting flutter folder just click OK.
Flutter SDK path is set now, then click Next.
Change package name if you want.
I have changed to “com.androidride” , leave others, and click Finish.
How To Run Flutter Project In Android Studio
After the build, the project will shown up just like above.
Like Android Project, Select your emulator and click on Run button.
The flutter application is ready now.
How To Open Existing Flutter Project In Android Studio
Method I – Drag And Drop Flutter Project To Android Studio
Before drag and drop your project, make sure you have installed the flutter plugin in Android Studio.
Method II – Using Open An Existing Android Studio Project
Click on “Open an Existing Android Studio project “.
Now you have to find the location of your flutter project. Here, my fluter project is located at desktop.
After selecting your project, just click OK.
The project is ready now.
I believe that this post will help you start your flutter journey. If you like this post, please share it with your family and friends. Thank you.
This post contains affiliate links. If you use these links to buy something I may earn a commission. Thanks.”
We are using lots of apps that load data while we scrolling. Facebook, Instagram, and more apps using this technique. This technique helps users to wait less time.
So if you are planning to make an app like that, using RecyclerView. Then this post is for you.
In this post, You will learn how to use Load More on Scroll or pagination or endless scrolling or infinite scroll or whatever you call, with RecyclerView.
How To Implement Pagination In Android RecyclerView
In this post, I am going to talk about two methods, that implement pagination in RecyclerView. But in both methods, we will use scroll Listener with RecyclerView to listen to scroll events. When RecyclerView scrolls, onScrolled() method gets called.
So first learn how to add OnScrollListener with Recyclerview.
package com.androidride;

import android.view.LayoutInflater;
import android.view.View;
import android.view.ViewGroup;
import android.widget.ProgressBar;
import android.widget.TextView;
import android.widget.Toast;

import androidx.annotation.NonNull;
import androidx.recyclerview.widget.RecyclerView;

import java.util.List;

public class RecyclerViewAdapter extends RecyclerView.Adapter
{
    public static final int VIEW_TYPE_DATA = 0;
    public static final int VIEW_TYPE_PROGRESS = 1;

    public List dataList;

    public RecyclerViewAdapter(List dataList)
    {
        this.dataList = dataList;
    }
    @NonNull
    @Override
    public RecyclerView.ViewHolder onCreateViewHolder(@NonNull ViewGroup viewGroup, int viewtype)
    {
        if(viewtype == VIEW_TYPE_DATA)
        {//inflates row layout.
            View view = LayoutInflater.from(viewGroup.getContext()).inflate(R.layout.row,viewGroup,false);
            return new DataViewHolder(view);
        }
        else
        {//inflates progressbar layout.
            View view = LayoutInflater.from(viewGroup.getContext()).inflate(R.layout.progressbar,viewGroup,false);
            return new ProgressViewHolder(view);
        }
    }

    @Override
    public void onBindViewHolder(@NonNull RecyclerView.ViewHolder viewHolder, int i)
    {
        if(viewHolder instanceof DataViewHolder)
        {
            ((DataViewHolder) viewHolder).textView.setText(dataList.get(i));
        }
    }

    @Override
    public int getItemViewType(int position)
    {//if data is load, returns Progressbar viewtype.
        return dataList.get(position) == "load" ? VIEW_TYPE_PROGRESS : VIEW_TYPE_DATA;
    }

    @Override
    public int getItemCount()
    {
        return dataList == null ? 0 : dataList.size();
    }


    class DataViewHolder extends RecyclerView.ViewHolder
    {
        TextView textView;

        public DataViewHolder(@NonNull View itemView)
        {
            super(itemView);
            textView = (TextView)itemView.findViewById(R.id.textview);

            itemView.setOnClickListener(new View.OnClickListener()
            {
                @Override
                public void onClick(View view)
                {
                    Toast.makeText(view.getContext(), dataList.get(getAdapterPosition()), Toast.LENGTH_SHORT).show();
                }
            });

        }
    }

    class ProgressViewHolder extends RecyclerView.ViewHolder
    {
        ProgressBar progressBar;

        public ProgressViewHolder(@NonNull View itemView)
        {
            super(itemView);
            progressBar = (ProgressBar)itemView.findViewById(R.id.progressBar);

        }
    }
}
getItemViewType(int position) method returns VIEW_TYPE_PROGRESS, if data is "load". Otherwise, it returns VIEW_TYPE_DATA.
Based on ViewType, In onCreateViewHolder layout will get inflated.
Grid RecyclerView Pagination Example - Different Approach
Now we will make a Grid RecyclerView with pagination. Sometimes we need to load data before the last item loads.
For that purpose, you can make use of this approach.
Okay, what we do in this approach.
we define 3 variables, visibleThreshold, lastVisibleItem, and totalItemCount.
visibleThreshold : limit of items that user want to see before loading next items
lastVisibleItem : just like name, last visible item position in adapter
totalItemCount : No.of items in adapter
after the scroll listener setup,
When onScrolled() gets called, just checks totalItemCount <= lastVisibleItem + visibleThreshold with isLoading : variable for storing progressbar state.
if both are true, next chunks of data get loaded
class MainActivity : AppCompatActivity()
{
    lateinit var list : ArrayList
    lateinit var adapter : RecyclerViewAdapter
    private var isLoading: Boolean = false
    lateinit var gridlayoutManager : GridLayoutManager


    private var visibleThreshold = 5
    private var lastVisibleItem = 0
    private var totalItemCount = 0

    //handler instance
    private var handler: Handler = Handler()

    override fun onCreate(savedInstanceState: Bundle?) {
        super.onCreate(savedInstanceState)
        setContentView(R.layout.activity_main)

        //no of columns or span in the grid.
        var columns = 2

        gridlayoutManager = GridLayoutManager(this, columns)
        recyclerview.layoutManager = gridlayoutManager

        load()

        adapter = RecyclerViewAdapter(list)

        recyclerview.adapter = adapter

        addScrollerListener()

        gridlayoutManager.spanSizeLookup = object : GridLayoutManager.SpanSizeLookup()
        {
            //Each item occupies 1 span by default.
            override fun getSpanSize(p0: Int): Int
            {
                return when (adapter.getItemViewType(p0))
                {
                    //returns total no of spans, to occupy full sapce for progressbar
                    RecyclerViewAdapter.VIEW_TYPE_PROGRESS -> gridlayoutManager.spanCount
                    RecyclerViewAdapter.VIEW_TYPE_DATA -> 1
                    else -> -1
                }
            }
        }
    }

      private  fun addScrollerListener()
        {
            recyclerview.addOnScrollListener(object : RecyclerView.OnScrollListener()
            {
                override fun onScrolled(recyclerView: RecyclerView, dx: Int, dy: Int)
                {
                    super.onScrolled(recyclerView, dx, dy)

                    //total no. of items
                    totalItemCount = gridlayoutManager.itemCount
                    //last visible item position
                    lastVisibleItem = gridlayoutManager.findLastCompletelyVisibleItemPosition()

                    if(!isLoading && totalItemCount <= (lastVisibleItem + visibleThreshold))
                    {
                        loadMore()
                        isLoading = true
                    }
                }
            })
        }


    private fun loadMore()
    {
        handler.post(Runnable
        {
            //adds load item in list
            list.add("load")
            adapter.notifyItemInserted(list.size - 1)

        })

        recyclerview.postDelayed(Runnable {

            //removes load item in list.
            list.removeAt(list.size - 1)
            var listSize = list.size

            adapter.notifyItemRemoved(listSize)
            //next limit
            var nextLimit = listSize + 10

            for(i in listSize until nextLimit)
            {
                list.add("Item No $i")
            }

            adapter.notifyDataSetChanged()
            isLoading = false

        },7000)

    }

    private fun load()
    {
        list = ArrayList()

        for(i in 0..9)
        {
            list.add("Item $i")
        }
    }

}
Do you want to learn, how to develop Android apps?
There’s only one way – write a lot of code! : Head First Android Development.
So in this post, I am talking about Head First Android Development – 2nd Edition, One of my favorite Android programming books. Actually the 3 reasons why I think it’s better to buy and also something you want to consider before buying.
By referring Second Edition you can understand that there is a successful First edition. After the victorious initial release in 2015, it got positive reviews all over the world. Experienced programmers and writers Dawn Griffiths and David Griffiths made the second part as well as the first version.
They included lots of basics stuff again. Such as Constraint layout, Support library, and RecyclerView – the book becomes a larger one and it pays off.
It’s From Head First – This Is Enough
Head First – For me, This one reason is enough to buy this book. Not only this book fan, but I am also a Head First fan too.
One minute if you don’t know about the Head First, it’s just a book series published by Oreilly. Head First released lots of books on topics like programming, Science and Mathematics.
Okay… But what makes Head First different from others?.
Because of their teaching style.
They prefer visual learning, The brain processes visual information 60,000 times faster than text and that helps you to grasp information easily.
Visual information holds in your memory better than large chunks of text.
Saying things repetitively in different ways that also attach the information in your head.
The next one I think is conversational style – they present information just like in a conversation. Because we pay more attention to the conversation than a lecture.
Head First books are not for read-only. You have to think, write and do challenges such as puzzles, quizzes and more.
However, in their way, they tried their maximum to tune our brain with humor and excitement with knowledge in each book I have read.
Step By Step App Making Process Makes You More Confident
Confidence – that’s my third reason why I recommend it. When you complete Head First Android Development, you will have the confidence to make your own apps. That’s how I did feel after finished.
The chapters in the book deal with creating a new app with a new concept or updating the existing one. Whatever you do, you will write a lot of code throughout the book. Remember the beginning?
Step by step you will learn to make more apps and more about Android.
In each chapter, difficulty level increases. But you won’t feel it as much as other books when compared to this one.
Okay. Let’s talk about the chapters, how it works for you?
The book starts with creating a basic Helloworld app, in that chapter you will learn how to set up Android Development Environment and a little about other basic building blocks of Android.
After that, you start to make an interactive app built by mainly Spinner and Button in the second chapter.
In the third chapter, you will learn how to use intents with activities inside your app and other apps.
After that, chapter 4, you will learn about how activities work? What happens or which method gets called in its lifecycle with the help of a stopwatch app.
Thenceforth in Views and ViewGroups chapter, you will get to know how to use GUI components and show you how LinearLayout and FrameLayout works.
How to make complex layouts using Constraint layout that will be learned in chapter 6 by making the “My Constraint Layout” app.
If you are a beginner and have a great idea for an app, the next chapter will help you to organize your ideas and make an awesome app. For example, you will make a starbuzz app from scratch.
Following this, you will understand the importance of the Android Support library, also learn how to make shortcuts in the app bar.
Android apps are running on different devices. What you do if you want your app to look different depending on the phone or tablet? There are 3 main chapters for dealing with that question with Fragments.
You will create a workout app that’s enough to deal with fragment lifecycle methods. The next chapter will help you to implement material design in-app with the help of Android Design Support Library.
You will see how to use tabs, toolbar, floating action buttons and snack bars.
In the 13th chapter, you will learn about an advanced type of list: RecyclerView. CardView also get introduced. You will build an app with these too.
The next chapter will show you how to show different sections of our app using navigation drawer.
The next 3 chapters will clear almost all your doubts about the SQLite database in Android. Only through making apps.
after that, you will get introduced to Services, which helps us to work in the background. such as downloading files.
oh, this is enough, I have almost summarized it. But the books contain a lot more than that.
Before Buying Head First Android Development – Second Edition
This book is enough for a beginner, but there is something you must consider while buying this one.
You should know Java programming language
This is not a reference book and it takes time to complete. Just reading isn’t the way to use this book.
Second edition released in 2017, so Book uses Android Studio 2.3. So it little bit outdated now.
It just introduces below topics, not a detailed tutorial
WebView – Don’t worry, our webview guide is here
Content Provider
Loaders
Broadcast Receivers
Testing like topics.
For Indian users, All Indian Reprints of O’Reilly are printed in Greyscale (B/W)
Conclusion
There are lots of books you can find about Android Programming. For me, Head First Android Programming – Second Edition will stay in front of them. When I started learning Android app development, I always roam around online tutorials and gets nowhere. But after reading Head First, It’s changed. It gives me enough information and confidence to make my own apps. Although it’s late to review this book, but still people searching about this book, talking about this. That’s why I reviewed it now. But for beginners, It’s still worth reading. If Head First releases the 3rd edition, I would definitely read it.
In this post, I will teach you how to make Horizontal RecyclerView In Android with 4 ideas. In the end, we will create a Horizontal RecyclerView project too.
RecyclerView uses LayoutManager class to arrange its items, so below we are going to use the LayoutManager class to make it work.
1. Horizontal RecyclerView Using LinearLayoutManager
This is the first and most commonly used option to make Horizontal RecyclerView. LinearLayoutManager provides a constructor that we can change the orientation of RecyclerView.
LinearLayoutManager(Context context, int orientation, boolean reverseLayout)
val layoutManager = LinearLayoutManager(this@MainActivity,LinearLayoutManager.HORIZONTAL,false)
recyclerview.layoutManager = layoutManager
If you are using the latest Android Studio versions, there will be a CheckBox with the text “Use androidx.* artifacts”. Make sure that’s checked, which creates our project with androidx library.
Click Finish.
are these thoughts running through your head? then Go on.
Or
you know something about RecyclerView then Refresh your knowledge by reading this post.
In this article, you will learn about RecyclerView, RecyclerView Adapter, and a simple example that helps you to create your one.
At last, I will teach you how to use Checkbox with RecyclerView. Yes, you can scroll fearlessly without thinking about losing the selected states in CheckBox.
From the name, we can understand that it’s an Android View. Actually, It is a ViewGroup with scroll ability which works based on adapter principles.
In simple words, It helps us to show a large no. of data collections just like ListView and GridView.
If RecyclerView wants to show large no.of items, it does not create the same amount of views. It just creates the viewholders which hold the inflated view needed to fill the screen and some more.
After that when the user scrolls, it makes use of cached views. Yes, It recycles views, again and again, that’s why it got the name “RecyclerView”.
As a successor, It is far away from ancestors(ListView, GridView) by performances and abilities. By more features, it becomes a little bit complex too.
Let’s look up the history, ListView has been part of Android since 1.0, but each os releases, new features got added. Not in the case of ListView.
ListView simply defeated by developer’s needs such as different types of layouts and animation support. That’s where RecyclerView was born.
Finally in 2014 Android Lolipop introduced RecyclerView as a standalone support library.
After the arrival of the AndroidX library (after API level 28.0.0), RecyclerView changed its package name android.support.v7.widget.RecyclerView to androidx.recyclerview.widget.RecyclerView.
If you are using Android Studio, just add it to gradle and use.
8 Differences Between ListView And RecyclerView In Android
1. ViewHolder pattern
ViewHolder pattern is a strategy used to store view references in memory.
It reduces the number of calls to complicated and tedious findViewById(), which makes scrolling smooth.
,
In the case of ListView, it was optional, you can build your favorite list without any use of ViewHolder.
But when it comes to RecyclerView side, google developers make it as default for RecyclerView.
2. Re-Using views
Both ListView and RecyclerView support Reusing views. On the ListView side, it gives the option to reuse.
Using the above example code, we can check the convertView is null or not. If it is null, that means there is no recycled view. Then we can inflate the layout.
If it is not null, means that not the first time, so we can use convertView and avoid layout inflation.
3. Layout Types
With ListView, you can easily make a list with simple and less code.
Code is a bit complex with RecyclerView, but it provides more options: horizontal, vertical list, grid, and staggered grid
You can also create your custom layout manager using RecyclerView.LayoutManager.
4.Animation Support
In the animation section, RecyclerView is far ahead from ListView. It’s not easy for beginners to make animations in ListView.
But RecyclerView shows Fade in, Fade out, translate and crossfade animations when you add, delete, move and update an item in RecyclerView.
This is default in RecyclerView because it internally uses the DefaultItemAnimator class. That’s why they gave that name.
If you don’t like these animations and want to make your animations make use of RecyclerView.ItemAnimator class.
5. Divider
ListView has divider by default.
The android:divider and android:dividerHeight attributes or setDivider(),setDividerHeight() helps you to make custom divider in ListView.
But RecyclerView doesn’t give these options.
But you can use the DividerItemDecoration class to make a simple divider or Make use of RecyclerView.OnItemDecoration class to decorate the view.
6. Click Events
One of the main disadvantages we face with RecyclerView is that it lacks OnItemClickListener. Because it’s not a subclass of AdapterView like ListView.
It provides RecyclerView.OnItemTouchListener to capture click events. It gives more control to the developer.
You can also use OnClickListener with views on the item.
7.Notify Methods
When notifying adapter, while data change occurs we can call notifyDatasetChanged() with ListView.
But ListView doesn’t know what had happened? It can be the addition, deletion or change of items in the dataset but don’t know what was happened.
For RecyclerView there are lots of notify* methods to inform, including notifyDatasetChanged().
Using the appropriate notify* method can invoke better animation in RecyclerView.
8. Header and Footer
It is easy to add Header and Footer in ListView using addHeaderView() and addFooterView().
But RecyclerView doesn’t have these methods instead it supports different types of view.
Finally, RecyclerView supports Nested Scrolling.
I think that’s enough for the comparison. So use them based on your needs. If you are a beginner in Android App Development, Learn ListView first then go with RecyclerView.
How To Use RecyclerView In Android?
RecyclerView is one of the most valuable widgets in Android development. Out of the box, RecyclerView is lazy. Because it has given responsibilities to different classes.
So before Using RecyclerView, you should know about these classes.
1)RecyclerView.Adapter
This is the most important class in RecyclerView. Same as other AdapterView, It connects the View(RecyclerView) and data.
RecyclerView has no default adapters, So you need to create a custom class by extending Recyclerview.Adapter.
It is responsible for
Creating ViewHolders
Binds data to ViewHolders.
Informs Recyclerview about dataset changes.
Most of the important methods in this class are:
i)OnCreateViewHolder() : This method is called when RecyclerView needed to create a viewholder.
ii)OnBindViewHolder(): Calls whenever needed to bind data with view in viewholder.
iii)getItemCount() : Used to return total number of items in the dataset (ArrayList, array etc).
iv)getItemViewType(): it returns the viewtype based on the position.
2) RecyclerView.LayoutManager
As the name says, it helps RecyclerView to manage layout by positioning each item.
Unlike ListView, RecyclerView shows child items in Horizontal, Vertical list, grid, and staggered grid because of LayoutManager.
Scrolling responsibility is also own by LayoutManager. When you scroll up in RecyclerView, LayoutManager moves your items up.
It provides different classes for arranging items:
i)LinearLayoutManager: Creates vertical and horizontal lists.
ii)GridLayoutManager: Creates grid layouts.
iii)StaggeredGridLayoutManager: Creates StaggeredGrid layouts.
iv)WearableLinearLayoutManager: This class is for wearable devices.
3) RecyclerView.ItemDecoration
The name implies, it decorates RecyclerView’s item or view. It provides not only a divider, Using this abstract class you can draw four sides of the item. When using the divider as a view in XML, it decreases performance. That’s where the importance of this class comes through.
Version 25.1.0 Support library introduces the DividerItemDecoration class, to make a simple divider. Use addItemDecoration() method to add with RecyclerView. This class supports both horizontal and vertical orientations, so you can use it with any of your lists without any worries.
4) RecyclerView.ItemAnimator
Google developers gave more importance to animations in RecyclerView, So RecyclerView provides RecyclerView.ItemAnimator class for handling animations.
You can make custom animations using this class.
Just I said in ListView vs RecyclerView comparison, RecyclerView animates items when item adds, delete or any other move event happens because it internally uses DefaultItemAnimator.
But you can not see these animations when RecyclerView loading for the first time.
5) RecyclerView.ViewHolder
You can consider ViewHolder as something which holds View.
Unlike ListView, we need to make custom ViewHolder class by extending RecyclerView.ViewHolder class.
In this subclass, we must store the item view’s references. This ViewHolder class contains additional information like its position in the layout.
Simple RecyclerView Example With CardView In Android Studio – OnClickListener Included
In this example, I will explain how to create RecyclerView in Android Studio in 10 simple steps with a detailed explanation. The final output will look like below.
I assume that you have created a Project in Android Studio, then add these
STEP 1 – Add Dependencies In build.gradle
RecyclerView and CardView are support libraries, so you must add dependencies in your build.gradle file, If your app needs to support above API 28.0.0, you must use AndroidX libraries. otherwise, you can continue with the support library.
Just like ListView, just add it to your layout. here activity_main.xml
This code creates a RecyclerView widget with id “recyclerview”.
android:scrollbars=”vertical” – It creates vertical scrollbar to the RecyclerView. Otherwise user never get to know how long the RecyclerView is.
Use android.support.v7.widget.RecyclerView as root widget if you are using the support library, attributes are same as above.
STEP 3 – Create Row Layout For RecyclerView
In this step, we will create a layout and RecyclerView will show it as child items. Right-click on the layout folder in res directory. New->Layout Resource File-> put file name as row_layout.xml and put below code.
This code creates TextView inside CardView. You can use app: namespace to specify support library attributes.
if you are using support library, Use android.support.v7.widget.CardView.
STEP 4 – Create An Array And Pass It To RecyclerView Adapter
<code><code>
RecyclerView adapter needs data and layout. So here, we will create an array of months and pass it to the adapter class, which you are going to make in the next step.
class MainActivity : AppCompatActivity()
{

    var months_array = arrayOf("JANUARY","FEBRUARY","MARCH","APRIL","MAY","JUNE","JULY","AUGUST","SEPTEMBER","OCTOBER","NOVEMBER","DECEMBER")

    lateinit var adapter :RecyclerViewAdapter

    override fun onCreate(savedInstanceState: Bundle?)
    {
        super.onCreate(savedInstanceState)
        setContentView(R.layout.activity_main)

        adapter = RecyclerViewAdapter(months_array)

    }
}
public class RecyclerViewAdapter extends RecyclerView.Adapter
{

String[] months_array;

    public RecyclerViewAdapter(String[] months_array)
    {
        this.months_array = months_array;
    }

}
STEP 6 – Create A Custom ViewHolder Class And Extend Adapter Class With RecyclerView.Adapter
In this step, You will create an inner ViewHolder class by extending RecyclerView.ViewHolder. After initializing views in ViewHolder, makes RecyclerViewAdapter extends RecyclerView.Adapter with ViewHolder as the generic parameter. Just like below
class RecyclerViewAdapter(var months_array: Array) : RecyclerView.Adapter()
{

    inner class ViewHolder(itemView : View) : RecyclerView.ViewHolder(itemView)
  {
      var textview = itemView.textview
  }
}
@NonNull
    @Override
    public ViewHolder onCreateViewHolder(@NonNull ViewGroup parent, int viewType)
    {
       LayoutInflater inflater = LayoutInflater.from(parent.getContext());

       View view = inflater.inflate(R.layout.row_layout,parent,false);

       return new ViewHolder(view);
    }
parent: RecyclerView, viewType: 0, You can have different types of view. Here is only one viewtype, contain value zero.
Creates inflater object using context
row_layout inflated and become view object
Return ViewHolder with view for reference storage purpose
STEP 9 – Bind ViewHolder With Data In onBindViewHolder()
<code><code>
Here we will bind our TextView with array item. Access TextView using viewholder. This method calls when the item wants to show, so here we attach data with the view in ViewHolder.
    @Override
    public void onBindViewHolder(@NonNull ViewHolder holder, int position)
    {
        holder.textview.setText(months_array[position]);
    }
You can access each element that initialized in ViewHolder class.
Here we access textview and set month from string array
STEP 10 – Set LayoutManager and Adapter
In this step, You will set LayoutManager and divider, at last, you will attach an adapter too.
Let’s back to MainActivity. Put the below code in onCreate() and Run.
        //sets layoutmanager
        val layoutManager = LinearLayoutManager(this)
        recyclerview.layoutManager = layoutManager
        //sets divider in the list
        val dividerItemDecoration = DividerItemDecoration(this, LinearLayoutManager.VERTICAL)
        recyclerview.addItemDecoration(dividerItemDecoration)
        //Attaches adapter with RecyclerView.
        recyclerview.adapter = adapter
        LinearLayoutManager linearLayoutManager = new LinearLayoutManager(this);
        recyclerview.setLayoutManager(linearLayoutManager);

        DividerItemDecoration dividerItemDecoration  = new DividerItemDecoration(this,LinearLayoutManager.VERTICAL);
        recyclerview.addItemDecoration(dividerItemDecoration);

        recyclerview.setAdapter(adapter);
Unlike ListView, We need to implement LayoutManager for RecyclerView. Here we need a Vertical list. Use
Make sure you have attached LayoutManger and adapter is not empty, otherwise that may leads to error message “e recyclerview no adapter attached skipping layout”
So use above code and Run
RecyclerView is ready now.
STEP 11 – Attach An OnClickListener with Root Element Inside ViewHolder Class
In this step, you will learn how to get click events and react based on that. Here you will attach OnClickListener with itemView.
            inner class ViewHolder(itemView: View) : RecyclerView.ViewHolder(itemView)
            {
             var textview = itemView.textview

               init
               {
               itemView.setOnClickListener {
                 Toast.makeText(itemView.context, months_array[adapterPosition],Toast.LENGTH_SHORT).show()
                      }
               }

             }
getAdapterPosition() method returns the clicked item position, Using Kotlin synthetic property we can use “adapterPositon”here.
Run again.
Finally, you have made a simple RecyclerView. Congrats!
How above RecyclerView Adapter Works?
<code><code>
Okay. let’s clear it out… How RecyclerView adapter works based on the above example?
At first, getItemCount() method gets called and that will return 12.
After that, for creating ViewHolder, onCreateViewHolder() gets called. It inflates the XML layout and makes View and passes it to ViewHolder for storing references.
After that onBindViewHolder() gets called, here we use ViewHolder to access the TextView and attaches text. The 0th row is created.
The above process repeats and creates as many ViewHolders to fill the screen and even more. It depends on the screen size and layout size.
After that RecyclerView stops calling onCreateViewHolder but onBindViewHolder still repeats its job.
RecyclerView With CheckBox Example In Android Studio
In this example, we will create an app that holds CheckBox and its state. While scrolling too.
Let’s create a project.
Open your Android Studio.
Step 1
Start a new Android Studio project.
Application Name: RecyclerView With CheckBox In Android Example Company Domain: androidride.com
//androidx library users

    implementation 'androidx.cardview:cardview:1.0.0'
    implementation 'androidx.recyclerview:recyclerview:1.1.0'

/*
*If you are using the support library
    *implementation 'com.android.support:recyclerview-v7:28.0.0'
    * implementation 'com.android.support:cardview-v7:28.0.0'
    *
    * */
For Kotlin users, Make sure that you have using kotlin-android-extensions
activity_main.xml
<!--?xml version="1.0" encoding="utf-8"?-->
It creates a RecyclerView with Vertical scrollbars and assigns id “recyclerview”.
If you are using the support library, replace androidx.recyclerview.widget.RecyclerView with android.support.v7.widget.RecyclerView.
checkbox_row.xml
<!--?xml version="1.0" encoding="utf-8"?-->
Creates a CheckBox inside a CardView.
Support library users – replace androidx.cardview.widget.CardView with android.support.v7.widget.CardView.
Data.kt
package com.androidride.recyclerviewwithcheckboxinandroidexample

data class Data(var position: Int)
Only one property : position – We can pass it through constructor
package com.androidride.recyclerviewwithcheckboxinandroidexample;

public class Data
{
    int position;

    public int getPosition()
    {
        return position;
    }

    public void setPosition(int position)
    {
        this.position = position;
    }
}
MainActivity.kt
class MainActivity : AppCompatActivity()
{

    var list = ArrayList()

    lateinit var  adapter : RecyclerViewAdapter

    override fun onCreate(savedInstanceState: Bundle?)
    {
        super.onCreate(savedInstanceState)
        setContentView(R.layout.activity_main)

        setupdata()

        adapter = RecyclerViewAdapter(list)
        //sets layoutmanager
        recyclerview.layoutManager = LinearLayoutManager(this)
        //sets adapter
        recyclerview.adapter = adapter

    }

    private fun setupdata()
    {
        for(i in 1..30)
        {//creates data object and add it to list.
            var data = Data(i)

            list.add(data)
        }
    }
}
public class MainActivity extends AppCompatActivity
{
    ArrayList dataList = new ArrayList<>();

    RecyclerView recyclerview;

    @Override
    protected void onCreate(Bundle savedInstanceState)
    {
        super.onCreate(savedInstanceState);
        setContentView(R.layout.activity_main);

        setupdata();

        recyclerview = (RecyclerView)findViewById(R.id.recyclerview);
        //pass list to adapter
        RecyclerViewAdapter adapter = new RecyclerViewAdapter(dataList);
        //sets LinearLayoutManager
        recyclerview.setLayoutManager(new LinearLayoutManager(this));
        //attach adapter with RecyclerView
        recyclerview.setAdapter(adapter);

    }

    private void setupdata()
    {
        for(int i=1;i<=30;i++)
        {
            //creates a Data object and add the position to it.
            Data data = new Data();
            data.setPosition(i);
            dataList.add(data);
        }
    }
}
RecyclerViewAdapter.kt
class RecyclerViewAdapter(var list: ArrayList) : RecyclerView.Adapter()
{

    var checkBoxStateArray = SparseBooleanArray()

    override fun onCreateViewHolder(parent: ViewGroup, viewType: Int): ViewHolder
    {
        val context = parent.context
//creates inflater
        val inflater = LayoutInflater.from(context)
//inflates checkbox_row
        val view = inflater.inflate(R.layout.checkbox_row,parent,false)
//returns ViewHolder with view.
        return ViewHolder(view)
    }
//returns no of elements, 30
    override fun getItemCount(): Int = list.size

    override fun onBindViewHolder(holder: ViewHolder, position: Int)
    {

        if(!checkBoxStateArray.get(position,false))
        {//checkbox unchecked.
            holder.checkbox.isChecked = false
        }
        else
        {//checkbox checked
            holder.checkbox.isChecked = true
        }
//gets position from data object
        var data_position = list.get(position).position
//sets text with checkbox
        holder.checkbox.text = "CheckBox $data_position"

    }

    inner class ViewHolder(itemView: View) : RecyclerView.ViewHolder(itemView)
    {//Using Kotlin Android Extensions, access checkbox
        var checkbox = itemView.checkbox

        init
        {//called after the constructor.

            checkbox.setOnClickListener {

            if(!checkBoxStateArray.get(adapterPosition,false))
            {//checkbox checked
                checkbox.isChecked = true
             //stores checkbox states and position
                checkBoxStateArray.put(adapterPosition,true)
            }
            else
            {//checkbox unchecked
                checkbox.isChecked = false
//stores checkbox states and position.
                checkBoxStateArray.put(adapterPosition,false)
            }

            }
        }


    }
}
 This post contains affiliate links. If you use these links to buy something I may earn a commission. Thanks.”
Let’s learn more about Flutter by making a Note-taking app. Using this app
This post contains affiliate links. If you use these links to buy something I may earn a commission. Thanks.”
Let’s learn more about Flutter by making a Note-taking app. Using this app
 Okay… Let’s make a simple Flutter project named “flutter_notes“.
If you don’t know how to make a Flutter project read this command guide and Flutter Android Studio setup guide.
Now just open pubspec.yaml file and put below packages like given below in dependencies section.
Spacing or indent is more important here, so if you don’t do it well, it will give you an error. Save the file and click on pub get.
Okay… Let’s make a simple Flutter project named “flutter_notes“.
If you don’t know how to make a Flutter project read this command guide and Flutter Android Studio setup guide.
Now just open pubspec.yaml file and put below packages like given below in dependencies section.
Spacing or indent is more important here, so if you don’t do it well, it will give you an error. Save the file and click on pub get.

 Create helper, models, screens, utils, widgets directories, and create dart files inside it. helper directory contains two dart files – database_helper.dart, and note_provider.dart.


 Let’s create our header before that place some constant values inside constants.dart file
 Let’s add the image. Create an assets folder and paste it there.
You can use any image, if you want an emoji image – you can download our code through subscribing our email.
Let’s add the image. Create an assets folder and paste it there.
You can use any image, if you want an emoji image – you can download our code through subscribing our email.  Add the image in pubspec.yaml file then only the app knows where is your image file.
 It’s time to create NoteEditScreen. Just paste the below code. note_edit_screen.dart